Webservice 实现
Webservice 实现................................................................................................................................ 1
Java 编写简单的 WebService 实例 .......................................................................................1
目标 .................................................................................................................................... 1
准备开发环境 .................................................................................................................... 1
Eclipse 编写简单的 WebService 实例 .................................................................................. 4
1、系统功能 ......................................................................................................................4
2、开发前准备 .................................................................................................................. 4
3、开发前配置 ..................................................................................................................5
4、开发 Web Service...................................................................................................... 5
5、自带 Web Service 调用测试 .....................................................................................9
6、外部客户端调用测试 ................................................................................................12
Oracle 调用 WebService 测试 ..............................................................................................14
1、原理说明.................................................................................................................... 14
2、Oracle 服务器端配置 ................................................................................................ 14
3、加载 JAR 包................................................................................................................ 14
4、测试调用 php webservice ......................................................................................... 15
5、测试调用 java webservice ......................................................................................... 16
Java 编写简单的 WebService 实例
目标
下面是一个从编写测试例子到发布 WebService,以及编写测试代码的过程介绍。
本例子的 WebService 提供了两个方法,分别是 sayHello 和 sayHelloToPerson,第一
个只是返回一个"Hello"字符串,没有参数,第二个函数接受一个字符串作为参数,返回"Hello
参数值",该例子比较简单,但是清楚的说明了从编写代码到发布为 WebService 以及测试
编写好的 WebService 全过程。
准备开发环境
Apache Axis2 是一个 Web Services 系统服务和客户端的实现。
1、下载和部署 Axis2。
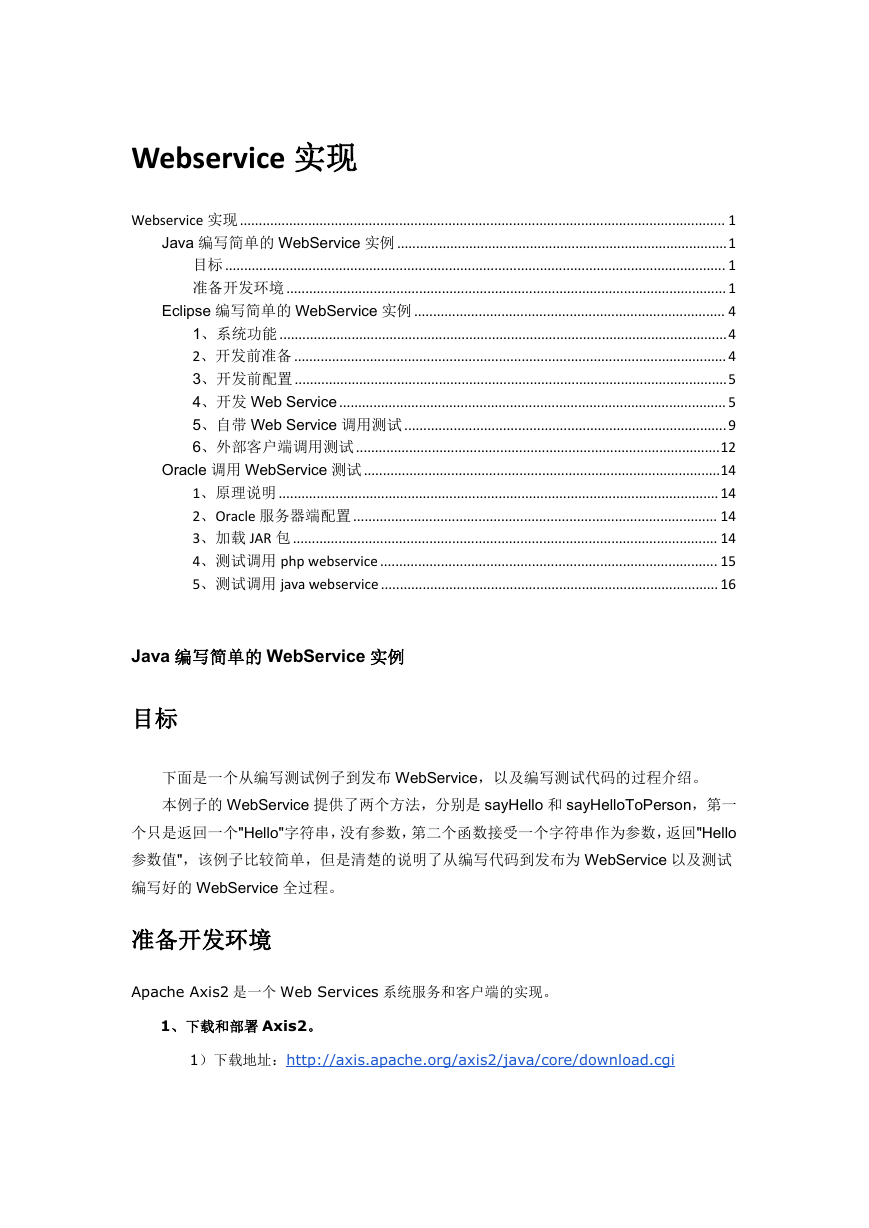
1)下载地址:http://axis.apache.org/axis2/java/core/download.cgi
�
下载 Binary Distribution 和 WAR Distribution 这两个压缩包。
2)将下载的 axis2-1.6.2-war.zip 解压,解压后将 axis2.war 复制到 tomcat 的
webapps 目录下
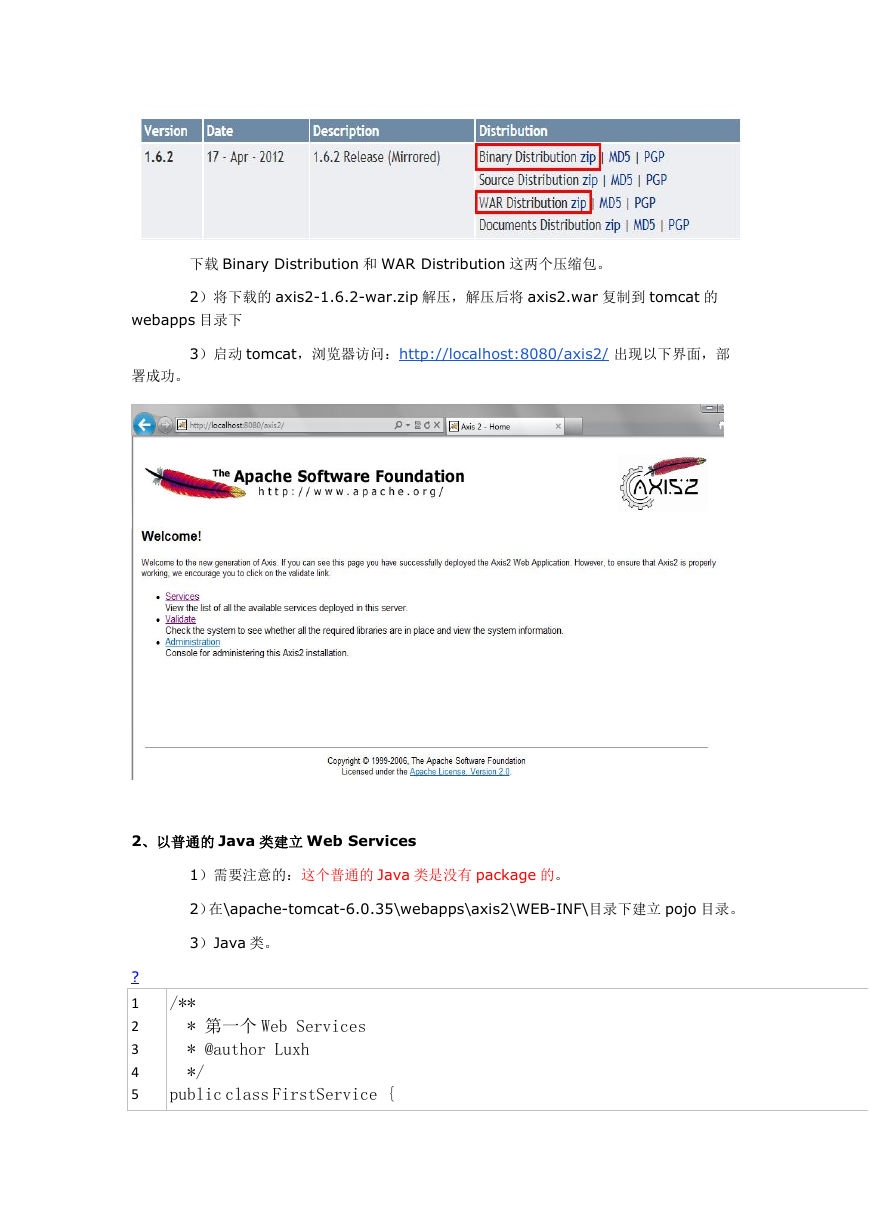
3)启动 tomcat,浏览器访问:http://localhost:8080/axis2/ 出现以下界面,部
署成功。
2、以普通的 Java 类建立 Web Services
1)需要注意的:这个普通的 Java 类是没有 package 的。
2)在\apache-tomcat-6.0.35\webapps\axis2\WEB-INF\目录下建立 pojo 目录。
3)Java 类。
?
1
2
3
4
5
/**
* 第一个 Web Services
* @author Luxh
*/
public class FirstService {
�
6
7
8
9
10
11
12
13
14
15
16
public String sayHello(String name) {
String result = "Hello,"+name+",this is first Axis2 Application!";
return result;
}
public String getInfo() {
return "This is first Axis2 Application!";
}
}
将这个类编译后的 FirstService.class 文件复制到
\apache-tomcat-6.0.35\webapps\axis2\WEB-INF\pojo 目录下,无需重启 tomcat,
Axis2 支持热部署。
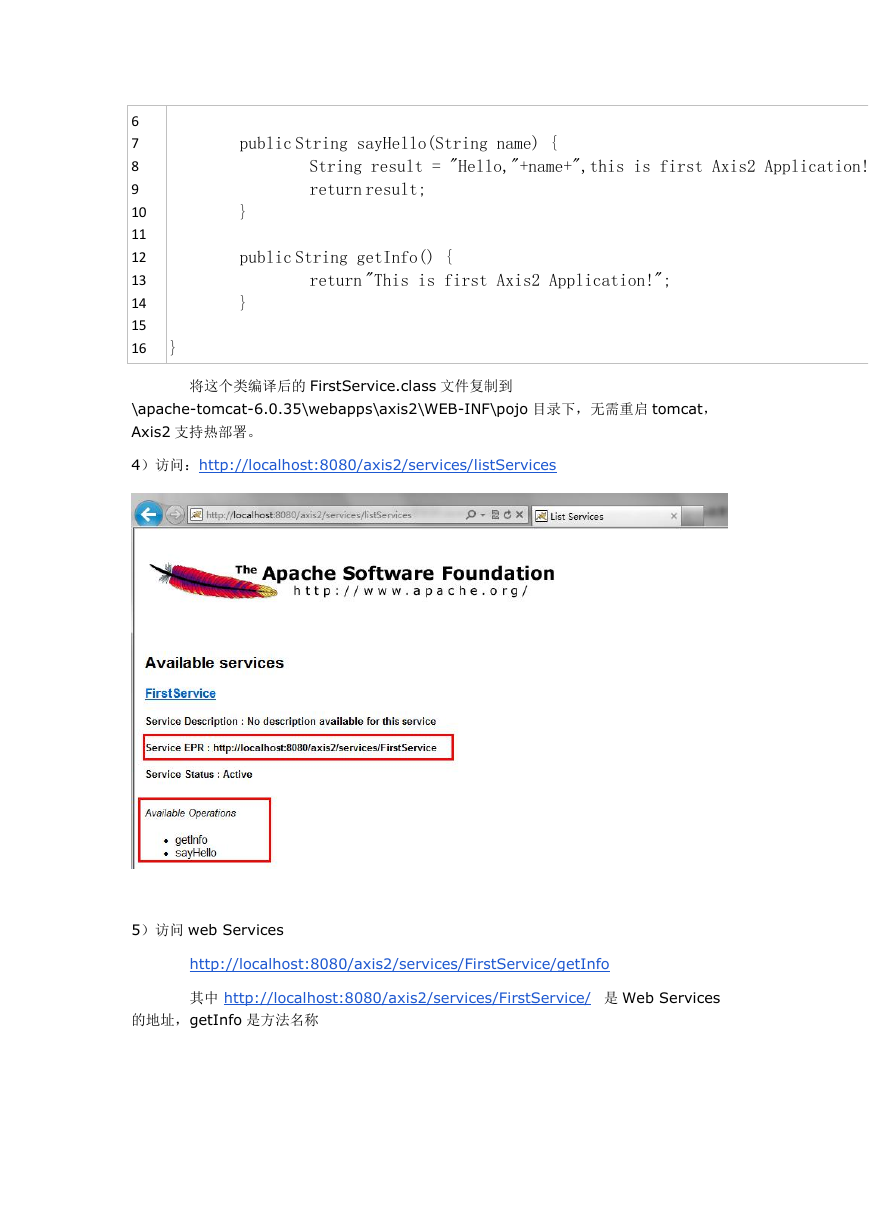
4)访问:http://localhost:8080/axis2/services/listServices
5)访问 web Services
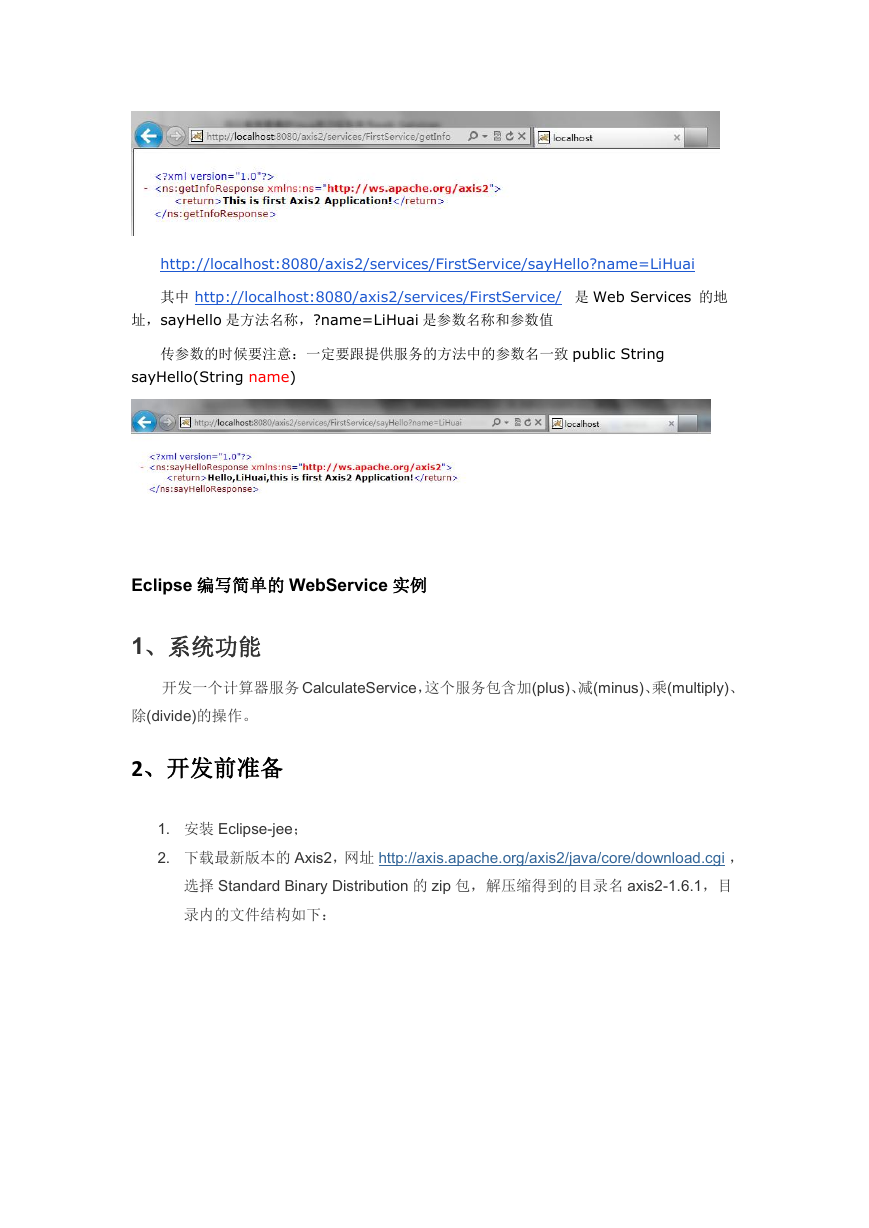
http://localhost:8080/axis2/services/FirstService/getInfo
其中 http://localhost:8080/axis2/services/FirstService/ 是 Web Services
的地址,getInfo 是方法名称
�
http://localhost:8080/axis2/services/FirstService/sayHello?name=LiHuai
其中 http://localhost:8080/axis2/services/FirstService/ 是 Web Services 的地
址,sayHello 是方法名称,?name=LiHuai 是参数名称和参数值
传参数的时候要注意:一定要跟提供服务的方法中的参数名一致 public String
sayHello(String name)
Eclipse 编写简单的 WebService 实例
1、系统功能
开发一个计算器服务 CalculateService,这个服务包含加(plus)、减(minus)、乘(multiply)、
除(divide)的操作。
2、开发前准备
1. 安装 Eclipse-jee;
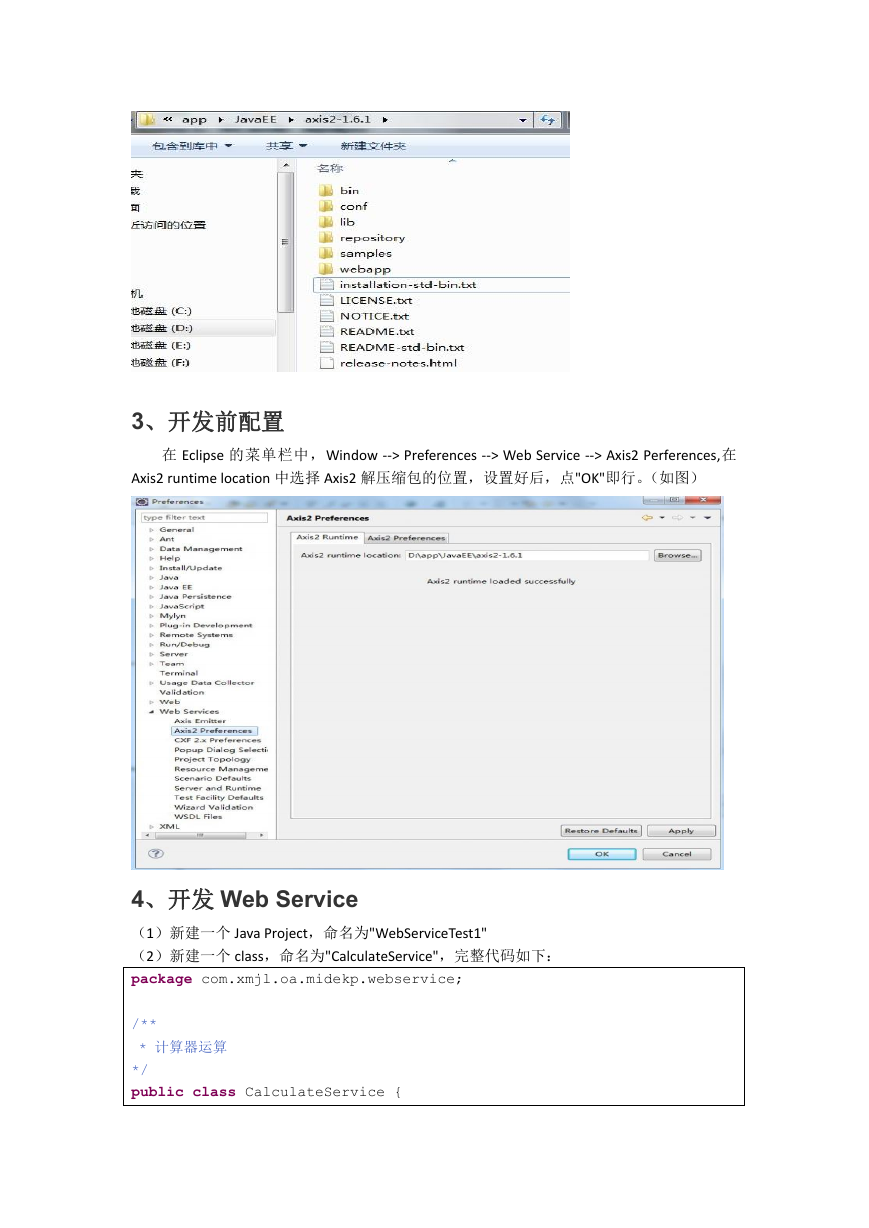
2. 下载最新版本的 Axis2,网址 http://axis.apache.org/axis2/java/core/download.cgi ,
选择 Standard Binary Distribution 的 zip 包,解压缩得到的目录名 axis2-1.6.1,目
录内的文件结构如下:
�
3、开发前配置
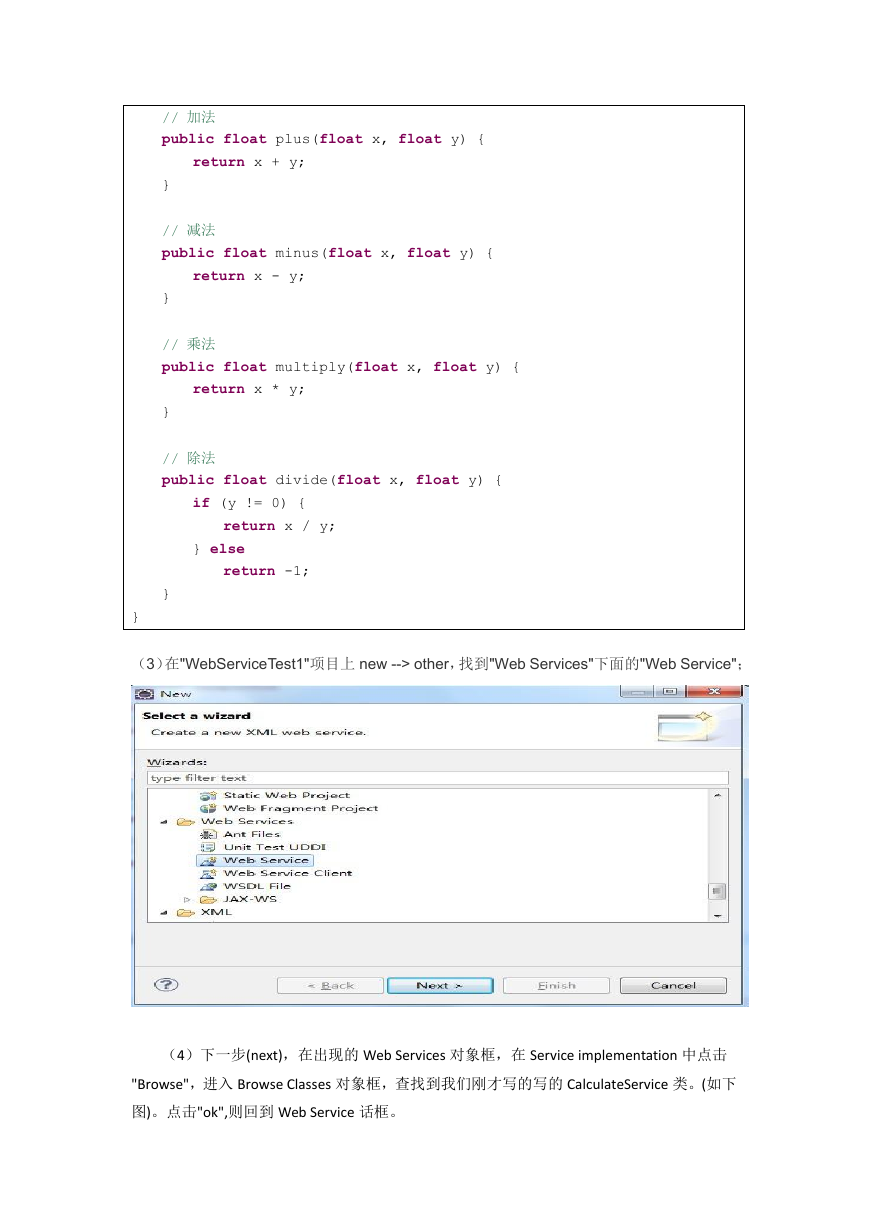
在 Eclipse 的菜单栏中,Window --> Preferences --> Web Service --> Axis2 Perferences,在
Axis2 runtime location 中选择 Axis2 解压缩包的位置,设置好后,点"OK"即行。(如图)
4、开发 Web Service
(1)新建一个 Java Project,命名为"WebServiceTest1"
(2)新建一个 class,命名为"CalculateService",完整代码如下:
package com.xmjl.oa.midekp.webservice;
/**
* 计算器运算
*/
public class CalculateService {
�
// 加法
public float plus(float x, float y) {
return x + y;
// 减法
public float minus(float x, float y) {
return x - y;
}
}
}
// 乘法
public float multiply(float x, float y) {
return x * y;
// 除法
public float divide(float x, float y) {
if (y != 0) {
return x / y;
} else
return -1;
}
}
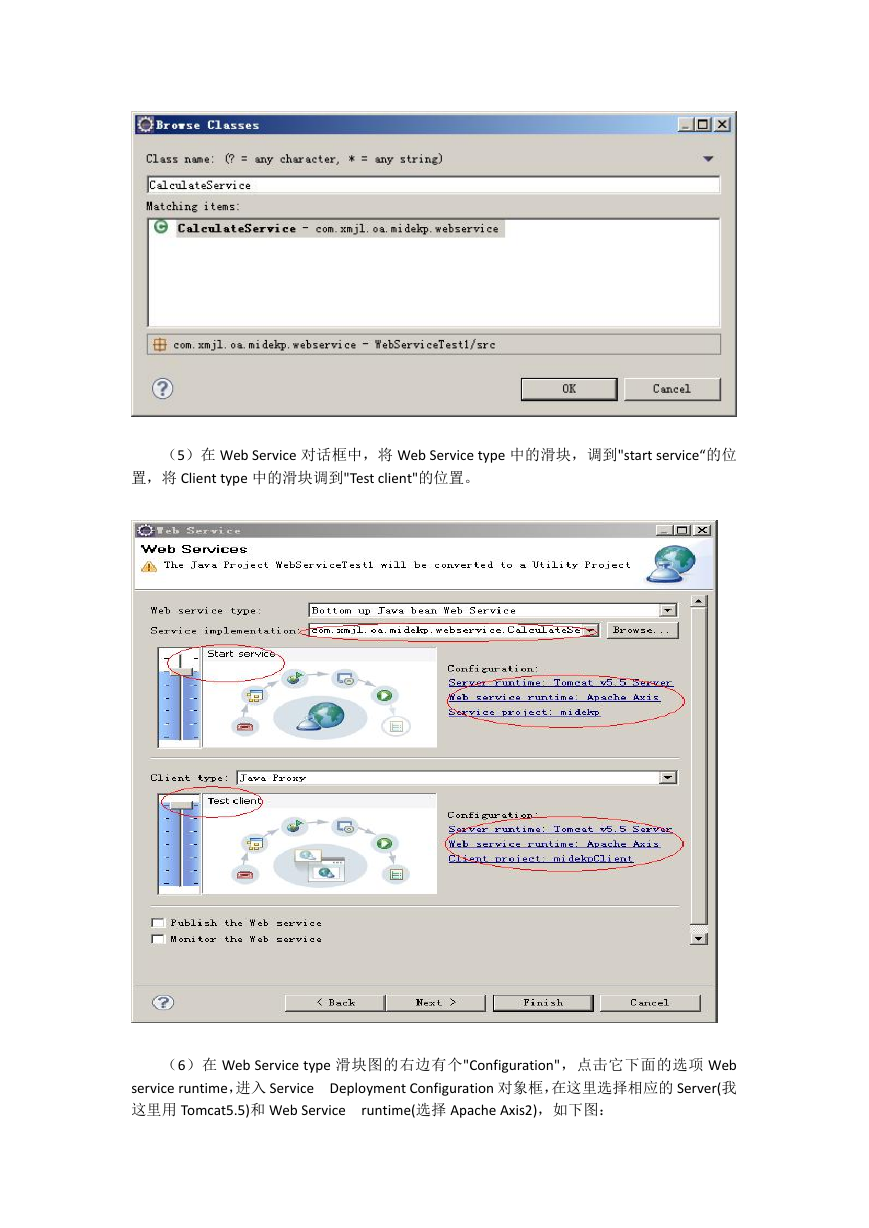
(3)在"WebServiceTest1"项目上 new --> other,找到"Web Services"下面的"Web Service";
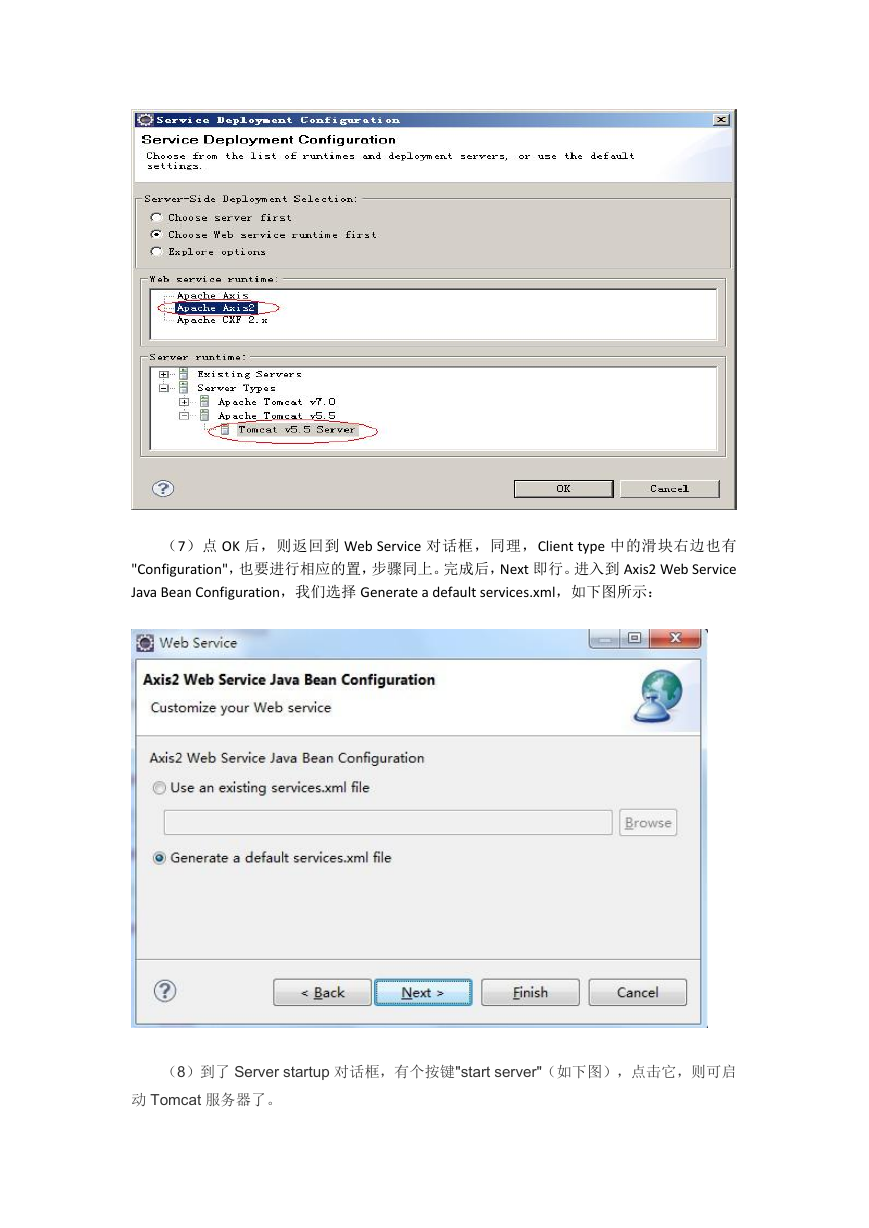
(4)下一步(next),在出现的 Web Services 对象框,在 Service implementation 中点击
"Browse",进入 Browse Classes 对象框,查找到我们刚才写的写的 CalculateService 类。(如下
图)。点击"ok",则回到 Web Service 话框。
�
(5)在 Web Service 对话框中,将 Web Service type 中的滑块,调到"start service“的位
置,将 Client type 中的滑块调到"Test client"的位置。
(6)在 Web Service type 滑块图的右边有个"Configuration",点击它下面的选项 Web
service runtime,进入 Service Deployment Configuration 对象框,在这里选择相应的 Server(我
这里用 Tomcat5.5)和 Web Service
runtime(选择 Apache Axis2),如下图:
�
(7)点 OK 后,则返回到 Web Service 对话框,同理,Client type 中的滑块右边也有
"Configuration",也要进行相应的置,步骤同上。完成后,Next 即行。进入到 Axis2 Web Service
Java Bean Configuration,我们选择 Generate a default services.xml,如下图所示:
(8)到了 Server startup 对话框,有个按键"start server"(如下图),点击它,则可启
动 Tomcat 服务器了。
�


 2023年江西萍乡中考道德与法治真题及答案.doc
 2012年重庆南川中考生物真题及答案.doc
 2013年江西师范大学地理学综合及文艺理论基础考研真题.doc
 2020年四川甘孜小升初语文真题及答案I卷.doc
 2020年注册岩土工程师专业基础考试真题及答案.doc
 2023-2024学年福建省厦门市九年级上学期数学月考试题及答案.doc
 2021-2022学年辽宁省沈阳市大东区九年级上学期语文期末试题及答案.doc
 2022-2023学年北京东城区初三第一学期物理期末试卷及答案.doc
 2018上半年江西教师资格初中地理学科知识与教学能力真题及答案.doc
 2012年河北国家公务员申论考试真题及答案-省级.doc
 2020-2021学年江苏省扬州市江都区邵樊片九年级上学期数学第一次质量检测试题及答案.doc
 2022下半年黑龙江教师资格证中学综合素质真题及答案.doc