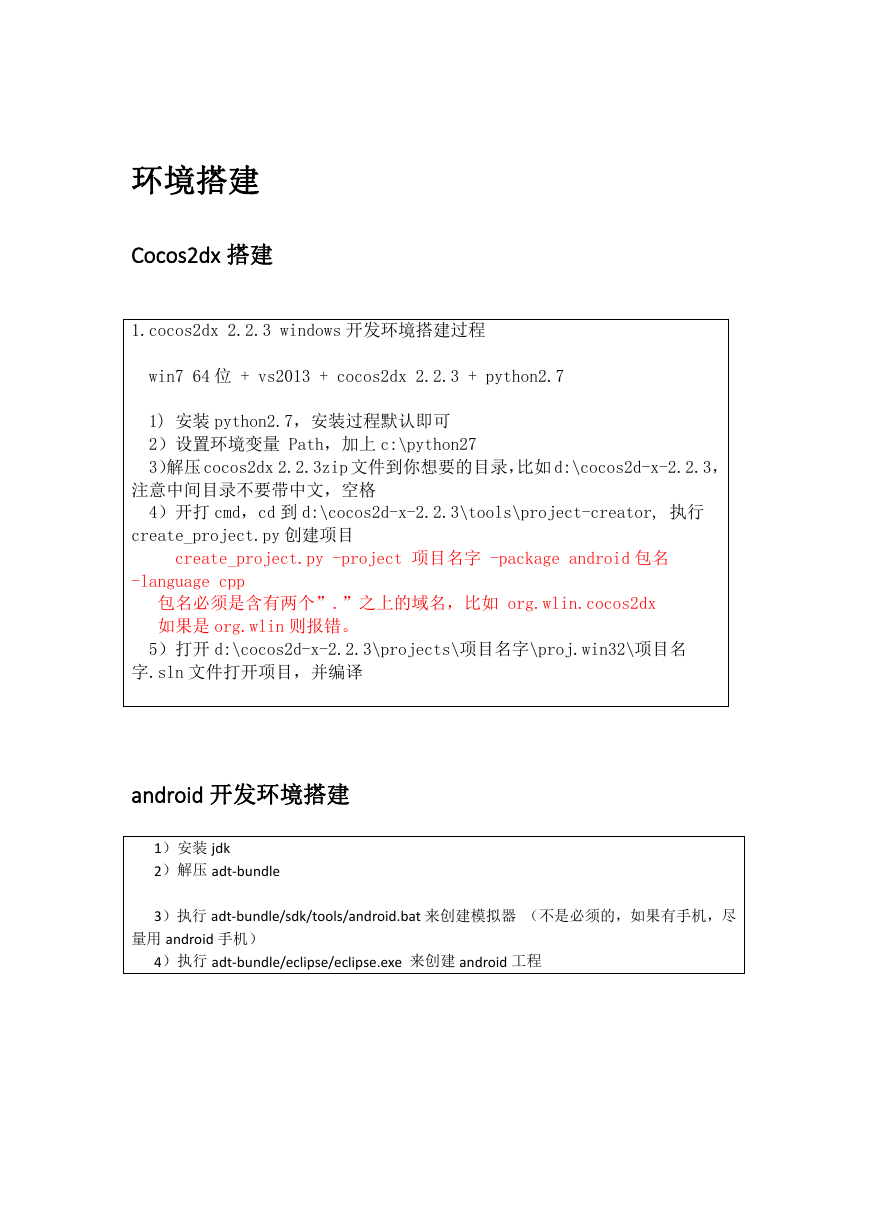
环境搭建
Cocos2dx搭建
android开发环境搭建
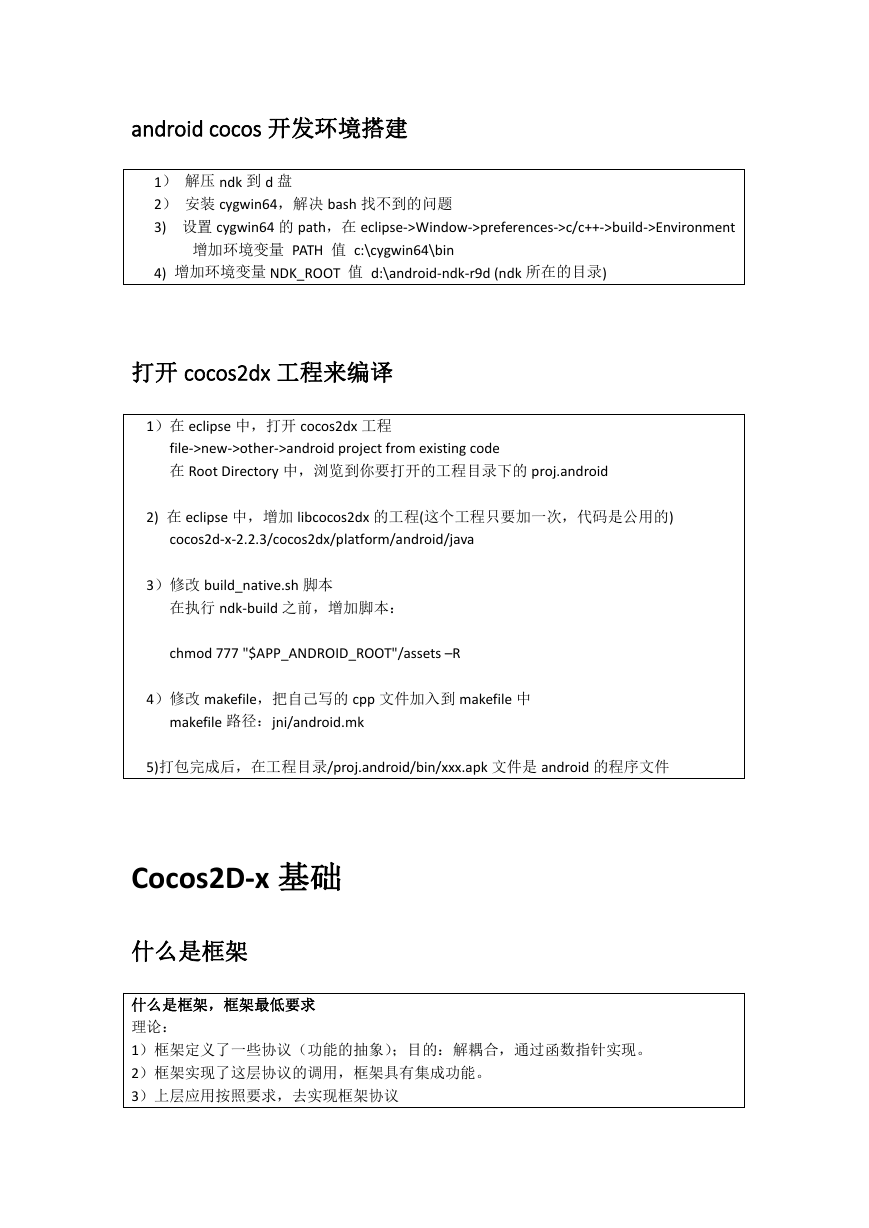
android cocos开发环境搭建
打开cocos2dx工程来编译
Cocos2D-x基础
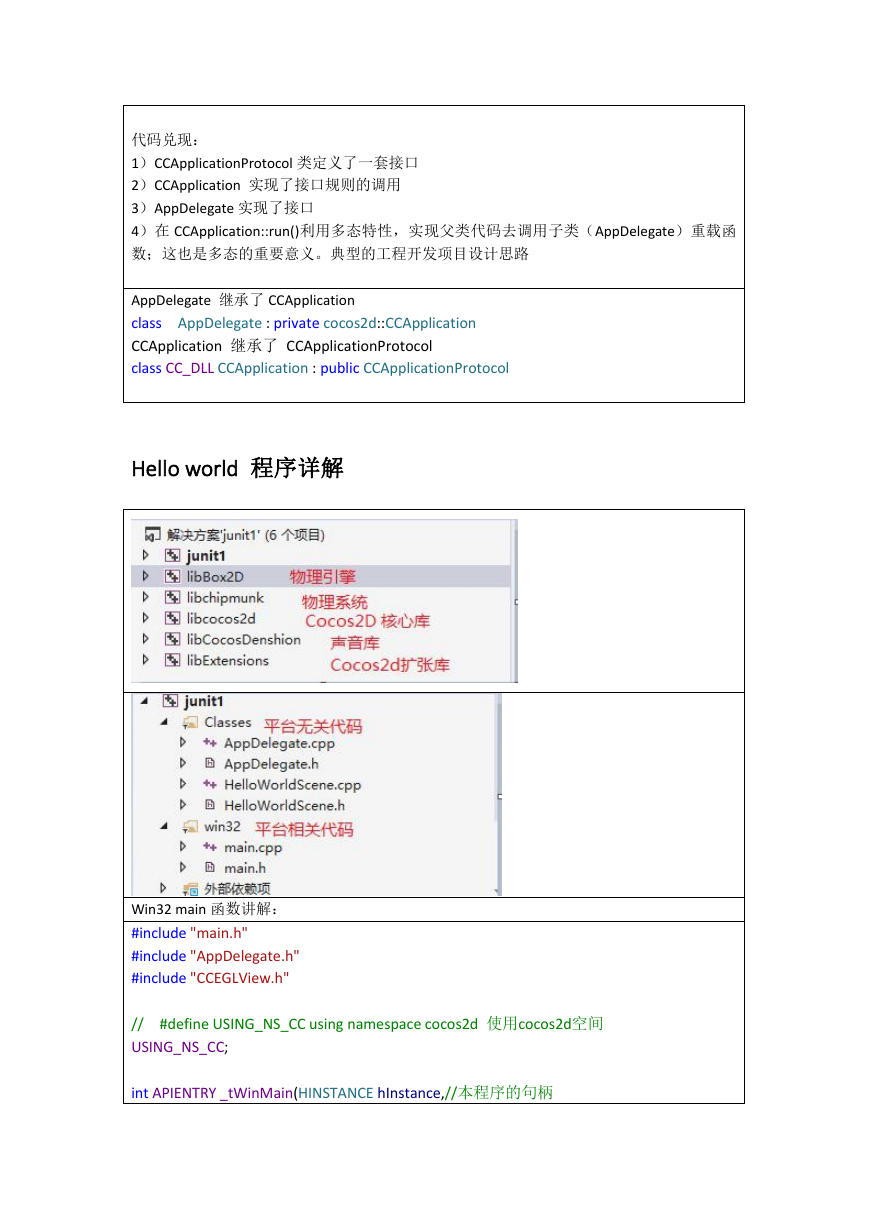
什么是框架
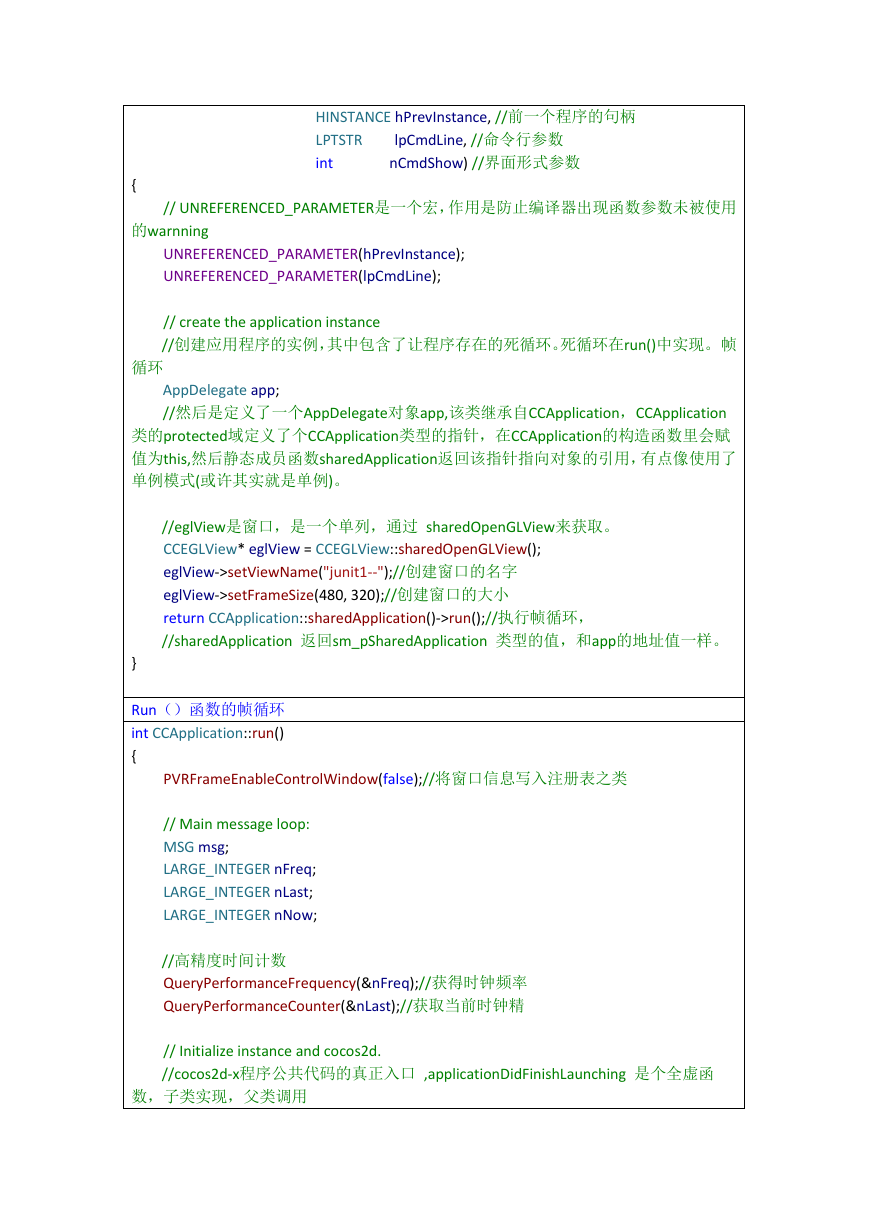
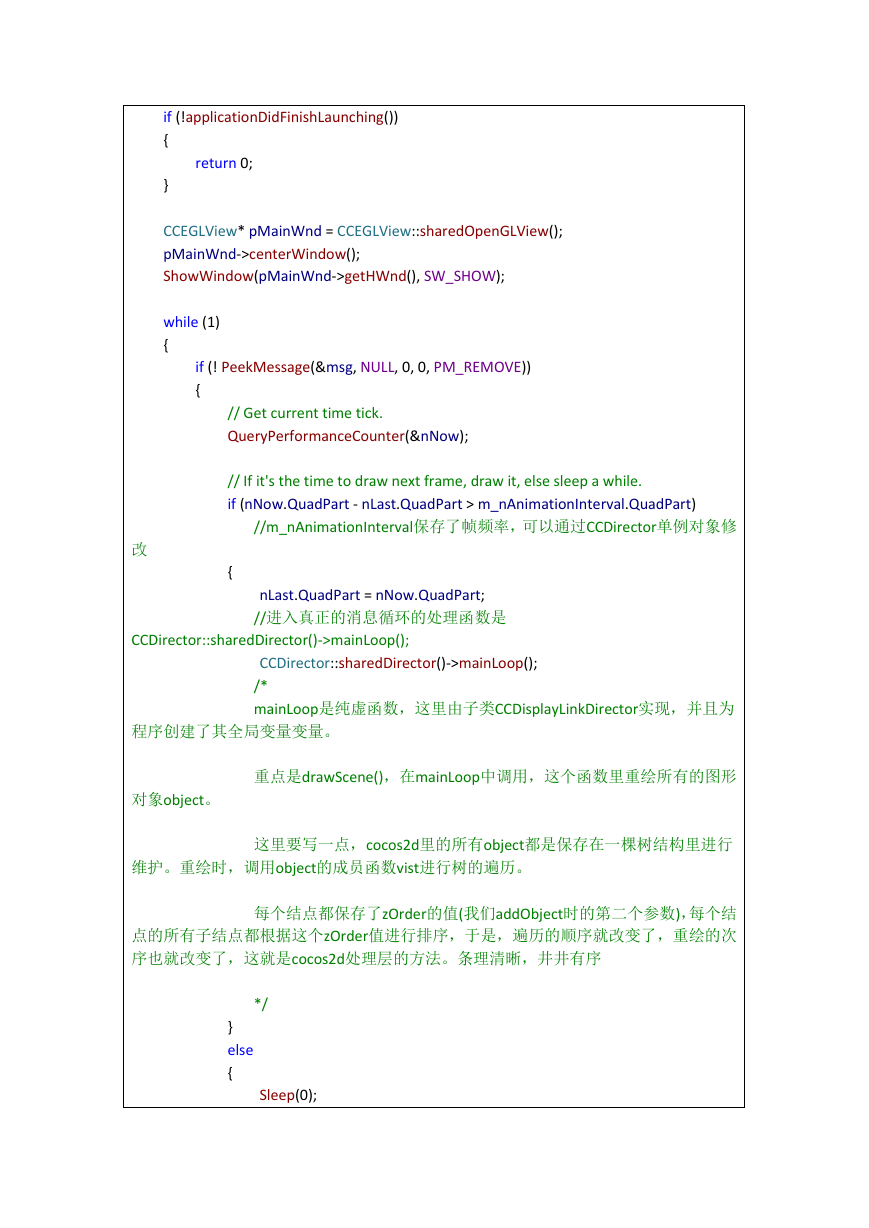
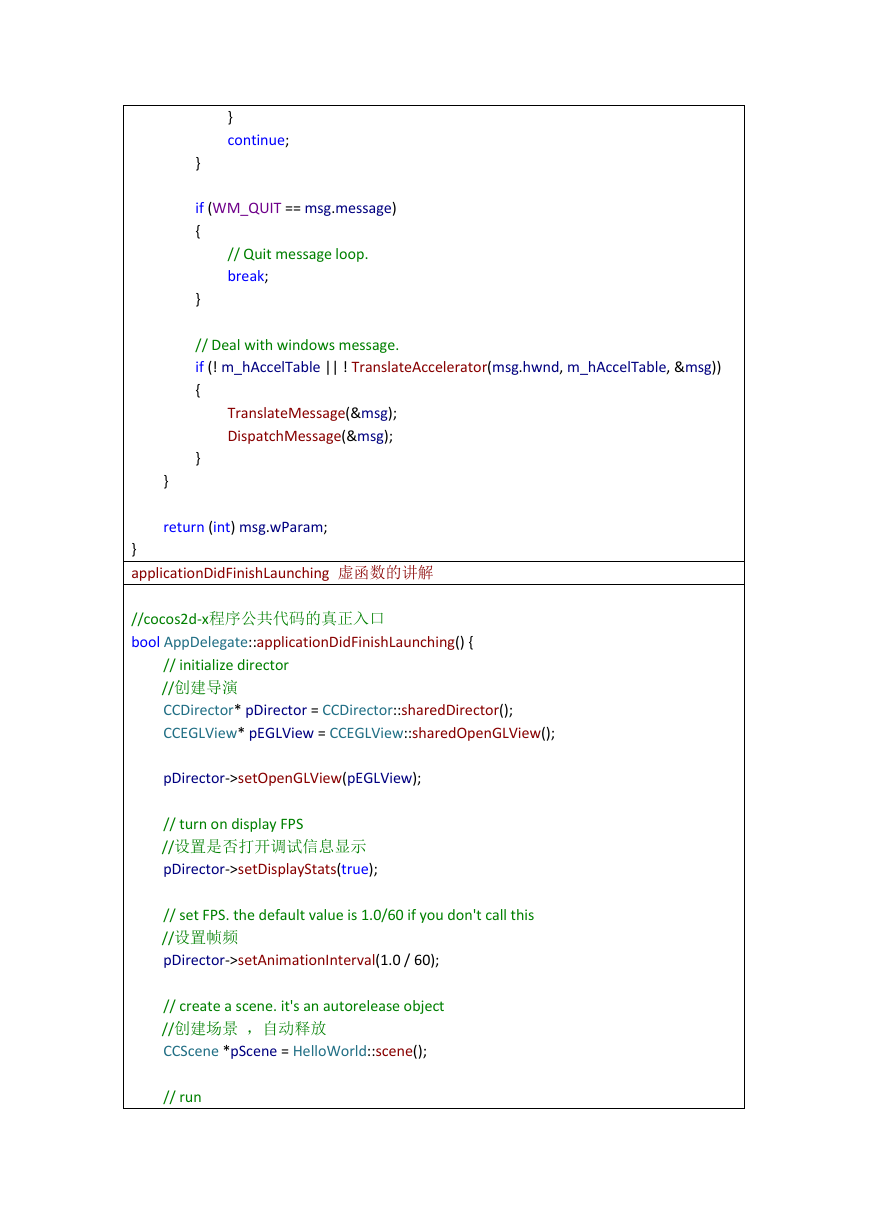
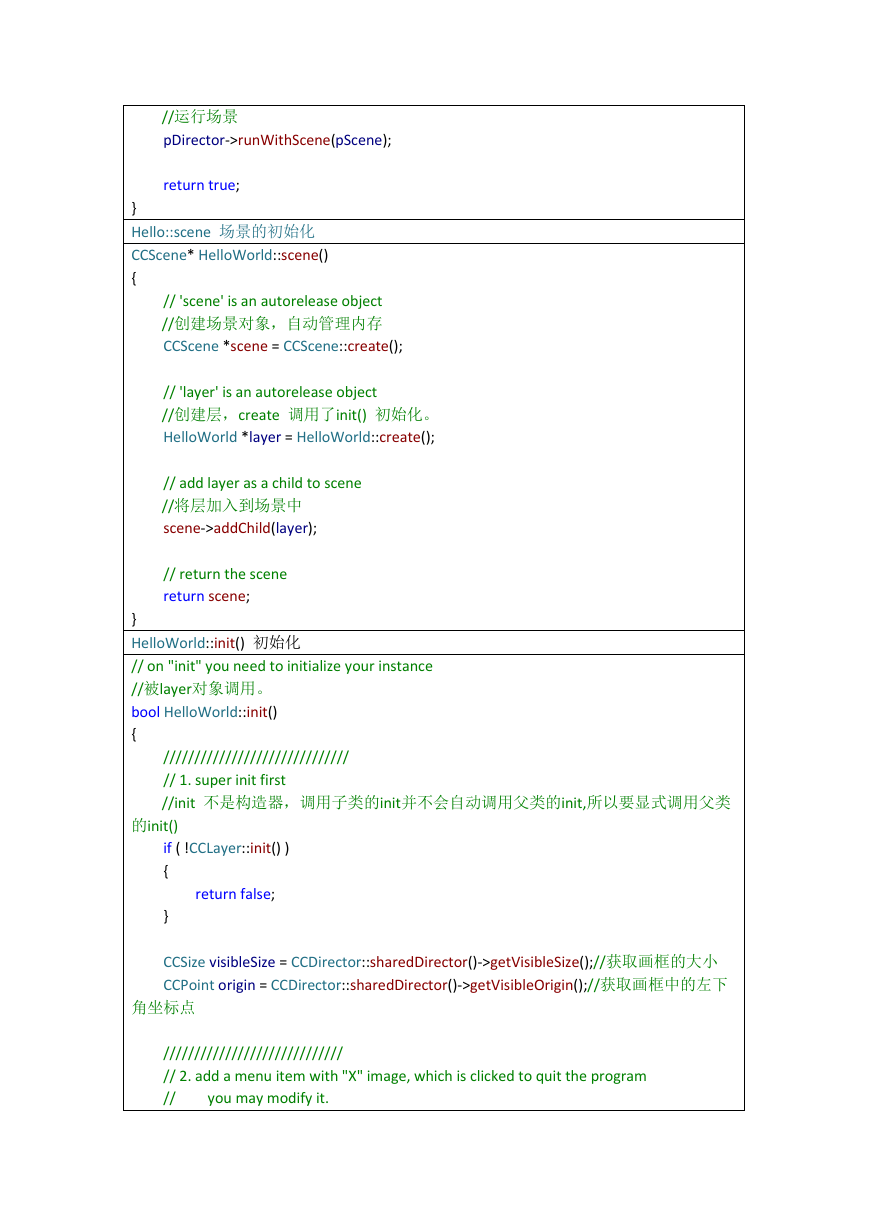
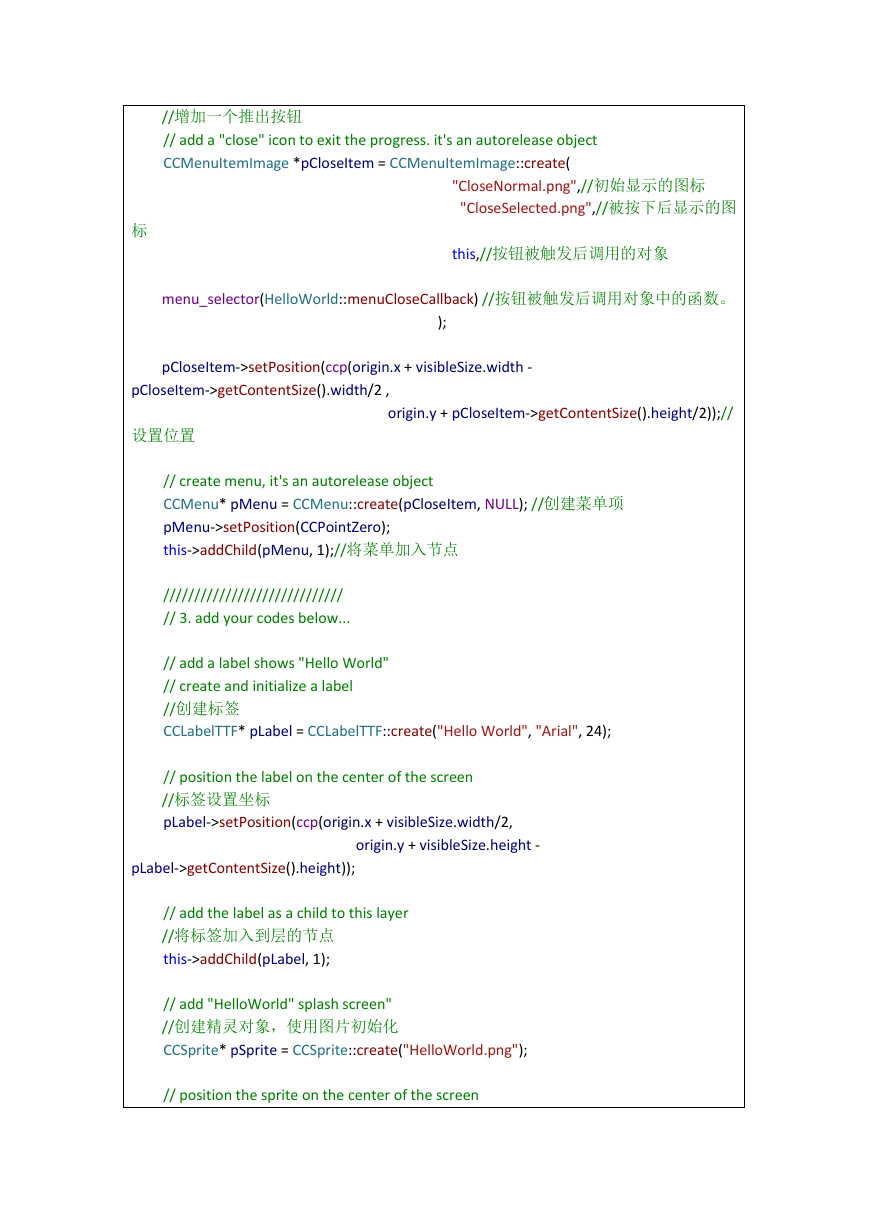
Hello world 程序详解
选择器
精灵的创建
参考:cocos2d-x-win32初始化
参考:
三种模式
kResolutionUnKnown 认识 FrameSize
kResolutionExactFit and kResolutionShowAll 认识 WinS
kResolutionNoBorder 了解 VisibleSize 与 VisibleOrigin
kResolutionLeafsoar
开始基于 LsSize 的游戏设计实现
屏幕适配新解
=Hello调用过程图
Hello 的渲染树
Cocos2d核心类
CCNode 结点
继承结构
结构图:
主要成员数据
类函数
节点的创建与初始化
获取调试信息
加入节点
坐标体系
ZORDER和Tag
改变位置
设置缩放
扭曲效果系数
设置Z坐标
锚点
节点的尺寸
显示与隐藏
旋转
到达的顺序
OpenGL server状态
加节点获取节点
坐标转换
CCDirector导演类
继承图
成员数据
函数
创建导演
进入后台,暂停,继续,结束
CCScene 场景
继承图
创建场景
场景切换
场景切换的特效
代码实列
僵尸跳;
翻跳
翻页
CCLayer 层景
继承图
子类
子类的功能
触屏基础
分析触控事件的流程
触控处理以及代理设计模式
多个层同时注册触摸和多个触摸消息处理
触控事件小结
CCLayer
主要函数
CCLayerColor
CCLayerGradient
CCLayerMultiplex
CCMenu
CCMenu基础
CCControlSlider
文字显示
CCLabelTTF
CCLabelAtlas
批处理精灵
修改CCSprite实现触控
C++中的四个Cast
Cast与CCLableBMFont
文本输入与九宫格
CCTextFieldTTF
CCEditBox
设计分辨率
精灵波浪特效
Schedule和定时器
Selector小结
菜单持续激活的实现
声音和音效
OnEnter和onExit
内存管理
switchControl
代码测试
动作-Action
(移动)MoveTo / MoveBy
(缩放)ScaleTo / ScaleBy
(偏斜)SkewTo / SkewBy
(旋转)RotateTo / RotateBy
(旋转偏斜)RotationalSkewTo / RotationalSkewBy
(偏斜与旋转偏斜)Skew Comparison
(延时动作对比)Skew + Rotate + Scale
(跳) JumpTo / JumpBy
(贝塞尔曲线)BezierBy / BezierTo
(闪烁)Blink
(渐隐)FadeIn / FadeOut
(着色)TintTo / TintBy
(动画)Animation
(序列 组合动画)Sequence: Move + Rotate
(序列 组合动画-及时动画)Sequence of InstantActions
(序列 组合动画 延时动画 函数调用)callfunc
(序列 函数调用 节点 带数据)
(创建延时动作组合)CCSpawn
(重复动画)CallFuncN + RepeatForever
(重复与一直重复)Repeat/RepeatForever + RotateTo
(旋转颤动)RepeatForever / Repeat + Rotate
(反向动作)Reverse an action
(延时动作)DelayTime: m + delay + m
(可视切换,隐藏,组合动作)Reverse sequence 2
(重复动作与一直重复)Repeat / RepeatForever actions
(轨道 相机)OrbitCamera action
(跟随 画多边形)Follow action
(触发其他节点关联动作)ActionTargeted
(触屏)Tap screen
(附加动作)tacked Move + Jump actions
(附加动作)Stacked Move + Bezier actions
(附加动作移动+样条)
(多个动作同时)
(增加精灵与调用动作)
(精灵增加动作)addAction
(移动与反向移动 )
(数据传递)CCCallFuncND
(重复+移动)
(动作log)CCCallFuncN Rotation
(CatmullRom样条)CatmullRomBy / CatmullRomTo
(样条)CardinalSplineBy / CardinalSplineTo
(暂停/恢复)PauseResumeActions
(组合动画)Sequence: Move + Rotate + Scale + RemoveSelf
加速器Accelerometer
(加速传感测试)
管理类-ActionManager
(进入下一场景)
(逻辑性测试)Logic
(暂停/恢复)
(移动)
(恢复与定时器)
缓冲动作-ActionsEase
(基本缓冲动作)EaseIn - EaseOut – Stop
(开始结束都缓冲)EaseInOut and rates
(指数缓冲动作)ExpIn - ExpOut actions
(指数缓冲动作-开始结束都缓冲)EaseExponentialInOut action
(正弦缓冲)EaseSineIn – EaseSineOut
(正弦缓冲-开始结束都缓冲)EaseSineInOut action
(弹性缓冲)Elastic In - Out actions
(弹性缓冲动作-开始结束都缓冲)EaseElasticInOut action
(跳跃缓冲)Bounce In - Out actions
(跳跃缓冲-开始结束都缓冲)EaseBounceInOut action
(回震缓冲)Back In - Out actions
(回震缓冲-开始结束缓冲)EaseBackInOut action
(可变速动作)Speed action
进度动作-ActionProgress
(进度条定时器-半径样式-扇形)ProgressTo Radial
(进度条定时器-条状样式-水平)ProgressTo Horizontal
(进度条定时器-条状样式-垂直)ProgressTo Vertical
(设置中点-半径样式)Radial w/ Different Midpoints
(设置中点-条状样式)ProgressTo Bar Mid
(进度条+褪色)
(进度条定时器+精灵帧)Progress With Sprite Frame
物理引擎-Box2D
物理引擎-Box2DT-Bed
物理引擎-Chipmunk
点击+移动-ChickAndMove
(点击触控+背景变色)
声音引擎-CocosDenshion
(命名空间)
(加载音乐资源)
(设置声音大小)
(背景音乐)
(特效)
(调节音量)
配置-Configuration
(加载显示配置信息)Loading config file manually. See consol
(获取字符串信息)Using getCString(). Check the console
(加载无效的配置信息)Loading an invalid config file
(默认值)Tests defaults values
(增加信息配置信息)Tests setting values manually
Curl语言-Curl
Libcurl
当前语言-CurrentLanguage
(检测当前语言)
数据的访问者模式-DataVisitor
DataVisitor测试
简单的绘画-DrawPrimitive
基本物件-draw primitives
节点绘制Testing DrawNode - batched draws. Concave poly
特效-Effects
(场景的初始化)
(摇晃)Shaky3D
(波浪3D)Waves3D
(翻转)FlipX3D
(翻转)FlipY3D
(镜头)Lens3D
(涟漪)Ripple3D
(液体)Liquid
(波浪)Waves
(旋转)Twirl
(摇摆旋转)ShakyTiles3D
(破碎瓦片)ShatteredTiles3D
(洗牌)ShuffleTiles
(渐隐-左下角开始)FadeOutTRTiles
(渐隐-右上角开始)FadeOutBLTiles
(渐隐-向上)FadeOutUpTiles
(渐隐-向下)FadeOutDownTiles
(关闭)TurnOffTiles
(波浪地图)WavesTiles3D
(跳跃地图)JumpTiles3D
(行分离)SplitRows
(列分离)SplitCols
(翻页)PageTurn3D
高级特效-EffectsAdvanced
扩展-Extensions
文件工具包-FileUtils
(搜索文件)FileUtils: resolutions in directories
(搜索路径)FileUtils: search path
(文件查找)FileUtils: filename lookup
(检查文件是否存在)FileUtils: check whether the file exists
(将字典文件写入plist)FileUtils: CCDictionary to plist
字体Font
(字体显示)
fonts/A Damn Mess.ttf
fonts/Abberancy.ttf
fonts/Abduction.ttf
fonts/Paint Boy.ttf
fonts/Schwarzwald Regular.ttf
fonts/Scissor Cuts.ttf
(间隔时间)Interval
(定时器间隔测试)
键盘-keypad
标签-Label
LabelAtlas
LabelAtlasColor
Atlas3
Atlas4
Atlas5
Atlas6
AtlasBitmapColor
AtlasFastBitmap
BitmapFontMultiLine
LabelsEmpty
LabelBMFontHD
LabelAtlasHD
LabelGlyphDesigner
Atlas1
LabelTTFTest
LabelTTFMultiline
LabelTTFChinese
LabelBMFontChinese
BitmapFontMultiLineAlignment
LabelTTFA8Test
BMFontOneAtlas
BMFontUnicode
BMFontInit
TTFFontInit
Issue1343
LabelTTFAlignment
LabelBMFontBounds
TTFFontShadowAndStroke
LabelBMFontCrash
层景-Layer
CCTextureAtlas
菜单-Menu
MotionStreak
节点-Node
(定位点)-anchorPoint and children
(标签)-tags
(移除节点)-remove and cleanup
(移除/清理节点)-remove/cleanup with children
(压力测试)-stress test #1: no crashes
(压力测试)Stress泄漏stress test #2: no leaks
(定时器)cocosnode scheduler test #1
(精灵节点作为父节点)nodeToParent transform
(摄像机轨道)Camera Orbit test
(摄像机移动)Camera Zoom test
(摄像机中心)Camera Center test
(世界坐标转换为节点坐标)testing convertToNodeSpace / AR. Touc
(掩盖)
(混合颜色)GL_BLEND
Parallax
Particle
Performance
RenderTexture
RotateWorld
场景-Scene
Scheduler
Shader
骨骼-Spine
(骨骼动画)
精灵-Sprite
(批处理精灵)SpriteBatchNode (tap screen)
(精灵颜色+透明度)Sprite: Color & Opacity
(批处理精灵颜色+透明度)SpriteBatchNode: Color & Opacity
(精灵z轴显示顺序)Sprite: Z order
(批处理精灵z显示顺序)SpriteBatchNode: Z order
(重新排序)SpriteBatchNode: reorder
(定点)Sprite: openGL Z vertex
(批处理精灵)SpriteBatchNode: openGL Z vertex
(锚点)Sprite: anchor point
(批处理精灵锚点)SpriteBatchNode: anchor point
(批处理精灵-变形)SpriteBatchNode transformation
(精灵-翻转)Sprite Flip X & Y
(批处理精灵-翻转)SpriteBatchNode Flip X & Y
(锯齿)Sprite Aliased
(批处理精灵-锯齿)SpriteBatchNode Aliased
(精灵新纹理)
(批处理精灵切换纹理)SpriteBatchNode new texture (tap)
(精灵框架)SpriteFrames are obtained using the alias na
(精灵锚点偏移)
(精灵批处理锚点旋转)SpriteBatchNode offset + anchor + rot
(精灵设置锚点缩放)Sprite offset + anchor + scale
(批处理精灵锚点设置缩放)SpriteBatchNode offset + anchor + sca
(精灵动画)Sprite: Animation + flip
(精灵混合)HybrCCSprite* sprite Test
(组合精灵)SpriteBatchNode Grand Children
(精灵显示顺序)SpriteBatchNode Children Z
(精灵的可见性显示)Sprite & SpriteBatchNode Visibility
(批处理精灵与锚点)SpriteBatchNode: children + anchor
(批处理精灵缩放)Sprite/BatchNode + child + scale + rot
(多层子类精灵)Sprite multiple levels of children
(精灵批处理)Sprite + children + skew
(没有纹理的精灵)Sprite without texture
(创建精灵)Testing initWithTexture:rect method
(两种显示效果对比) Retina Display. SD (left) should be equ
(动画缓存)Sprite should be animated
(精灵动画缓存-加载资源)AnimationCache - Load file
(精灵偏移+锚点+缩放)Sprite offset + anchor + scale
(批处理精灵偏移+锚点+缩放) SpriteBatchNode offset + anchor +
(精灵偏移+锚点+翻转)Sprite offset + anchor + flip
(批处理精灵偏移+锚点+翻转)SpriteBatchNode offset + anchor + f
(节点排序)node sort same index
SpriteBatchNode + children + rot skew
Sprite rot skew + negative scale with children
SpriteBatchNode anchor + rot skew + scale
Sprite anchor + rot skew + scale
SpriteBatchNode offset + anchor + rot skew
Sprite offset + anchor + rotational skew
SpriteBatchNode reorder 1 child
TextInput
Texture2d
TextureCache
TexturePackerEncryption
TileMap
Touches
(球碰撞测试)
Transitions
UserDefault
(小型数据保存XML 读写测试)
Zwoptex-创建纹理工具
项目实战
一个都不能死项目
思路:
资源文件合成与拆分
实现步骤
NO Zuo NO Die
萝莉快跑
象棋
打飞机
参考
颜色对照表


 2023年江西萍乡中考道德与法治真题及答案.doc
 2012年重庆南川中考生物真题及答案.doc
 2013年江西师范大学地理学综合及文艺理论基础考研真题.doc
 2020年四川甘孜小升初语文真题及答案I卷.doc
 2020年注册岩土工程师专业基础考试真题及答案.doc
 2023-2024学年福建省厦门市九年级上学期数学月考试题及答案.doc
 2021-2022学年辽宁省沈阳市大东区九年级上学期语文期末试题及答案.doc
 2022-2023学年北京东城区初三第一学期物理期末试卷及答案.doc
 2018上半年江西教师资格初中地理学科知识与教学能力真题及答案.doc
 2012年河北国家公务员申论考试真题及答案-省级.doc
 2020-2021学年江苏省扬州市江都区邵樊片九年级上学期数学第一次质量检测试题及答案.doc
 2022下半年黑龙江教师资格证中学综合素质真题及答案.doc