Floodlight Notes
Baohua Yang
Updated: 2012-11-01
1. 安装运行
官方网站为 http://www.openflowhub.org。
1.1. 安装
1.1.1. 获取源码和编译
执行代码为
sudo apt-get install build-essential default-jdk ant python-dev eclipse
git clone git://github.com/floodlight/floodlight.git
cd floodlight
git checkout stable
ant;
1.1.2. 配置 eclipse
打开 eclipse,创建新的 workspace。
从菜单选择 File -> Import -> General -> Existing Projects into Workspac。点击下一步。
从 Select root directory 里面,找到 floodlight 所在目录。导入后勾上 Floodlight,点击
Finish。
下面配置运行时环境:
点击 Run->Run Configurations。
右键点击 Java Application,选择 New。
名字选择 FloodlightLaunch,Project 选择 Floodlight,Main 选择
net.floodlightcontroller.core.Main,最后点击 Apply。
�
1.1.3. 运行
java -jar target/floodlight.jar
1.2. 自定义配置
配置需要编译的模块,修改
src/main/resources/META-INF/services/net.floodlightcontroller.core.module
配置需要加载或运行的模块,配置启动参数等,修改
src/main/resources/floodlightdefault.properties
floodlight 作为服务启动时,配置文件在
/opt/floodlight/floodlight/configuration/floodlight.properties
2. REST API
尚未稳定。待完成。
REST API 是 Floodlight 与应用程序交互的核心渠道之一,目前,大部分应用都支持通
过该 API 与 Floodlight 进行交互。
2.1.
Static Flow Pusher
该模块能让用户手动修改每个交换机上的流表项,从而创建任意转发路径。
默认情况下,Forwarding 模块被加载,控制器进行被动(reactive)的流加载。
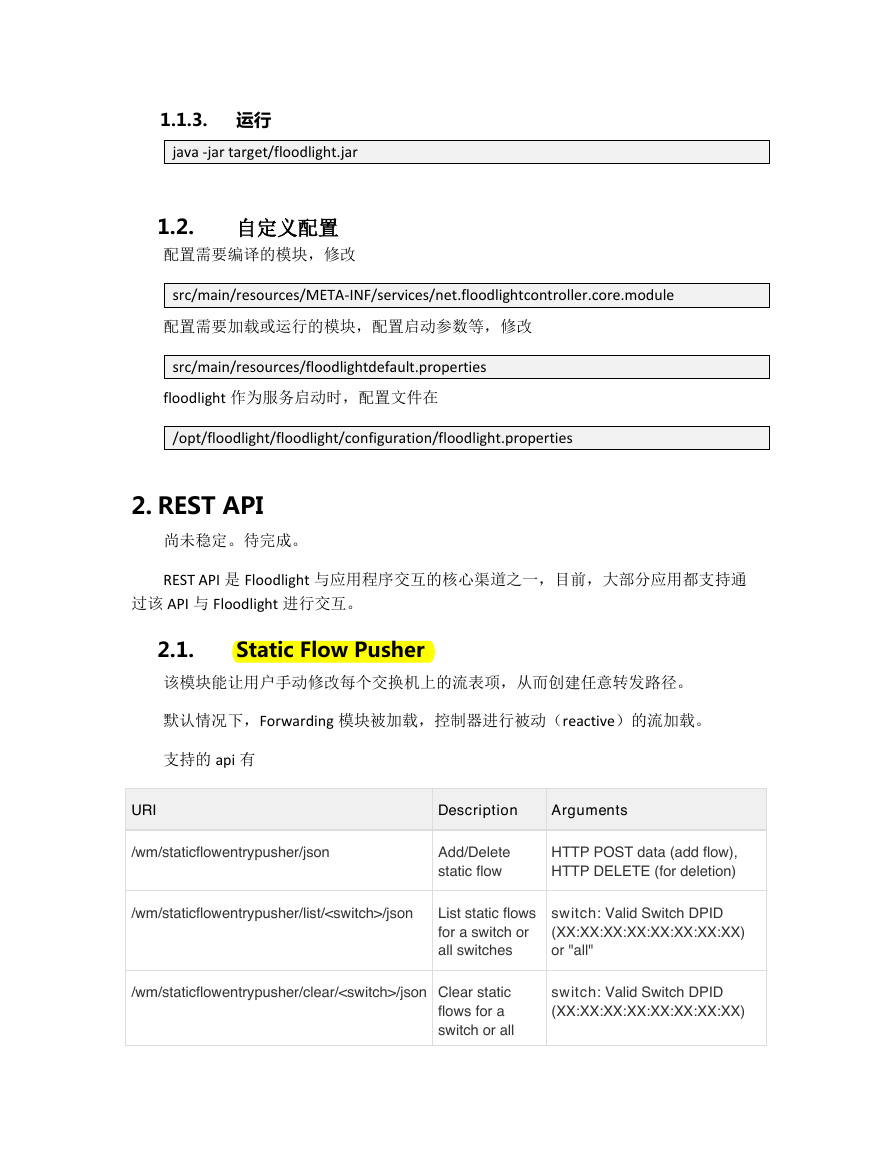
支持的 api 有
URI
Description Arguments
/wm/staticflowentrypusher/json
Add/Delete
static flow
HTTP POST data (add flow),
HTTP DELETE (for deletion)
/wm/staticflowentrypusher/list//json
List static flows
for a switch or
all switches
switch: Valid Switch DPID
(XX:XX:XX:XX:XX:XX:XX:XX)
or "all"
/wm/staticflowentrypusher/clear//json Clear static
flows for a
switch or all
switch: Valid Switch DPID
(XX:XX:XX:XX:XX:XX:XX:XX)
�
switches
or "all"
2.1.1. 添加流
向 switch 1 添加一条静态流表项(从 port 1 接收包,从 port 2 发出包)的例子如下,
其中,第二条指令 dump 出所有的流来。
curl -d '{"switch": "00:00:00:00:00:00:00:01", "name":"flow-mod-1", "cookie":"0",
"priority":"32768", "ingress-port":"1","active":"true", "actions":"output=2"}'
http://:8080/wm/staticflowentrypusher/json
curl http://:8080/wm/core/switch/1/flow/json;
2.1.2. 删除流
curl -X DELETE -d '{"name":"flow-mod-1"}'
http://:8080/wm/staticflowentrypusher/json
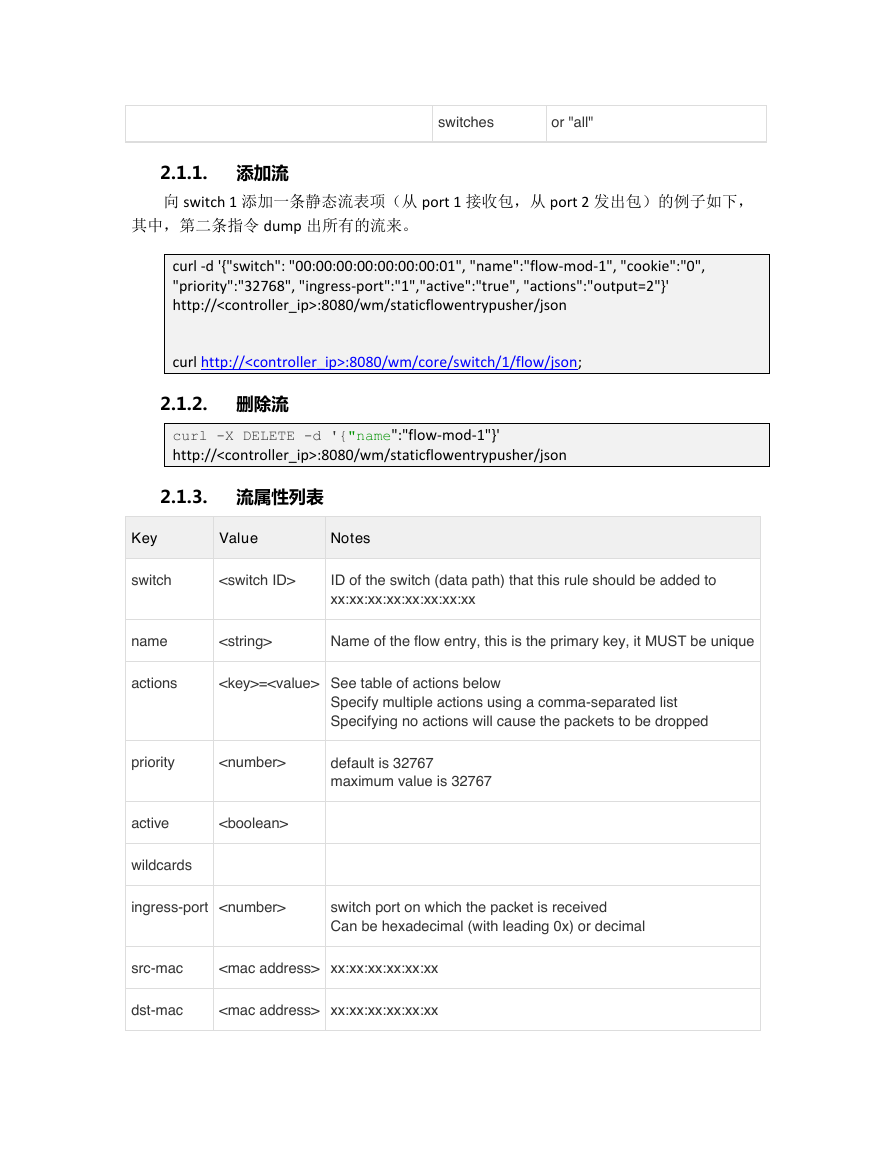
2.1.3. 流属性列表
Key
Value
Notes
switch
ID of the switch (data path) that this rule should be added to
xx:xx:xx:xx:xx:xx:xx:xx
name
Name of the flow entry, this is the primary key, it MUST be unique
actions
= See table of actions below
Specify multiple actions using a comma-separated list
Specifying no actions will cause the packets to be dropped
priority
default is 32767
maximum value is 32767
active
wildcards
ingress-port
switch port on which the packet is received
Can be hexadecimal (with leading 0x) or decimal
src-mac
xx:xx:xx:xx:xx:xx
dst-mac
xx:xx:xx:xx:xx:xx
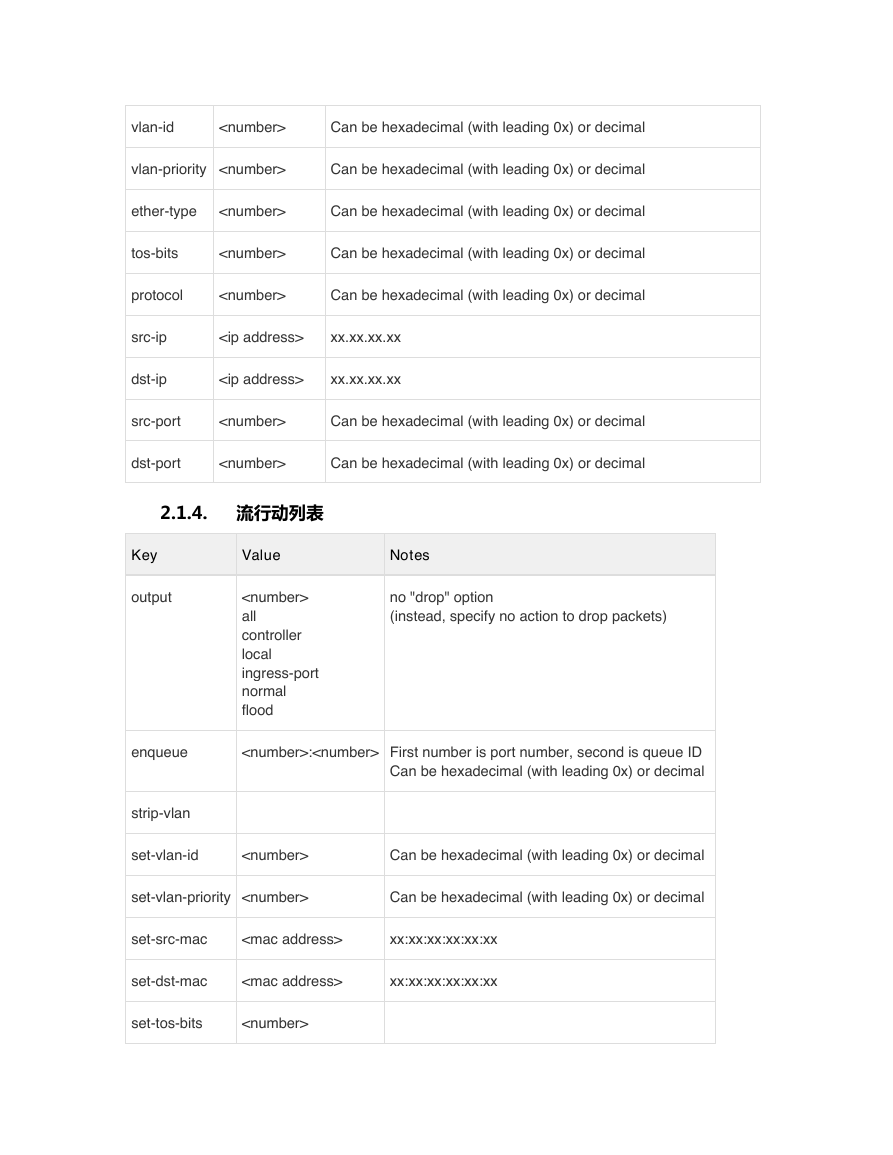
�
vlan-id
Can be hexadecimal (with leading 0x) or decimal
vlan-priority
Can be hexadecimal (with leading 0x) or decimal
ether-type
Can be hexadecimal (with leading 0x) or decimal
tos-bits
Can be hexadecimal (with leading 0x) or decimal
protocol
Can be hexadecimal (with leading 0x) or decimal
src-ip
xx.xx.xx.xx
dst-ip
xx.xx.xx.xx
src-port
Can be hexadecimal (with leading 0x) or decimal
dst-port
Can be hexadecimal (with leading 0x) or decimal
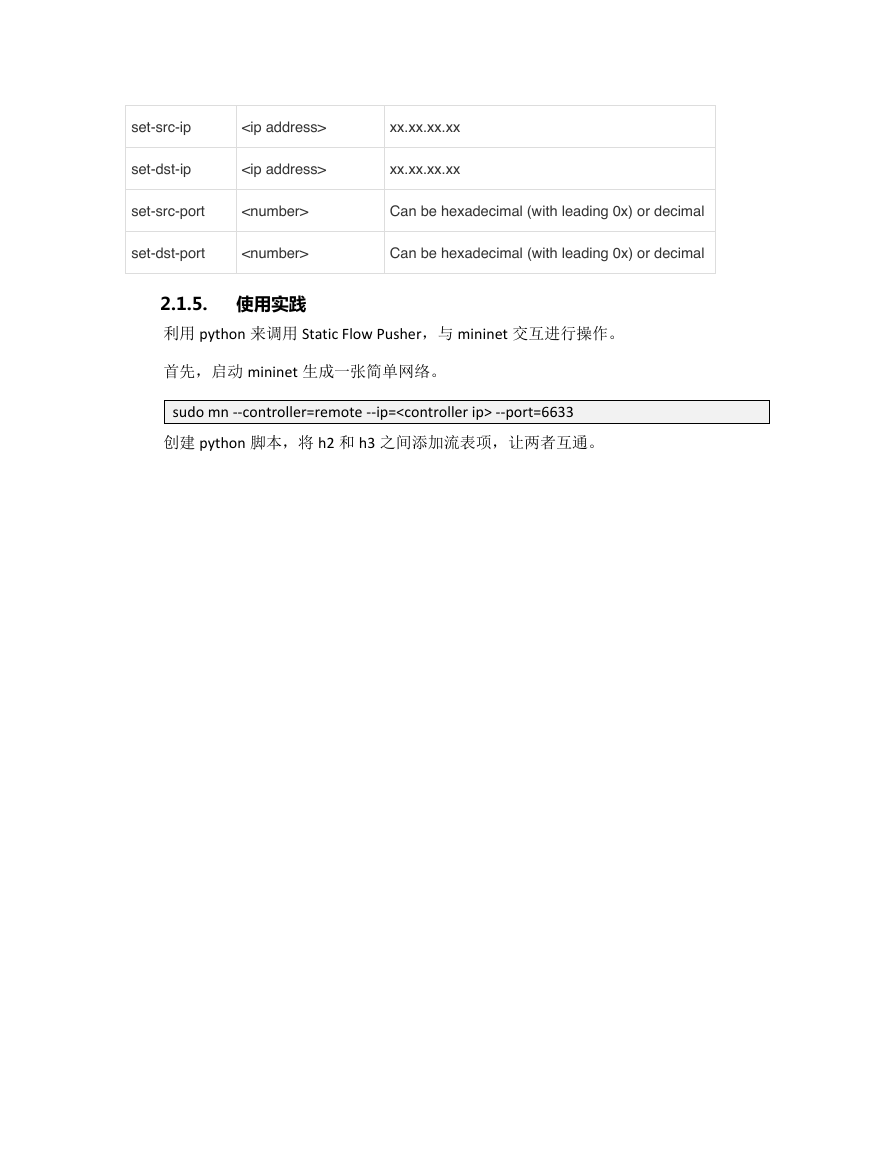
2.1.4. 流行动列表
Key
Value
Notes
no "drop" option
(instead, specify no action to drop packets)
output
all
controller
local
ingress-port
normal
flood
enqueue
: First number is port number, second is queue ID
Can be hexadecimal (with leading 0x) or decimal
strip-vlan
set-vlan-id
Can be hexadecimal (with leading 0x) or decimal
set-vlan-priority
Can be hexadecimal (with leading 0x) or decimal
set-src-mac
xx:xx:xx:xx:xx:xx
set-dst-mac
xx:xx:xx:xx:xx:xx
set-tos-bits
�
set-src-ip
xx.xx.xx.xx
set-dst-ip
xx.xx.xx.xx
set-src-port
Can be hexadecimal (with leading 0x) or decimal
set-dst-port
Can be hexadecimal (with leading 0x) or decimal
2.1.5. 使用实践
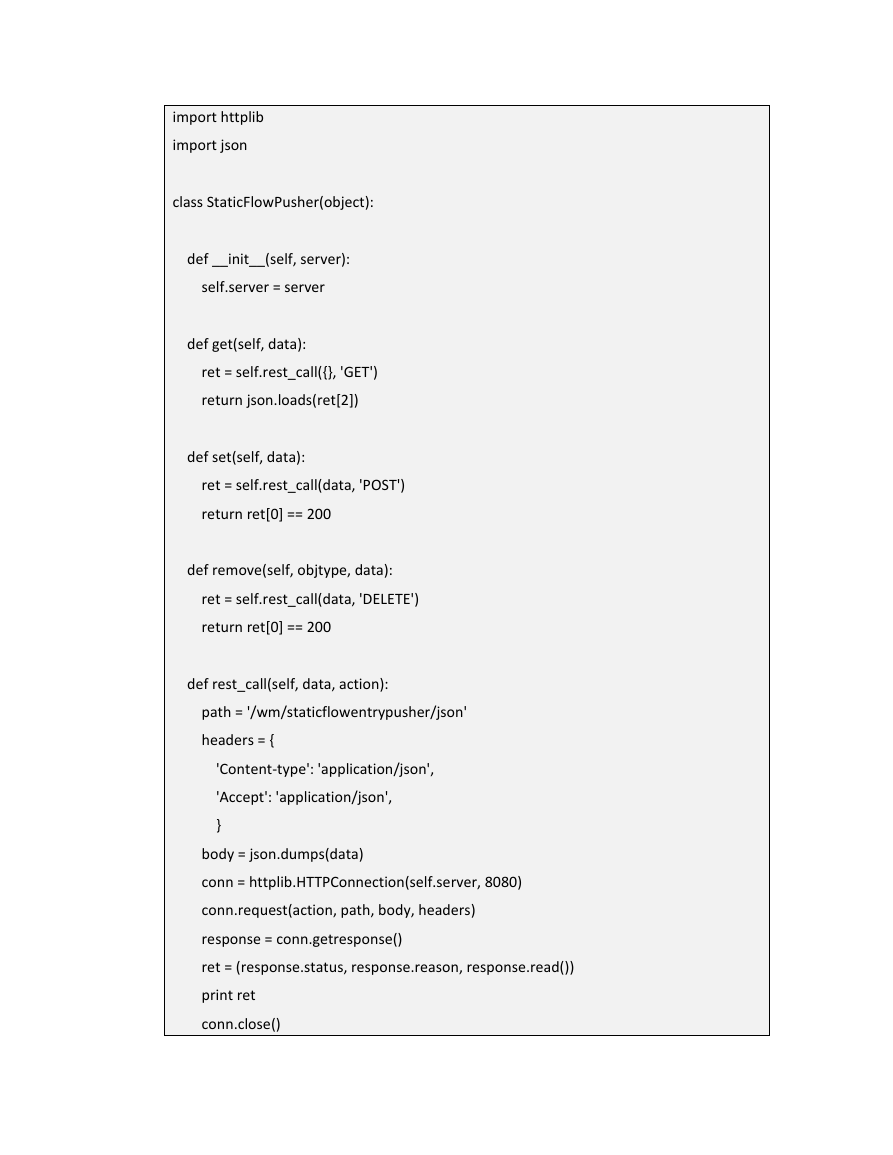
利用 python 来调用 Static Flow Pusher,与 mininet 交互进行操作。
首先,启动 mininet 生成一张简单网络。
sudo mn --controller=remote --ip= --port=6633
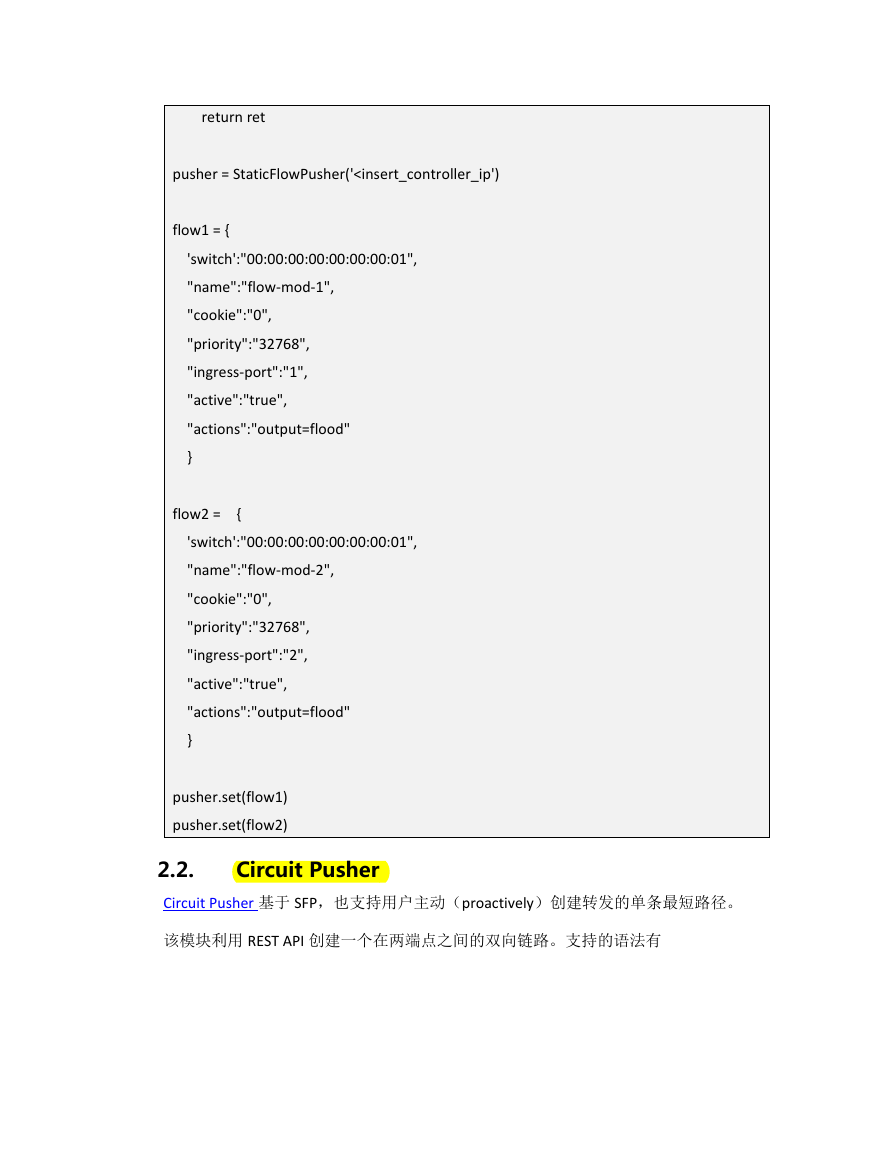
创建 python 脚本,将 h2 和 h3 之间添加流表项,让两者互通。
�
import httplib
import json
class StaticFlowPusher(object):
def __init__(self, server):
self.server = server
def get(self, data):
ret = self.rest_call({}, 'GET')
return json.loads(ret[2])
def set(self, data):
ret = self.rest_call(data, 'POST')
return ret[0] == 200
def remove(self, objtype, data):
ret = self.rest_call(data, 'DELETE')
return ret[0] == 200
def rest_call(self, data, action):
path = '/wm/staticflowentrypusher/json'
headers = {
'Content-type': 'application/json',
'Accept': 'application/json',
}
body = json.dumps(data)
conn = httplib.HTTPConnection(self.server, 8080)
conn.request(action, path, body, headers)
response = conn.getresponse()
ret = (response.status, response.reason, response.read())
print ret
conn.close()
�
return ret
pusher = StaticFlowPusher('
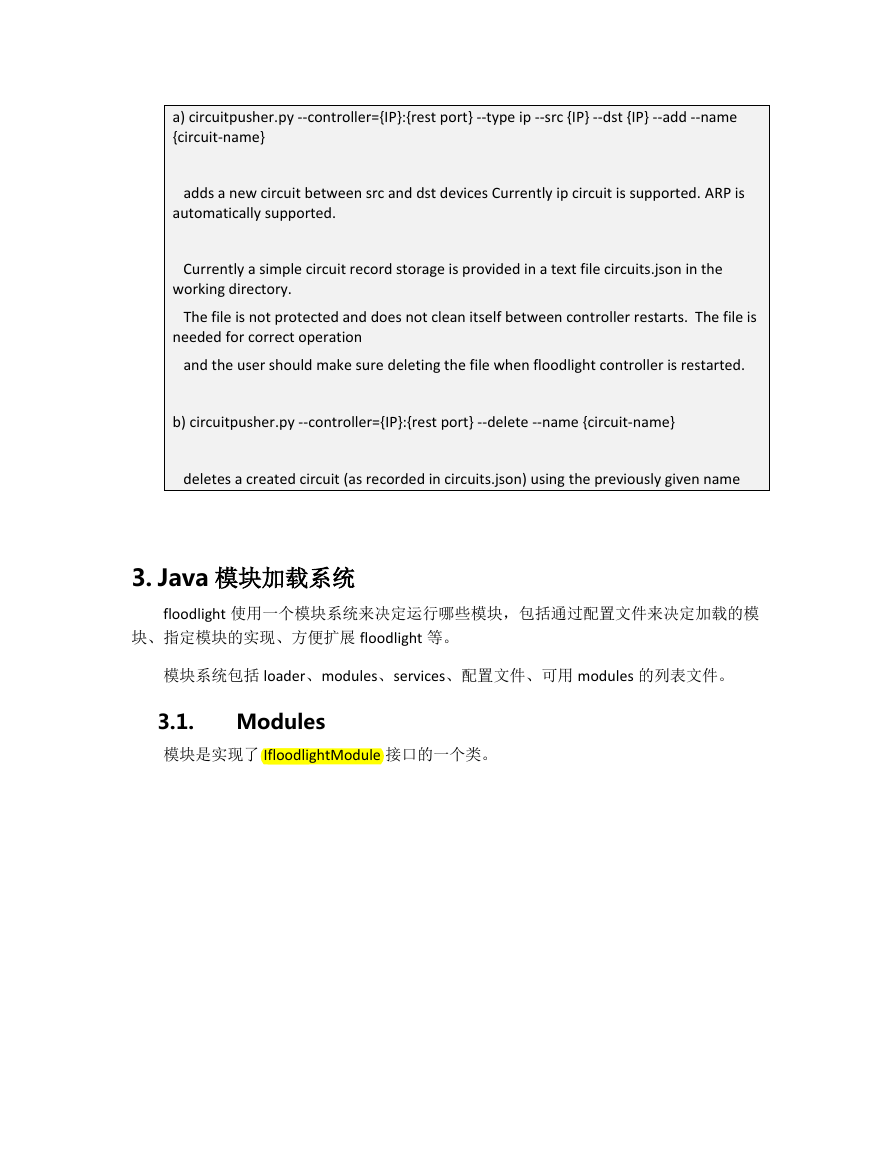
a) circuitpusher.py --controller={IP}:{rest port} --type ip --src {IP} --dst {IP} --add --name
{circuit-name}
adds a new circuit between src and dst devices Currently ip circuit is supported. ARP is
automatically supported.
Currently a simple circuit record storage is provided in a text file circuits.json in the
working directory.
The file is not protected and does not clean itself between controller restarts. The file is
needed for correct operation
and the user should make sure deleting the file when floodlight controller is restarted.
b) circuitpusher.py --controller={IP}:{rest port} --delete --name {circuit-name}
deletes a created circuit (as recorded in circuits.json) using the previously given name
3. Java 模块加载系统
floodlight 使用一个模块系统来决定运行哪些模块,包括通过配置文件来决定加载的模
块、指定模块的实现、方便扩展 floodlight 等。
模块系统包括 loader、modules、services、配置文件、可用 modules 的列表文件。
3.1. Modules
模块是实现了 IfloodlightModule 接口的一个类。
�



 2023年江西萍乡中考道德与法治真题及答案.doc
 2012年重庆南川中考生物真题及答案.doc
 2013年江西师范大学地理学综合及文艺理论基础考研真题.doc
 2020年四川甘孜小升初语文真题及答案I卷.doc
 2020年注册岩土工程师专业基础考试真题及答案.doc
 2023-2024学年福建省厦门市九年级上学期数学月考试题及答案.doc
 2021-2022学年辽宁省沈阳市大东区九年级上学期语文期末试题及答案.doc
 2022-2023学年北京东城区初三第一学期物理期末试卷及答案.doc
 2018上半年江西教师资格初中地理学科知识与教学能力真题及答案.doc
 2012年河北国家公务员申论考试真题及答案-省级.doc
 2020-2021学年江苏省扬州市江都区邵樊片九年级上学期数学第一次质量检测试题及答案.doc
 2022下半年黑龙江教师资格证中学综合素质真题及答案.doc