logo资料库

爱普泰克数码相机-PocketCam 6200说明书.pdf

第1页 / 共70页
第2页 / 共70页
第3页 / 共70页
第4页 / 共70页
第5页 / 共70页
第6页 / 共70页
第7页 / 共70页
第8页 / 共70页
资料共70页,剩余部分请下载后查看
eManual
WELCOME
SAFETY NOTICE
TABLE OF CONTENTS
CAMERA PARTS
GETTING STARTED
► Loading the battery
► Charging the battery
► Inserting the SD/MMC card (optional)
► Attaching the carrying strap (optional)
► Using the tripod (optional)
► How to hold your camera
BASIC OPERATION
► Turning on your camera
► Turning off your camera
► Mode selection
► Taking a still picture
► Zooming
► Setting focus
► Recording a video clip
► Zooming
► Setting focus
► Recording a voice clip
► Playing back your recordings
► Playing back your recordings - thumbnails
► Connecting the camera to your TV
ADVANCED OPERATIONS
► Digital Camera - Recording voice memo
► Digital Camera - Setting picture resolution
► Digital Camera - Setting flash strobe
► Digital Camera - Setting selftimer
► Digital Camera - Setting picture effect
► Digital Camera - Setting white balance
► Digital Camera - Setting exposure method
► Digital Camera - Setting exposure value
► Digital Camcorder - Setting video resolution
► Digital Camcorder - Setting video effect
► Setting voice memo
► Deleting files
► Sorting files
► Setting file info
CAMERA SETTINGS
► Camera settings mode
► Setting date and time
► Setting beep sound
► Setting date stamp
► Setting panel brightness
► Setting flicker
► Setting language
► Setting TV system
► Setting TV-out
► Restoring default settings
► Formatting media
COPYING FILES TO YOUR PC
► Installing the driver to your PC
► Connecting the camera to your PC
► Copying files to the PC
► Viewing/Playing files on your PC
► File Location
USING MP3 PLAYER
► Copying MP3 files to the camera
► Setting the output device
► Playing MP3 music
► Play list mode
► Repeating playing
► Deleting MP3 files
USING PC CAMERA
► Installing the PC Camera software
► Starting the application
► The application interface
► Recording a movie
► Taking a snapshot
► Format options
► Properties options
► Flicker options
TROUBLESHOOTING
ADDENDA
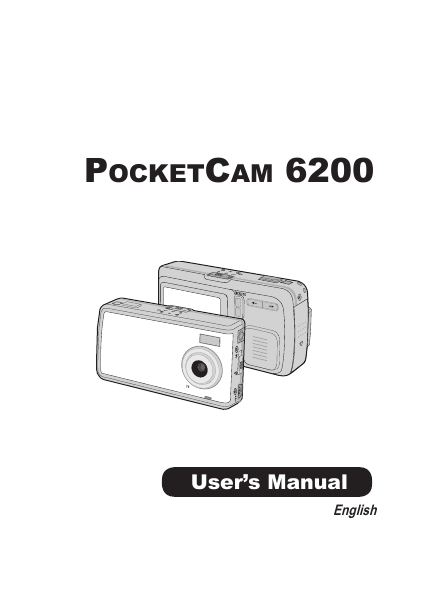
POCKETCAM 6200 User’s Manual English
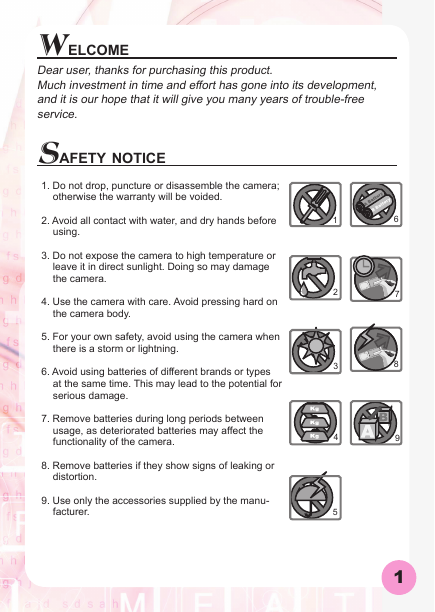
WELCOME Dear user, thanks for purchasing this product. Much investment in time and effort has gone into its development, and it is our hope that it will give you many years of trouble-free service. SAFETY NOTICE 1. Do not drop, puncture or disassemble the camera; otherwise the warranty will be voided. 2. Avoid all contact with water, and dry hands before using. 3. Do not expose the camera to high temperature or leave it in direct sunlight. Doing so may damage the camera. 4. Use the camera with care. Avoid pressing hard on the camera body. 5. For your own safety, avoid using the camera when there is a storm or lightning. 6. Avoid using batteries of different brands or types at the same time. This may lead to the potential for serious damage. 7. Remove batteries during long periods between usage, as deteriorated batteries may affect the functionality of the camera. 8. Remove batteries if they show signs of leaking or distortion. 9. Use only the accessories supplied by the manu- facturer. 1 2 3 4 5 6 7 8 9 1
TABLE OF CONTENTS Welcome Safety notice Table of contents Camera parts Getting started ► Loading the battery ► Charging the battery ► Inserting the SD/MMC card (optional) ► Attaching the carrying strap (optional) ► Using the tripod (optional) ► How to hold your camera Basic operation ► Turning on your camera ► Turning off your camera ► Mode selection ► Taking a still picture ► Zooming ► Setting focus ► Recording a video clip ► Zooming ► Setting focus ► Recording a voice clip ► Playing back your recordings ► Playing back your recordings - thumbnails ► Connecting the camera to your TV Advanced operations ► Digital Camera - Recording voice memo ► Digital Camera - Setting picture resolution ► Digital Camera - Setting flash strobe ► Digital Camera - Setting selftimer ► Digital Camera - Setting picture effect ► Digital Camera - Setting white balance ► Digital Camera - Setting exposure method ► Digital Camera - Setting exposure value ► Digital Camcorder - Setting video resolution ► Digital Camcorder - Setting video effect ► Setting voice memo ► Deleting files ► Sorting files ► Setting file info 2 1 1 2 4 5 5 6 7 8 8 9 1 0 1 0 1 0 1 1 1 2 1 3 1 3 1 4 1 5 1 5 1 6 1 7 1 9 2 0 2 1 2 1 2 2 2 3 2 4 2 5 2 6 2 7 2 8 2 9 3 0 3 1 3 2 3 3 3 4
Camera settings ► Camera settings mode ► Setting date and time ► Setting beep sound ► Setting date stamp ► Setting panel brightness ► Setting flicker ► Setting language ► Setting TV system ► Setting TV-out ► Restoring default settings ► Formatting media Copying files to your PC ► Installing the driver to your PC ► Connecting the camera to your PC ► Copying files to the PC ► Viewing/Playing files on your PC ► File Location Using MP3 player ► Copying MP3 files to the camera ► Setting the output device ► Playing MP3 music ► Play list mode ► Repeating playing ► Deleting MP3 files Using PC camera ► Installing the PC Camera software ► Starting the application ► The application interface ► Recording a movie ► Taking a snapshot ► Format options ► Properties options ► Flicker options Troubleshooting Addenda 3 5 3 5 3 5 3 6 3 6 3 7 3 7 3 8 3 8 3 9 4 0 4 1 4 2 4 2 4 5 4 6 4 8 4 9 5 0 5 0 5 1 5 2 5 4 5 4 5 6 5 8 5 8 5 8 6 0 6 1 6 1 6 1 6 2 6 2 6 3 6 6 3
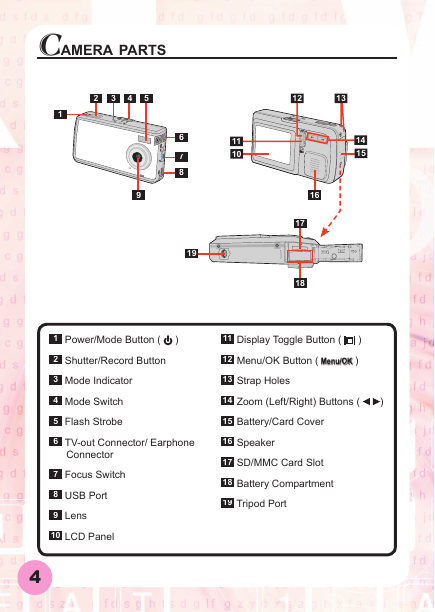
CAMERA PARTS 2 3 4 5 12 13 1 9 6 7 8 19 11 10 14 15 16 17 18 ) ) 11 Display Toggle Button ( 12 Menu/OK Button ( 13 Strap Holes 14 Zoom (Left/Right) Buttons ( 15 Battery/Card Cover 16 Speaker 17 SD/MMC Card Slot 18 Battery Compartment 19 Tripod Port ) ) 1 Power/Mode Button ( 2 Shutter/Record Button 3 Mode Indicator 4 Mode Switch 5 Flash Strobe 6 TV-out Connector/ Earphone Connector 7 Focus Switch 8 USB Port 9 Lens 10 LCD Panel 4
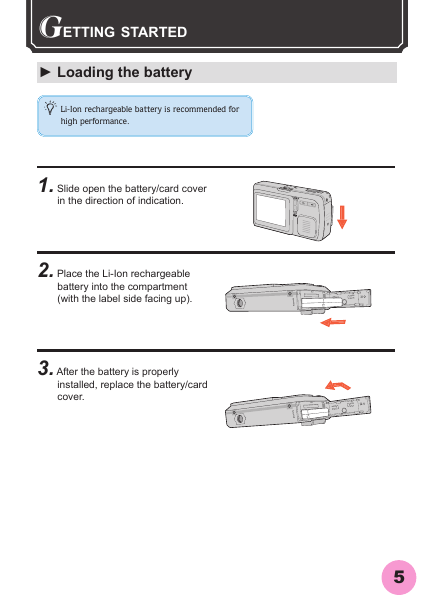
GETTING STARTED ► Loading the battery  Li-Ion rechargeable battery is recommended for high performance. 1. Slide open the battery/card cover in the direction of indication. 2. Place the Li-Ion rechargeable battery into the compartment (with the label side facing up). 3. After the battery is properly installed, replace the battery/card cover. 5
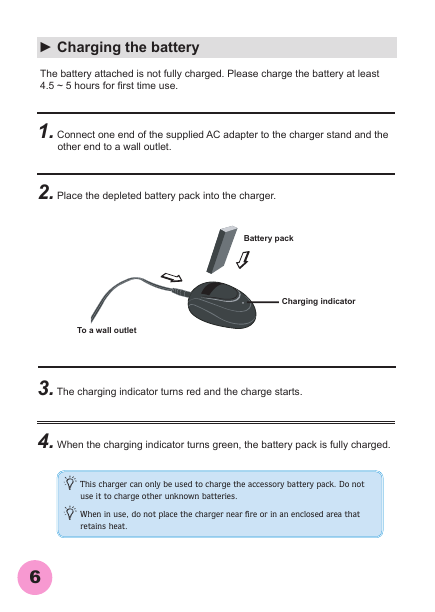
► Charging the battery The battery attached is not fully charged. Please charge the battery at least 4.5 ~ 5 hours for first time use. 1. Connect one end of the supplied AC adapter to the charger stand and the other end to a wall outlet. 2. Place the depleted battery pack into the charger. Battery pack Charging indicator To a wall outlet 3. The charging indicator turns red and the charge starts. 4. When the charging indicator turns green, the battery pack is fully charged.  This charger can only be used to charge the accessory battery pack. Do not use it to charge other unknown batteries.  When in use, do not place the charger near fire or in an enclosed area that retains heat. 6
分享到:
收藏