Ansible Modules
@author 刘振伟
@QQ 570962906
Ansible拥有大量的模块(module library)来操作远程主机节点或者通过playbook对节点操作。
用户也可以开发自己的模块,这些模块可以控制系统资源,如系统服务,包管理,文件操作或者执行系统命令等等。
Ansible中每个模块都会完成特定的任务。在每个playbook任务定义的任务都会依次得到执行,当然也可以指定值运行某个特定的操作。
ansible webservers -m service -a "name=httpd state=started"
ansible webservers -m ping
ansible webservers -m command -a "/sbin/reboot -t now"
如上边第一个命令是使用service模块在webservres组内的所有主机节点上启动httpd服务,-m指定模块名称,-a指定模块所需的参数, key=value 方式
指定模块参数,多个参数以空格隔开。有些模块是不需要带参数的。command或者shell模块则需要指定一个字符串参数,表示要运行的命令。
Ansible通过playbook中所定义的操作以同样的方式执行每个模块:
- name: reboot the servers
action: command /sbin/reboot -t now
也可以以下边的方式定义:
- name: reboot the servers
command: /sbin/reboot -t now
给模块传递参数:
- name: restart webserver
service:
name: httpd
state: restarted
所有的模块包括自己开发的模块都会或者应该返回一个JSON格式的数据。使用playbook的时候,某一个任务可以触发另一个任务的执行。
查看某个某块的文档:
ansible-doc yum
列出所有已经安装的模块:
ansible-doc -l
核心模块
核心模块
Ansible会维护一些较为核心的模块,这些模块托管在github上 ansible-modules-core.
附加模块
附加模块
这些模块目前随着Ansible安装使用,但以后可能也会独立安装。这些模块大多数由社区维护。非核心模块功能也是较为齐全的,但是其维护及相应效
率有可能没有核心模块那么高。 附加模块也是托管在github上的 ansible-modules-extras。
返回值返回值
Ansible模块通常会返回一个有一定格式的数据(JSON格式的数据),可以将其赋值给一个变量,也可以直接输出到标准输出上。
行为(Facts)
�
一些模块会给Ansible返回一个facts ,通过ansible_facts ,当前主机可以将其直接作为一个变量使用。
状态(status)
每个模块都必须返回一个状态,来说明模块是否执行成功,或者是说明操作对象是否发生变化(如上传文件到远程机,根据状态可以判断该文件是否
修改过,只有修改过的文件Ansible才会重新上传覆盖)
其他返回信息
通常,模块还会返回成功或者失败的信息。一些模块会直接返回标准输出和标准错误信息,如command和shell模块。如果Ansible见到标准输出信息,
会将其追加到stdou_lines列表中,并打印出来。
介绍几个较为常用的模块
介绍几个较为常用的模块
Commands Modules(命令模块
命令模块)
command --- 在远程节点上执行命令
Command模块后边紧跟这要执行的命令,命令的参数以空格隔开。指定的命令会在所选的所有的节点上执行。命令并不是通过shell执行的,所以并不
能使用$HOME 等环境变量和一些操作符(<,>,|,&) 。shell模块支持环境变量和操作符。
选项:
chdir 在运行命令之前,先切换到指定的目录
[root@web1 ~]# ansible webservers -m command -a "ls -l chdir=/tmp"
192.168.1.65 | success | rc=0 >>
total 68
-rw-r--r--. 1 root root 61530 Jul 13 15:59 5kcrm.sql
srwx------. 1 mongod mongod 0 Jul 22 06:28 mongodb-27017.sock
-rw-r--r--. 1 root root 0 Jul 22 11:59 test
drwx------. 2 root root4096 Jul 21 22:49 vmware-root
上边的命令,先切换到/tmp目录下,然后执行ls -l 命令。
creates 后边可以直接指定一个文件名(目录名),或者是以正则模式匹配一系列文件名。如果所指定的文件存在的话,则不执行指定的命令。
[root@web1 ~]# ansible webservers -m command -a "ls -l /tmp creates=/tmp/test"
192.168.1.65 | success | rc=0 >>
skipped, since /tmp/test exists
[root@web1 ~]# ansible webservers -m command -a "ls -l /tmp creates=/tmp/test2"
192.168.1.65 | success | rc=0 >>
total 68
-rw-r--r--. 1 root root 61530 Jul 13 15:59 5kcrm.sql
srwx------. 1 mongod mongod 0 Jul 22 06:28 mongodb-27017.sock
-rw-r--r--. 1 root root 0 Jul 22 11:59 test
drwx------. 2 root root4096 Jul 21 22:49 vmware-root
上边的命令,如果/tmp/test 存在的话,则不执行ls -l /tmp 命令。/tmp/test2 不存在,执行了ls -l /tmp 命令。示例中的test和test2可以是目录也可
以是文件。
removes 后边可以直接指定一个文件名(或目录名),或者是以正则模式匹配一系列文件名。如果所指定的文件不存在的话,则不运行命令。
[root@web1 ~]# ansible webservers -m command -a "ls -l /tmp removes=/tmp/testdir2"
192.168.1.65 | success | rc=0 >>
skipped, since /tmp/testdir2 does not exist
[root@web1 ~]# ansible webservers -m command -a "ls -l /tmp removes=/tmp/testdir"
192.168.1.65 | success | rc=0 >>
total 72
-rw-r--r--. 1 root root 61530 Jul 13 15:59 5kcrm.sql
srwx------. 1 mongod mongod 0 Jul 22 06:28 mongodb-27017.sock
-rw-r--r--. 1 root root 0 Jul 22 11:59 test
drwxr-xr-x. 2 root root4096 Jul 22 12:03 testdir
�
drwx------. 2 root root4096 Jul 21 22:49 vmware-root
/tmp/testdir2不存在则不执行指定的命令。/tmp/testdir存在则运行命令。
warn 这个是在1.8版本中新增的选项。如果再ansible.cfg配置文件中开启了警告信息,可以只用此选项对当前命令关闭警告,默认为True。
Playbooks示例:
# Example from Ansible Playbooks.
- command: /sbin/shutdown -t now
# Run the command if the specified file does not exist.
- command: /usr/bin/make_database.sh arg1 arg2 creates=/path/to/database
# You can also use the 'args' form to provide the options. This command
# will change the working directory to somedir/ and will only run when
# /path/to/database doesn't exist.
- command: /usr/bin/make_database.sh arg1 arg2
args:
chdir: somedir/
creates: /path/to/database
[root@web1 ~]# cat /etc/ansible/playbook.yml
---
- hosts: webservers
remote_user: root
tasks:
- name: ls -l /tmp
command: /bin/ls -l /tmp removes=/tmp/testdir
[root@web1 ~]# ansible-playbook /etc/ansible/playbook.yml
PLAY [webservers] *************************************************************
GATHERING FACTS ***************************************************************
ok: [192.168.1.65]
TASK: [ls -l /tmp] ************************************************************
changed: [192.168.1.65]
PLAY RECAP ********************************************************************
192.168.1.65 : ok=2changed=1unreachable=0failed=0
script 在远程机上运行本地脚本
script 模块的-a选项直接跟一个本地脚本的绝对路径,脚本的参数以空格隔开。该模块首先将指定的脚本传到远程节点上,然后在远程节点的shell环
境下执行该脚本。
[root@web1 ~]# cat /root/test.sh
#!/bin/bash
echo $1
[root@web1 ~]# ansible webservers -m script -a "/root/test.sh 12"
192.168.1.65 | success >> {
"changed": true,
"rc": 0,
"stderr": "",
"stdout": "12\n"
}
creates和removes参数与command模块的参数类似:
[root@web1 ~]# ansible webservers -m script -a "/root/test.sh 12 creates=/tmp/test"
192.168.1.65 | success >> {
"changed": false,
"msg": "skipped, since /tmp/test exists"
�
}
[root@web1 ~]# ansible webservers -m script -a "/root/test.sh 12 creates=/tmp/test2"
192.168.1.65 | success >> {
"changed": true,
"rc": 0,
"stderr": "",
"stdout": "12\n"
}
[root@web1 ~]# ansible webservers -m script -a "/root/test.sh 12 removes=/tmp/test2"
192.168.1.65 | success >> {
"changed": false,
"msg": "skipped, since /tmp/test2 does not exist"
}
[root@web1 ~]# ansible webservers -m script -a "/root/test.sh 12 removes=/tmp/test"
192.168.1.65 | success >> {
"changed": true,
"rc": 0,
"stderr": "",
"stdout": "12\n"
}
Playbooks示例:-v参数显示详细信息
[root@web1 ~]# cat /etc/ansible/playbook.yml
---
- hosts: webservers
remote_user: root
tasks:
# - name: ls -l /tmp
# command: /bin/ls -l /tmp removes=/tmp/testdir
- name: test script module
script: /root/test.sh test
[root@web1 ~]# ansible-playbook /etc/ansible/playbook.yml -v
PLAY [webservers] *************************************************************
GATHERING FACTS ***************************************************************
ok: [192.168.1.65]
TASK: [test script module] ****************************************************
changed: [192.168.1.65] => {"changed": true, "rc": 0, "stderr": "", "stdout": "test\n"}
PLAY RECAP ********************************************************************
192.168.1.65 : ok=2changed=1unreachable=0failed=0
通常情况都是将某个功能开发成一个Ansible的模块来使用,而并不是像上边那样在远程节点上运行本地的脚本。
shell 在远程节点执行命令
shell 模块的参数为命令名称,命令本身的参数以空格隔开。像command 模块那样在远程节点执行命令,但shell 模块再远程节点是通过shell环境
(/bin/bash)执行命令的,该模块也可以执行一个shell脚本,但该脚本必须在远程节点上存在。
chdir 、creates 、removes 参数与command 模块的参数一样。
[root@web1 ~]# ansible webservers -m shell -a "echo $HOME"
192.168.1.65 | success | rc=0 >>
/root
[root@web1 ~]# ansible webservers -m shell -a "echo $HOME removes=/tmp/test"
192.168.1.65 | success | rc=0 >>
/root
�
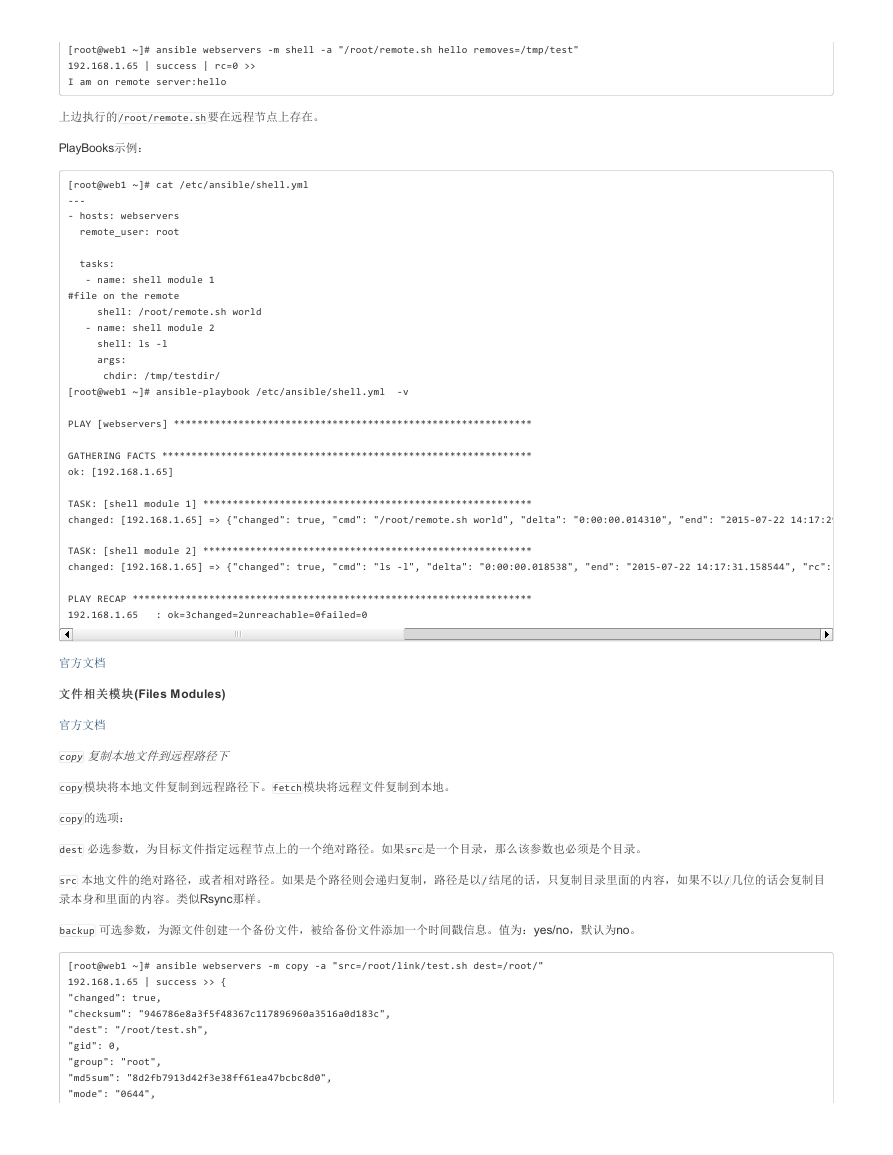
[root@web1 ~]# ansible webservers -m shell -a "/root/remote.sh hello removes=/tmp/test"
192.168.1.65 | success | rc=0 >>
I am on remote server:hello
上边执行的/root/remote.sh 要在远程节点上存在。
PlayBooks示例:
[root@web1 ~]# cat /etc/ansible/shell.yml
---
- hosts: webservers
remote_user: root
tasks:
- name: shell module 1
#file on the remote
shell: /root/remote.sh world
- name: shell module 2
shell: ls -l
args:
chdir: /tmp/testdir/
[root@web1 ~]# ansible-playbook /etc/ansible/shell.yml -v
PLAY [webservers] *************************************************************
GATHERING FACTS ***************************************************************
ok: [192.168.1.65]
TASK: [shell module 1] ********************************************************
changed: [192.168.1.65] => {"changed": true, "cmd": "/root/remote.sh world", "delta": "0:00:00.014310", "end": "2015-07-22 14:17:29.724289", "rc": 0, "start": "2015-07-22 14:17:29.709979", "stderr": "", "stdout": "I am on remote server:world", "warnings": []}
TASK: [shell module 2] ********************************************************
changed: [192.168.1.65] => {"changed": true, "cmd": "ls -l", "delta": "0:00:00.018538", "end": "2015-07-22 14:17:31.158544", "rc": 0, "start": "2015-07-22 14:17:31.140006", "stderr": "", "stdout": "total 0\n-rw-r--r--. 1 root root 0 Jul 22 14:15 testfile", "warnings": []}
PLAY RECAP ********************************************************************
192.168.1.65 : ok=3changed=2unreachable=0failed=0
官方文档
文件相关模块(Files Modules)
文件相关模块
官方文档
copy 复制本地文件到远程路径下
copy 模块将本地文件复制到远程路径下。fetch 模块将远程文件复制到本地。
copy 的选项:
dest 必选参数,为目标文件指定远程节点上的一个绝对路径。如果src 是一个目录,那么该参数也必须是个目录。
src 本地文件的绝对路径,或者相对路径。如果是个路径则会递归复制,路径是以/ 结尾的话,只复制目录里面的内容,如果不以/ 几位的话会复制目
录本身和里面的内容。类似Rsync那样。
backup 可选参数,为源文件创建一个备份文件,被给备份文件添加一个时间戳信息。值为:yes/no,默认为no。
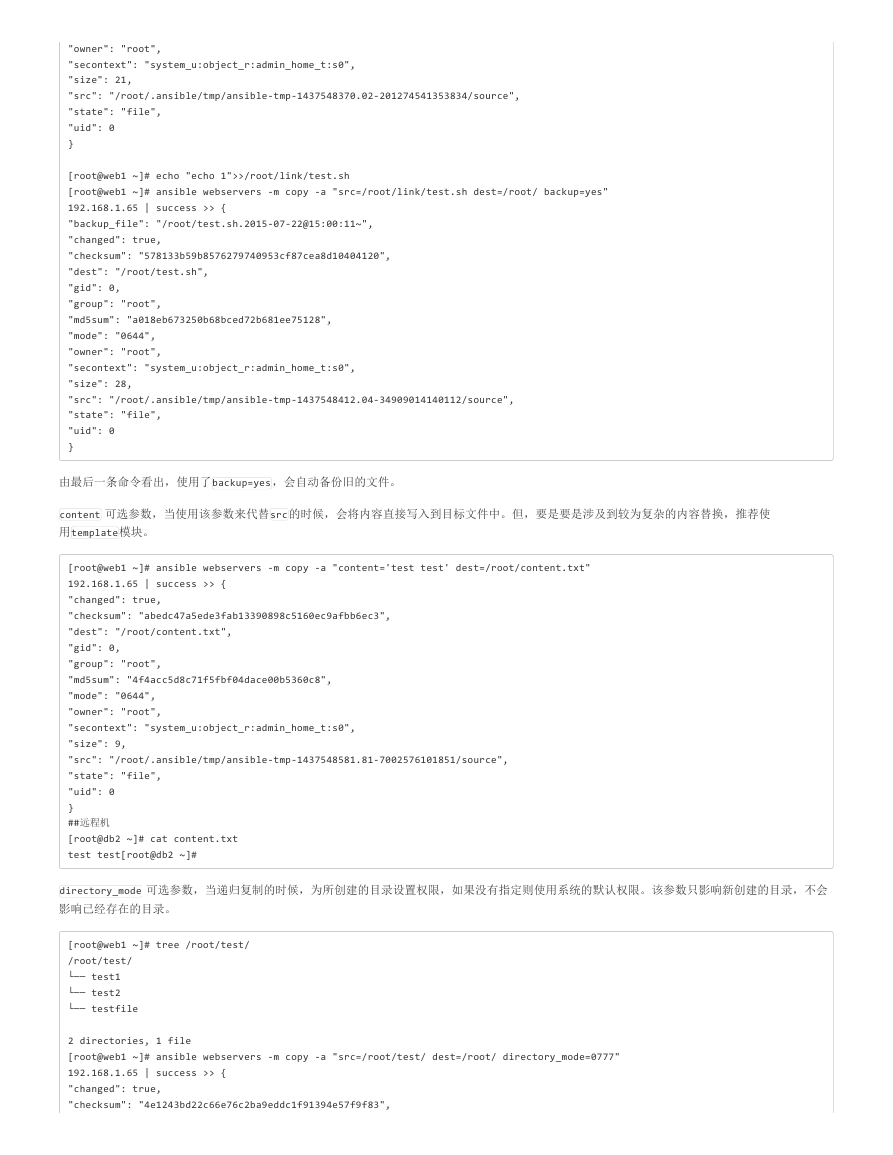
[root@web1 ~]# ansible webservers -m copy -a "src=/root/link/test.sh dest=/root/"
192.168.1.65 | success >> {
"changed": true,
"checksum": "946786e8a3f5f48367c117896960a3516a0d183c",
"dest": "/root/test.sh",
"gid": 0,
"group": "root",
"md5sum": "8d2fb7913d42f3e38ff61ea47bcbc8d0",
"mode": "0644",
�
"owner": "root",
"secontext": "system_u:object_r:admin_home_t:s0",
"size": 21,
"src": "/root/.ansible/tmp/ansible-tmp-1437548370.02-201274541353834/source",
"state": "file",
"uid": 0
}
[root@web1 ~]# echo "echo 1">>/root/link/test.sh
[root@web1 ~]# ansible webservers -m copy -a "src=/root/link/test.sh dest=/root/ backup=yes"
192.168.1.65 | success >> {
"backup_file": "/root/test.sh.2015-07-22@15:00:11~",
"changed": true,
"checksum": "578133b59b8576279740953cf87cea8d10404120",
"dest": "/root/test.sh",
"gid": 0,
"group": "root",
"md5sum": "a018eb673250b68bced72b681ee75128",
"mode": "0644",
"owner": "root",
"secontext": "system_u:object_r:admin_home_t:s0",
"size": 28,
"src": "/root/.ansible/tmp/ansible-tmp-1437548412.04-34909014140112/source",
"state": "file",
"uid": 0
}
由最后一条命令看出,使用了backup=yes ,会自动备份旧的文件。
content 可选参数,当使用该参数来代替src 的时候,会将内容直接写入到目标文件中。但,要是要是涉及到较为复杂的内容替换,推荐使
用template 模块。
[root@web1 ~]# ansible webservers -m copy -a "content='test test' dest=/root/content.txt"
192.168.1.65 | success >> {
"changed": true,
"checksum": "abedc47a5ede3fab13390898c5160ec9afbb6ec3",
"dest": "/root/content.txt",
"gid": 0,
"group": "root",
"md5sum": "4f4acc5d8c71f5fbf04dace00b5360c8",
"mode": "0644",
"owner": "root",
"secontext": "system_u:object_r:admin_home_t:s0",
"size": 9,
"src": "/root/.ansible/tmp/ansible-tmp-1437548581.81-7002576101851/source",
"state": "file",
"uid": 0
}
##远程机
[root@db2 ~]# cat content.txt
test test[root@db2 ~]#
directory_mode 可选参数,当递归复制的时候,为所创建的目录设置权限,如果没有指定则使用系统的默认权限。该参数只影响新创建的目录,不会
影响已经存在的目录。
[root@web1 ~]# tree /root/test/
/root/test/
└── test1
└── test2
└── testfile
2 directories, 1 file
[root@web1 ~]# ansible webservers -m copy -a "src=/root/test/ dest=/root/ directory_mode=0777"
192.168.1.65 | success >> {
"changed": true,
"checksum": "4e1243bd22c66e76c2ba9eddc1f91394e57f9f83",
�
"dest": "/root/test1/test2/testfile",
"gid": 0,
"group": "root",
"md5sum": "d8e8fca2dc0f896fd7cb4cb0031ba249",
"mode": "0644",
"owner": "root",
"secontext": "system_u:object_r:admin_home_t:s0",
"size": 5,
"src": "/root/.ansible/tmp/ansible-tmp-1437548879.2-36869348375941/source",
"state": "file",
"uid": 0
}
#远程机
[root@db2 ~]# ll /root/test1/
total 4
drwxrwxrwx. 2 root root 4096 Jul 22 15:07 test2
force,该参数默认值为yes,当远程文件与本地文件内容不一致的时候会替换远程文件。只有当远程目标文件不存在的时候才会传输文件。
group 文件或目录的所属组.
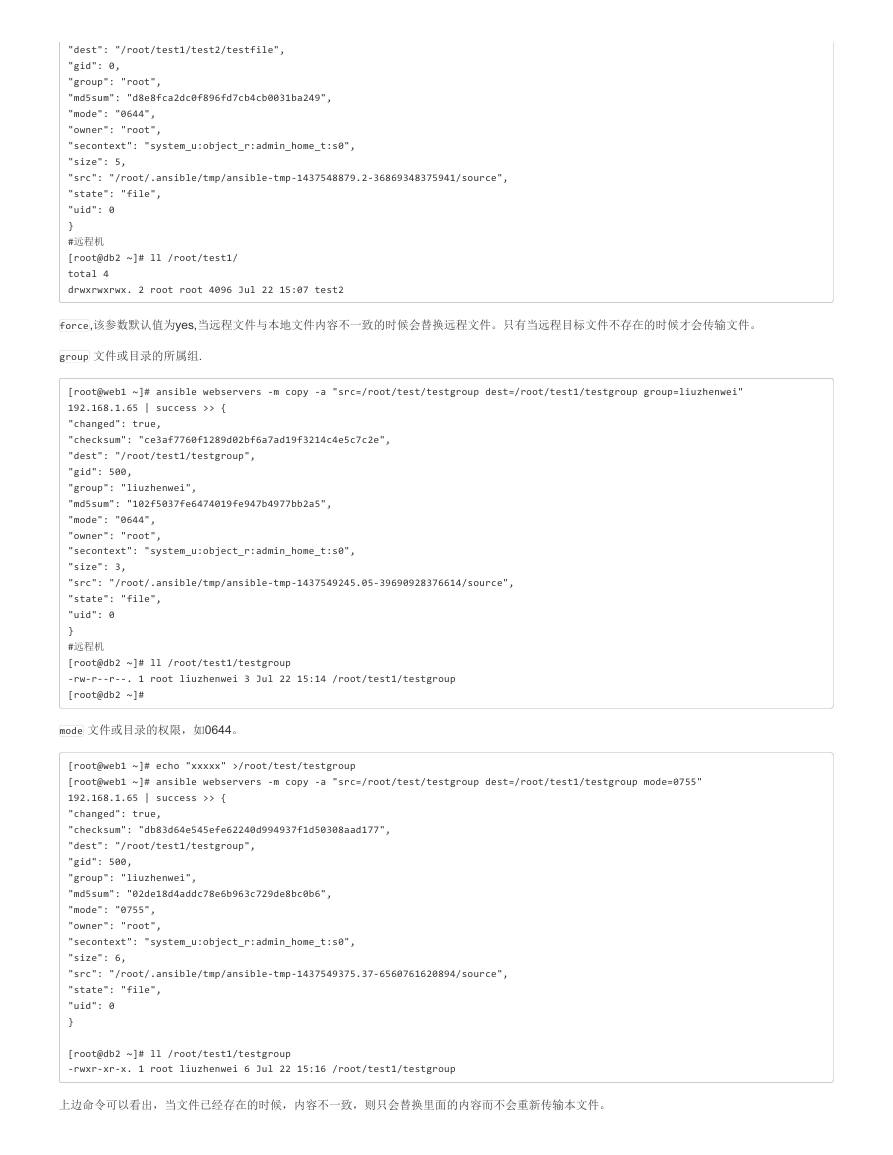
[root@web1 ~]# ansible webservers -m copy -a "src=/root/test/testgroup dest=/root/test1/testgroup group=liuzhenwei"
192.168.1.65 | success >> {
"changed": true,
"checksum": "ce3af7760f1289d02bf6a7ad19f3214c4e5c7c2e",
"dest": "/root/test1/testgroup",
"gid": 500,
"group": "liuzhenwei",
"md5sum": "102f5037fe6474019fe947b4977bb2a5",
"mode": "0644",
"owner": "root",
"secontext": "system_u:object_r:admin_home_t:s0",
"size": 3,
"src": "/root/.ansible/tmp/ansible-tmp-1437549245.05-39690928376614/source",
"state": "file",
"uid": 0
}
#远程机
[root@db2 ~]# ll /root/test1/testgroup
-rw-r--r--. 1 root liuzhenwei 3 Jul 22 15:14 /root/test1/testgroup
[root@db2 ~]#
mode 文件或目录的权限,如0644。
[root@web1 ~]# echo "xxxxx" >/root/test/testgroup
[root@web1 ~]# ansible webservers -m copy -a "src=/root/test/testgroup dest=/root/test1/testgroup mode=0755"
192.168.1.65 | success >> {
"changed": true,
"checksum": "db83d64e545efe62240d994937f1d50308aad177",
"dest": "/root/test1/testgroup",
"gid": 500,
"group": "liuzhenwei",
"md5sum": "02de18d4addc78e6b963c729de8bc0b6",
"mode": "0755",
"owner": "root",
"secontext": "system_u:object_r:admin_home_t:s0",
"size": 6,
"src": "/root/.ansible/tmp/ansible-tmp-1437549375.37-6560761620894/source",
"state": "file",
"uid": 0
}
[root@db2 ~]# ll /root/test1/testgroup
-rwxr-xr-x. 1 root liuzhenwei 6 Jul 22 15:16 /root/test1/testgroup
上边命令可以看出,当文件已经存在的时候,内容不一致,则只会替换里面的内容而不会重新传输本文件。
�
owner 文件或目录的所有者。
Playbooks示例:
[root@web1 ~]# ansible-playbook /etc/ansible/copy.yml
PLAY [webservers] *************************************************************
GATHERING FACTS ***************************************************************
ok: [192.168.1.65]
TASK: [copy file] *************************************************************
changed: [192.168.1.65]
PLAY RECAP ********************************************************************
192.168.1.65 : ok=2changed=1unreachable=0failed=0
[root@web1 ~]# cat /etc/ansible/copy.yml
---
- hosts: webservers
remote_user: root
tasks:
- name: copy file
copy: src=/tmp/testfile dest=/tmp/testfile mode=0644
#远程节点
[root@db2 ~]# ll /tmp/testfile
-rw-r--r--. 1 root root 9 Jul 22 15:22 /tmp/testfile
返回值
src 要复制到远程节点的源文件路径
backup_file 远程节点上的备份文件路径,backup=yes的时候才有
uid 文件的所有者ID
dest 目标文件在远程节点上的绝对路径,/root/file.txt
checksum 校验值
md5sum md5校验值
state 状态,如 file
gid 文件的所属组ID
mode 文件的权限
owner 文件所有者
group 文件所属组
size 文件大小
本模块的官方文档
注:当复制大量的文件的时候,copy 模块并是最好的选择,这个时候可以使用synchronize 模块
synchronize 使用rsync来同步文件
该模块事实上是封装了rsync。在实际使用中用户也可以直接使用rsync来传输文件,但是这样的话 就需要指定大量的参数和节点facts。也可以使
用command 和shell 模块来执行rsync命令。synchronize 模块使得调用rsync 更加方便快捷,该模块并不支持rsync的所有功能。
选项:
�


 2023年江西萍乡中考道德与法治真题及答案.doc
 2012年重庆南川中考生物真题及答案.doc
 2013年江西师范大学地理学综合及文艺理论基础考研真题.doc
 2020年四川甘孜小升初语文真题及答案I卷.doc
 2020年注册岩土工程师专业基础考试真题及答案.doc
 2023-2024学年福建省厦门市九年级上学期数学月考试题及答案.doc
 2021-2022学年辽宁省沈阳市大东区九年级上学期语文期末试题及答案.doc
 2022-2023学年北京东城区初三第一学期物理期末试卷及答案.doc
 2018上半年江西教师资格初中地理学科知识与教学能力真题及答案.doc
 2012年河北国家公务员申论考试真题及答案-省级.doc
 2020-2021学年江苏省扬州市江都区邵樊片九年级上学期数学第一次质量检测试题及答案.doc
 2022下半年黑龙江教师资格证中学综合素质真题及答案.doc