Thank you for purchasing this Minolta product. Your new digital camera has
extraordinary features that expand your image capturing horizons.
• Megapixel (1.5 million pixels), progressive scan Sony Wfine CCD™ with primary
color filter.
• High quality 2 inch color LCD monitor with Live View display.
• Digita™ Operating Environment from FlashPoint Technology.
• Uses removable CompactFlash™ cards for storage, so there’s no limit on how
many shots you can take.
• Detatchable, compact lens unit. The Zoom 1500 lens unit features a focal length
of 7 - 21mm (approximate equivalent to 38 - 115mm in 35mm format) with Macro
capability. The Wide 1500 is a 5.2mm f/1.9 lens until (approximate equivalent to
28mm in 35mm format).
• Fast capture speed, capable of 3.5 frames per second in Burst mode.
• IrDA version 1.0 wireless communication with your IrDA-capable personal
computer (running Windows 95® or Windows 98®).
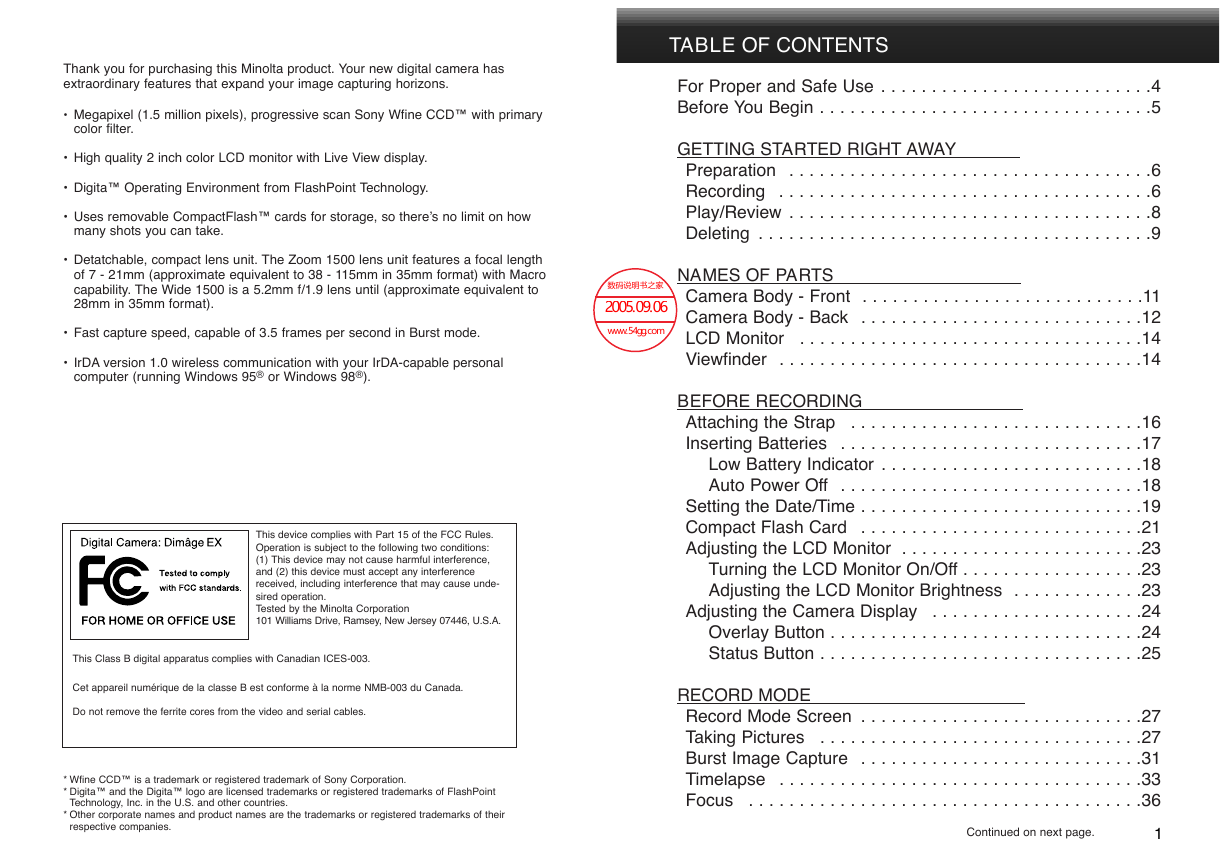
This device complies with Part 15 of the FCC Rules.
Operation is subject to the following two conditions:
(1) This device may not cause harmful interference,
and (2) this device must accept any interference
received, including interference that may cause unde-
sired operation.
Tested by the Minolta Corporation
101 Williams Drive, Ramsey, New Jersey 07446, U.S.A.
This Class B digital apparatus complies with Canadian ICES-003.
Cet appareil numérique de la classe B est conforme à la norme NMB-003 du Canada.
Do not remove the ferrite cores from the video and serial cables.
* Wfine CCD™ is a trademark or registered trademark of Sony Corporation.
* Digita™ and the Digita™ logo are licensed trademarks or registered trademarks of FlashPoint
Technology, Inc. in the U.S. and other countries.
* Other corporate names and product names are the trademarks or registered trademarks of their
respective companies.
TABLE OF CONTENTS
For Proper and Safe Use . . . . . . . . . . . . . . . . . . . . . . . . . . .4
Before You Begin . . . . . . . . . . . . . . . . . . . . . . . . . . . . . . . . .5
GETTING STARTED RIGHT AWAY
Preparation . . . . . . . . . . . . . . . . . . . . . . . . . . . . . . . . . . . .6
Recording . . . . . . . . . . . . . . . . . . . . . . . . . . . . . . . . . . . . .6
Play/Review . . . . . . . . . . . . . . . . . . . . . . . . . . . . . . . . . . . .8
Deleting . . . . . . . . . . . . . . . . . . . . . . . . . . . . . . . . . . . . . . .9
NAMES OF PARTS
Camera Body - Front . . . . . . . . . . . . . . . . . . . . . . . . . . . .11
Camera Body - Back . . . . . . . . . . . . . . . . . . . . . . . . . . . .12
LCD Monitor . . . . . . . . . . . . . . . . . . . . . . . . . . . . . . . . . .14
Viewfinder . . . . . . . . . . . . . . . . . . . . . . . . . . . . . . . . . . . .14
BEFORE RECORDING
Attaching the Strap . . . . . . . . . . . . . . . . . . . . . . . . . . . . .16
Inserting Batteries . . . . . . . . . . . . . . . . . . . . . . . . . . . . . .17
Low Battery Indicator . . . . . . . . . . . . . . . . . . . . . . . . . .18
Auto Power Off . . . . . . . . . . . . . . . . . . . . . . . . . . . . . .18
Setting the Date/Time . . . . . . . . . . . . . . . . . . . . . . . . . . . .19
Compact Flash Card . . . . . . . . . . . . . . . . . . . . . . . . . . . .21
Adjusting the LCD Monitor . . . . . . . . . . . . . . . . . . . . . . . .23
Turning the LCD Monitor On/Off . . . . . . . . . . . . . . . . . .23
Adjusting the LCD Monitor Brightness . . . . . . . . . . . . .23
Adjusting the Camera Display . . . . . . . . . . . . . . . . . . . . .24
Overlay Button . . . . . . . . . . . . . . . . . . . . . . . . . . . . . . .24
Status Button . . . . . . . . . . . . . . . . . . . . . . . . . . . . . . . .25
RECORD MODE
Record Mode Screen . . . . . . . . . . . . . . . . . . . . . . . . . . . .27
Taking Pictures . . . . . . . . . . . . . . . . . . . . . . . . . . . . . . . .27
Burst Image Capture . . . . . . . . . . . . . . . . . . . . . . . . . . . .31
Timelapse . . . . . . . . . . . . . . . . . . . . . . . . . . . . . . . . . . . .33
Focus . . . . . . . . . . . . . . . . . . . . . . . . . . . . . . . . . . . . . . .36
Continued on next page.
1
�
TABLE OF CONTENTS
RECORD MODE - CONTINUED
Focus Lamp/No Focus Indicator . . . . . . . . . . . . . . . . .36
Focus Range . . . . . . . . . . . . . . . . . . . . . . . . . . . . . . . .36
Special Focus Situations . . . . . . . . . . . . . . . . . . . . . . .37
Focus Hold . . . . . . . . . . . . . . . . . . . . . . . . . . . . . . . . .37
Built-in Flash . . . . . . . . . . . . . . . . . . . . . . . . . . . . . . . . . .38
Changing the Flash Mode . . . . . . . . . . . . . . . . . . . . . .38
Flash Range . . . . . . . . . . . . . . . . . . . . . . . . . . . . . . . .39
Digital Scene Selector . . . . . . . . . . . . . . . . . . . . . . . . . . .40
Macro (Zoom 1500 Lens Only) . . . . . . . . . . . . . . . . . . . . .42
Exposure Compensation . . . . . . . . . . . . . . . . . . . . . . . . .43
RECORD MODE MENUS
Record Mode Menus . . . . . . . . . . . . . . . . . . . . . . . . . . . .45
Selecting the Image Size . . . . . . . . . . . . . . . . . . . . . . . . .46
Selecting Image Quality . . . . . . . . . . . . . . . . . . . . . . . . . .47
Selecting Color or B&W . . . . . . . . . . . . . . . . . . . . . . . . . .49
Self Timer . . . . . . . . . . . . . . . . . . . . . . . . . . . . . . . . . . . .50
Selecting the Burst Capture Rate . . . . . . . . . . . . . . . . . . .52
Timelapse Interval and Total Images . . . . . . . . . . . . . . . . .53
White Balance . . . . . . . . . . . . . . . . . . . . . . . . . . . . . . . . .55
Bracket . . . . . . . . . . . . . . . . . . . . . . . . . . . . . . . . . . . . . .56
Instant Review . . . . . . . . . . . . . . . . . . . . . . . . . . . . . . . . .58
System Sounds . . . . . . . . . . . . . . . . . . . . . . . . . . . . . . . .59
Counter Reset . . . . . . . . . . . . . . . . . . . . . . . . . . . . . . . . .60
Camera Name . . . . . . . . . . . . . . . . . . . . . . . . . . . . . . . . .61
Formatting Compact Flash Cards . . . . . . . . . . . . . . . . . . .62
PLAY MODE
Play Mode Screen . . . . . . . . . . . . . . . . . . . . . . . . . . . . . .64
Playback . . . . . . . . . . . . . . . . . . . . . . . . . . . . . . . . . . . . .64
Zoom In - Zoom Out . . . . . . . . . . . . . . . . . . . . . . . . . . . . .66
Expand/Collapse - Open/Close . . . . . . . . . . . . . . . . . . . . .67
Play Button . . . . . . . . . . . . . . . . . . . . . . . . . . . . . . . . . . .68
2
PLAY MODE MENUS
Slideshow . . . . . . . . . . . . . . . . . . . . . . . . . . . . . . . . . . . .70
Playback Rate . . . . . . . . . . . . . . . . . . . . . . . . . . . . . . . . .72
REVIEW MODE
Review Mode Screen . . . . . . . . . . . . . . . . . . . . . . . . . . . .74
Reviewing/Selecting Images . . . . . . . . . . . . . . . . . . . . . . .75
Marking Images . . . . . . . . . . . . . . . . . . . . . . . . . . . . . . . .76
Category . . . . . . . . . . . . . . . . . . . . . . . . . . . . . . . . . . . . .78
Expand/Collapse - Open/Close . . . . . . . . . . . . . . . . . . . . .80
REVIEW MODE MENUS
Review Mode Menus . . . . . . . . . . . . . . . . . . . . . . . . . . . .83
Deleting Images . . . . . . . . . . . . . . . . . . . . . . . . . . . . . . . .84
Group . . . . . . . . . . . . . . . . . . . . . . . . . . . . . . . . . . . . . . .86
Creating a New Group . . . . . . . . . . . . . . . . . . . . . . . . .86
Adding to a Group . . . . . . . . . . . . . . . . . . . . . . . . . . . .88
Dissolving a Group . . . . . . . . . . . . . . . . . . . . . . . . . . .89
Protecting Images . . . . . . . . . . . . . . . . . . . . . . . . . . . . . .90
Camera to Camera Transfer . . . . . . . . . . . . . . . . . . . . . . .91
Find By Date . . . . . . . . . . . . . . . . . . . . . . . . . . . . . . . . . .94
Find By Category . . . . . . . . . . . . . . . . . . . . . . . . . . . . . . .96
Language . . . . . . . . . . . . . . . . . . . . . . . . . . . . . . . . . . . . .97
Video Mode . . . . . . . . . . . . . . . . . . . . . . . . . . . . . . . . . . .98
APPENDIX
Accessories . . . . . . . . . . . . . . . . . . . . . . . . . . . . . . . . . .101
Custom Scripts . . . . . . . . . . . . . . . . . . . . . . . . . . . . .102
Applications . . . . . . . . . . . . . . . . . . . . . . . . . . . . . . . .103
File Size . . . . . . . . . . . . . . . . . . . . . . . . . . . . . . . . . . . . .104
Card Capacity . . . . . . . . . . . . . . . . . . . . . . . . . . . . . . . .105
Troubleshooting . . . . . . . . . . . . . . . . . . . . . . . . . . . . . . .106
Care and Storage . . . . . . . . . . . . . . . . . . . . . . . . . . . . . .109
Technical Details . . . . . . . . . . . . . . . . . . . . . . . . . . . . . .112
User Technical Support . . . . . . . . . . . . . . . . . . . . . . . . .121
3
�
FOR PROPER AND SAFE USE
BEFORE YOU BEGIN
Read and understand all warnings and cautions before using this product.
WARNING
Batteries may become hot or explode due to improper use.
• Use only the batteries specified in this instruction manual.
• Do not install the batteries with the polarity (+/–) reversed.
• Do not subject batteries to fire or high temperatures.
• Do not attempt to recharge, short, or disassemble.
• Do not mix batteries of different types, brands, or ages.
Use caution, accidents may occur when using this product
near young children.
Keep batteries or things that could be swallowed away from
young children. Contact a doctor immediately if an object is
swallowed.
Immediately remove the batteries and discontinue use if...
• the camera is dropped or subjected to an impact in which the
interior is exposed.
• the product emits a strange smell, heat, or smoke.
Do not walk while looking at the monitor.
Do not disassemble. Electric shock may occur if a high
voltage circuit inside the camera is touched.
Take your camera to a Minolta Service Facility when repairs
are required.
The heat of the camera rises with extended periods of use.
Use caution when handling the camera or removing the
batteries and compact flash card.
Check the packing list before you begin. If some parts are missing,
contact your camera dealer or a Minolta Service Facility listed on the
back cover of this manual.
Dimâge EX Camera body
Zoom 1500 lens unit or Wide 1500 lens unit
Camera Case CC-EX1
Hand Strap HS-V1
Video Cable VC-EX1
Compact Flash Card
AA Alkaline Batteries (4)
PC Serial Adapter SC-EX1
Macintosh Adapter MA-EX1
Dimâge EX CD-ROM
Instruction Manuals (Camera and Software)
Warranty and Product & Software Registration Card
Data saved in flash memory may be irrecoverably lost or damaged for
unexpected reasons (static electricity, electric noise, a camera error, or other
malfunctions). Back-up the data recorded in the camera. Minolta is not
responsible if data stored in the camera is irretrievably lost or damaged.
4
5
�
GETTING STARTED RIGHT AWAY
PREPARATION - See pages 17 and 21 for detailed information.
Insert the batteries.
Insert the compact flash card.
RECORDING - See pages 27 – 30 for detailed information.
Press the main switch to turn the
camera on.
Set the camera to Record mode.
• Slide the Mode switch to REC.
Press the Display button to turn
on the LCD monitor.
Frame the image in either the
LCD monitor or viewfinder.
• Place the viewfinder’s focus frame on the
subject or center the subject in the LCD
monitor.
• Zoom 1500: Press the Left button (W) or
Right button (T) to zoom in on the subject
as desired.
Press the shutter-release button
part-way down.
• The green focus lamp will glow if focus is
confirmed.
• The orange flash lamp will glow if the flash
is charged and ready.
• In low-light situations the AF illuminator
(flash) will fire to aid in focus.
Press the shutter-release button
all the way down to take the
picture.
6
Continued on next page.
7
�
GETTING STARTED RIGHT AWAY - CONT’D
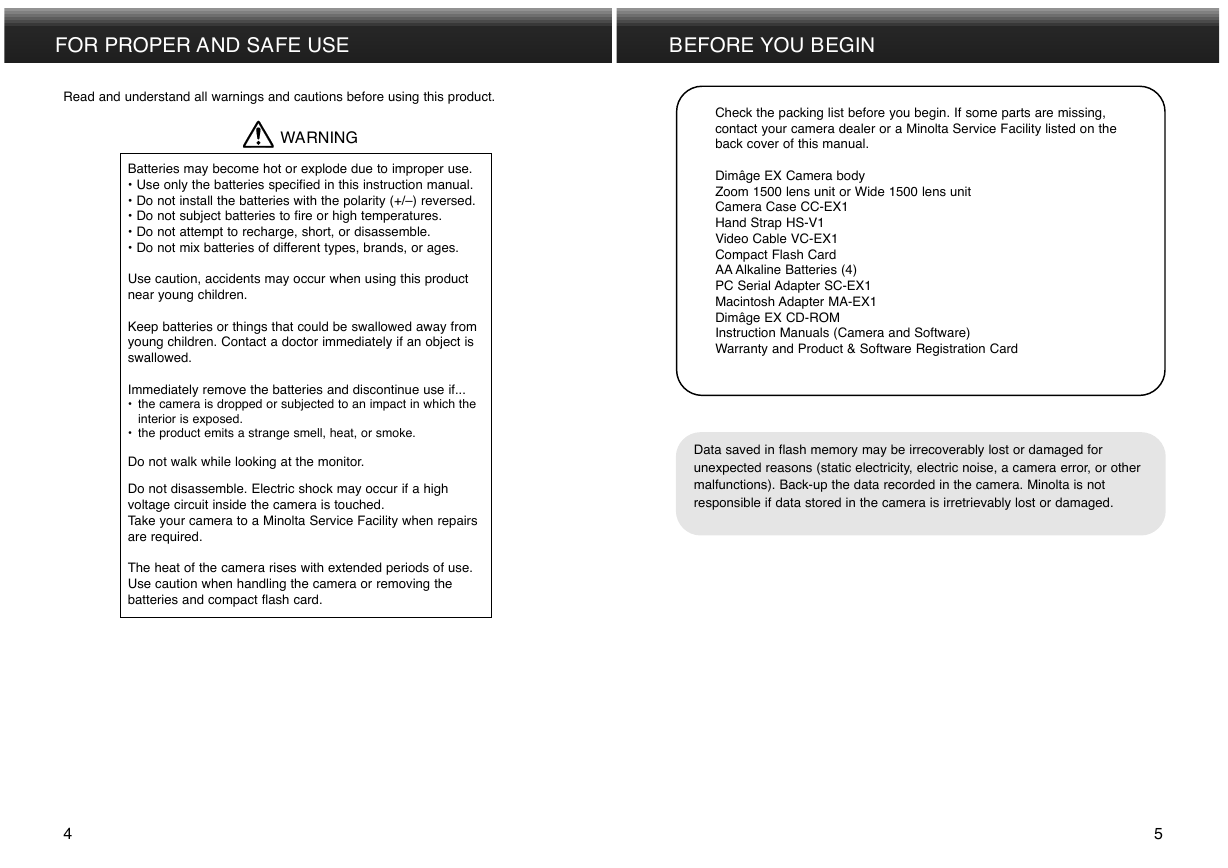
PLAY/REVIEW - See pages 64 and 83 for detailed information.
Turn the camera on.
Press the Left and Right buttons
to scroll through the images.
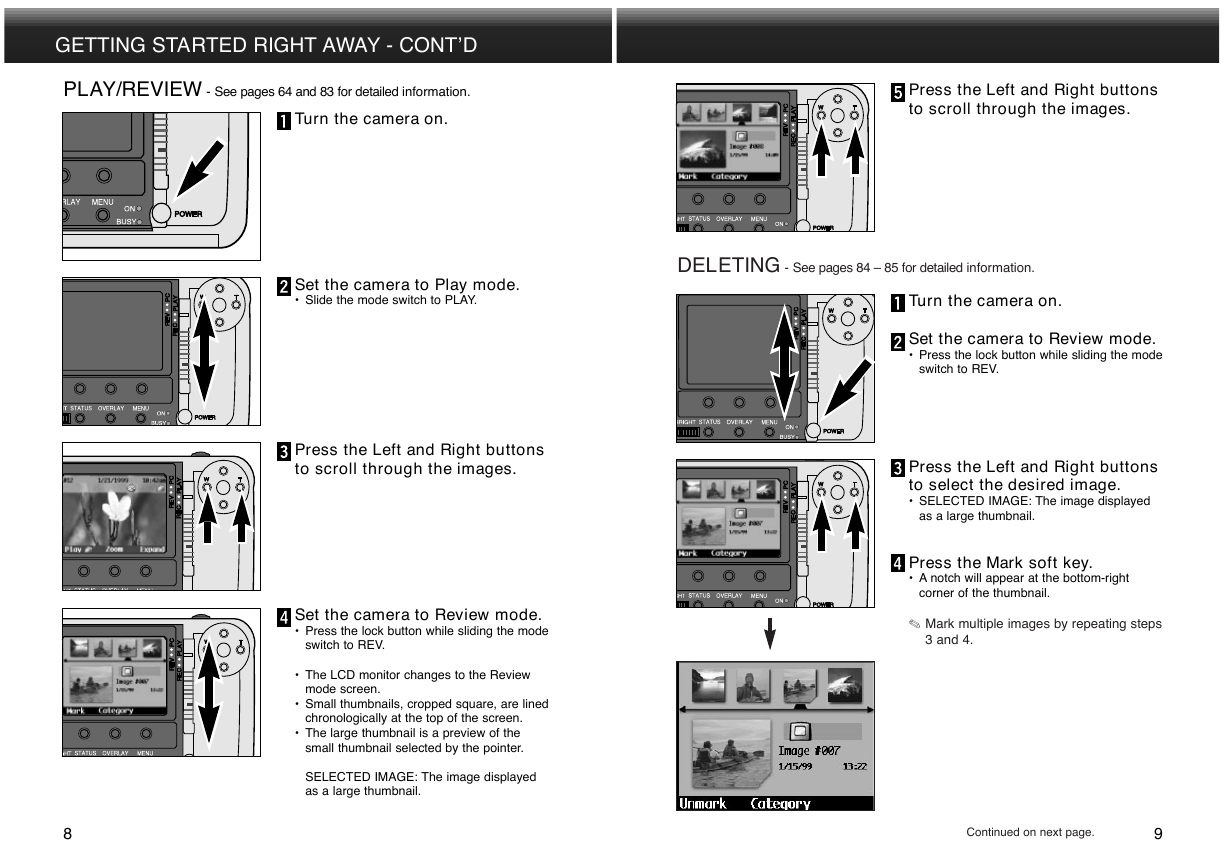
DELETING - See pages 84 – 85 for detailed information.
Turn the camera on.
Set the camera to Review mode.
• Press the lock button while sliding the mode
switch to REV.
Press the Left and Right buttons
to select the desired image.
• SELECTED IMAGE: The image displayed
as a large thumbnail.
Press the Mark soft key.
• A notch will appear at the bottom-right
corner of the thumbnail.
. Mark multiple images by repeating steps
3 and 4.
Set the camera to Play mode.
• Slide the mode switch to PLAY.
Press the Left and Right buttons
to scroll through the images.
Set the camera to Review mode.
• Press the lock button while sliding the mode
switch to REV.
• The LCD monitor changes to the Review
mode screen.
• Small thumbnails, cropped square, are lined
chronologically at the top of the screen.
• The large thumbnail is a preview of the
small thumbnail selected by the pointer.
SELECTED IMAGE: The image displayed
as a large thumbnail.
8
Continued on next page.
9
�
GETTING STARTED RIGHT AWAY - CONT’D
NAMES OF PARTS
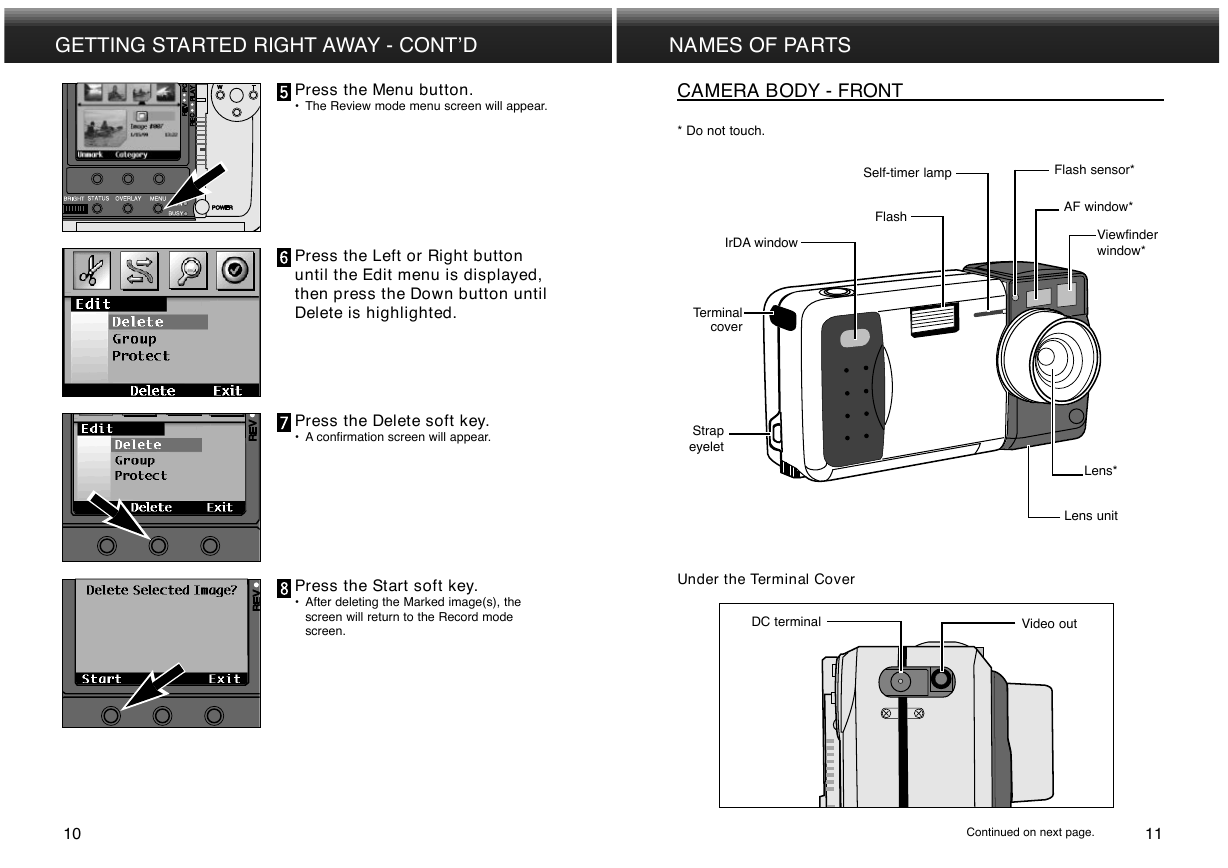
Press the Menu button.
• The Review mode menu screen will appear.
CAMERA BODY - FRONT
* Do not touch.
Press the Left or Right button
until the Edit menu is displayed,
then press the Down button until
Delete is highlighted.
Press the Delete soft key.
• A confirmation screen will appear.
Self-timer lamp
Flash
IrDA window
Flash sensor*
AF window*
Viewfinder
window*
Terminal
cover
Strap
eyelet
Lens*
Lens unit
Press the Start soft key.
• After deleting the Marked image(s), the
screen will return to the Record mode
screen.
Under the Terminal Cover
DC terminal
Video out
10
Continued on next page.
11
�
Focus lamp
(green)
Flash lamp
(orange)
Up button
Right button
Down button
Left button
Main switch
LCD Monitor
Shutter-release
button
Mode
switch
Lock
button
Display button
Macro button
(Zoom 1500 only)
Main switch
NAMES OF PARTS - CONT’D
CAMERA BODY - BACK
Soft keys
4-way controller
Viewfinder
Brightness-
control dial
Status button
Power lamp
Busy lamp
Overlay button
Menu button
SOFT KEYS
The function of the soft keys depend on the current soft key label on the LCD Monitor
(p. 14). In the display above, the function of the right soft key would be to save the
image, the function of the middle soft key would be to delete the image, and the left
soft key would be inactive.
4-WAY CONTROLLER (UP, DOWN, LEFT, AND RIGHT BUTTONS)
In Record mode, the Up and Down buttons control Exposure Compensation, while the
Left and Right buttons (with the Zoom 1500) control the focal length. In other modes
and in the menu function, the 4-way controller helps you navigate through menus and
images.
12
Camera Bottom
Tripod socket
Lens-unit release
Battery-/Card-chamber cover
Continued on next page.
13
�
NAMES OF PARTS - CONT’D
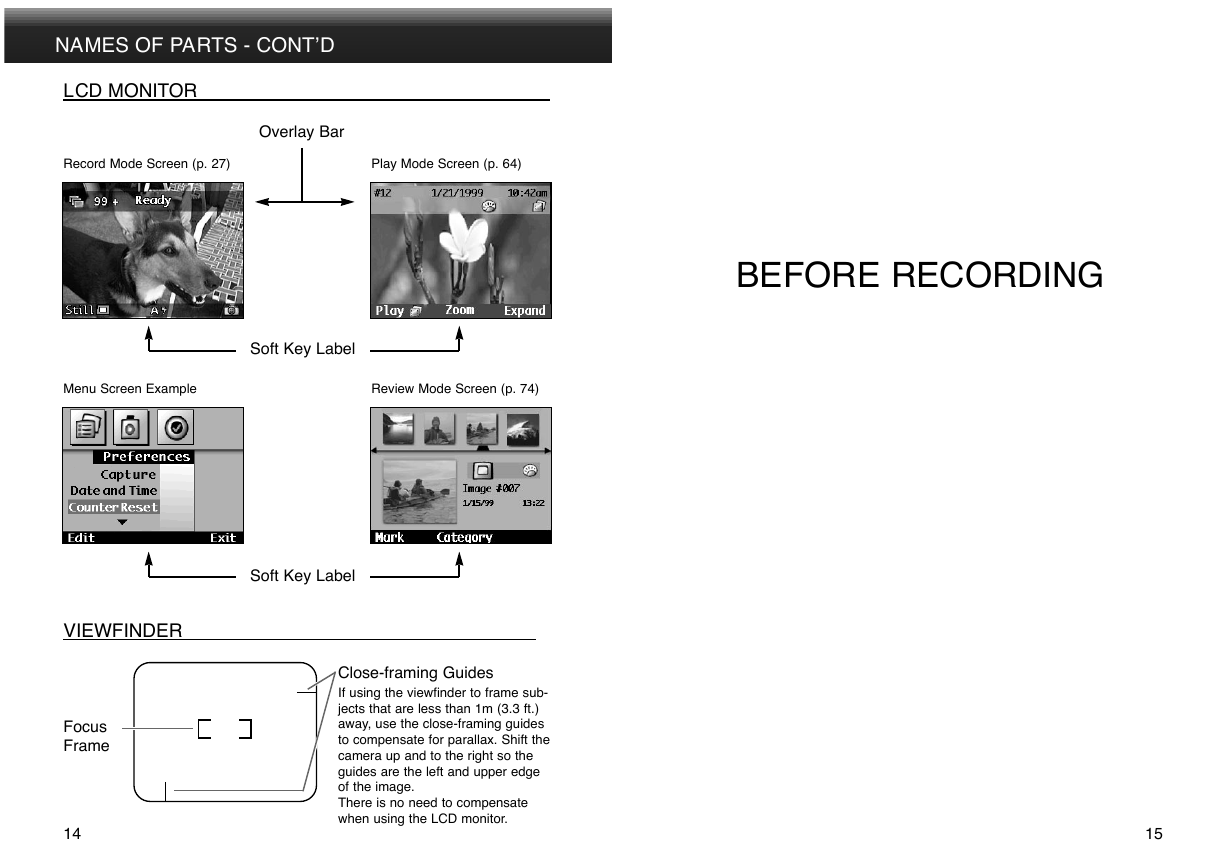
LCD MONITOR
Record Mode Screen (p. 27)
Play Mode Screen (p. 64)
Overlay Bar
Soft Key Label
Menu Screen Example
Review Mode Screen (p. 74)
Soft Key Label
VIEWFINDER
Focus
Frame
14
Close-framing Guides
If using the viewfinder to frame sub-
jects that are less than 1m (3.3 ft.)
away, use the close-framing guides
to compensate for parallax. Shift the
camera up and to the right so the
guides are the left and upper edge
of the image.
There is no need to compensate
when using the LCD monitor.
BEFORE RECORDING
15
�




 2023年江西萍乡中考道德与法治真题及答案.doc
 2012年重庆南川中考生物真题及答案.doc
 2013年江西师范大学地理学综合及文艺理论基础考研真题.doc
 2020年四川甘孜小升初语文真题及答案I卷.doc
 2020年注册岩土工程师专业基础考试真题及答案.doc
 2023-2024学年福建省厦门市九年级上学期数学月考试题及答案.doc
 2021-2022学年辽宁省沈阳市大东区九年级上学期语文期末试题及答案.doc
 2022-2023学年北京东城区初三第一学期物理期末试卷及答案.doc
 2018上半年江西教师资格初中地理学科知识与教学能力真题及答案.doc
 2012年河北国家公务员申论考试真题及答案-省级.doc
 2020-2021学年江苏省扬州市江都区邵樊片九年级上学期数学第一次质量检测试题及答案.doc
 2022下半年黑龙江教师资格证中学综合素质真题及答案.doc