User Manual
Package Contents:
Bean - Carabiner Camera
Li-Ion Rechargeable Battery
USB Cable/Video Cable
AC Adapter
User Guide
ArcSoft PhotoImpression
and Driver Installation CD
�
CONTENTS
I Getting to Know Your Camera .................................................. 3
1. Configuration & Installation .................................................... 3
2. LCD Display ........................................................................... 4
3. Setup ..................................................................................... 7
4: Turning on/off the Camera ..................................................... 8
5. Taking Pictures ...................................................................... 8
6. Video Recording: ................................................................. 10
7. Still Image Review ............................................................... 10
8. Digital Zoom ......................................................................... 13
9. Play Video Files on a Television .......................................... 14
Ⅱ. Setting up Your Camera ......................................................... 16
1. Setup in Capture Mode ........................................................ 16
2. Setup in Video Mode............................................................ 21
3. Setup in Playback Mode: ..................................................... 22
4. Other Setup ......................................................................... 24
Ⅲ. Software & download ............................................................. 31
1. Web-Cam Driver Installation ................................................ 31
2. Using as a Web-Cam ........................................................... 37
1
�
3. Downloading Images ......................................................... 38
Ⅳ. Maintenance .......................................................................... 38
1. Camera ................................................................................ 38
2. Battery ................................................................................. 39
3. Memory Card ....................................................................... 39
4. Caution ................................................................................ 41
Ⅴ. Specifications & System Requirements:................................. 41
1 . Camera Specifications ........................................................ 41
2. System Requirements: ...................................................... 43
2
�
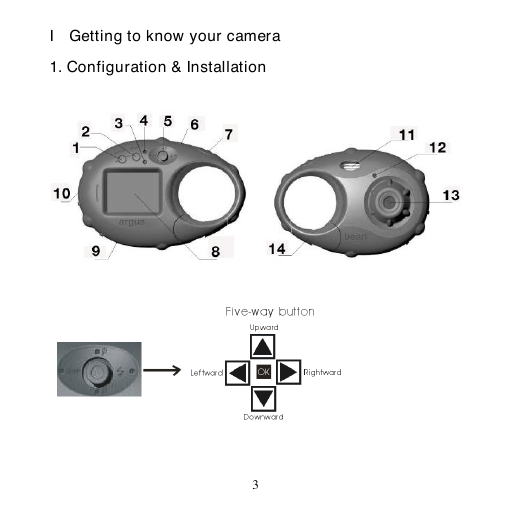
I Getting to know your camera
1. Configuration & Installation
3
�
1. Menu Button
3. Activity Light
5. Joystick
7. Shutter Button
9. SD card Slot
11. Flash
13. Lens
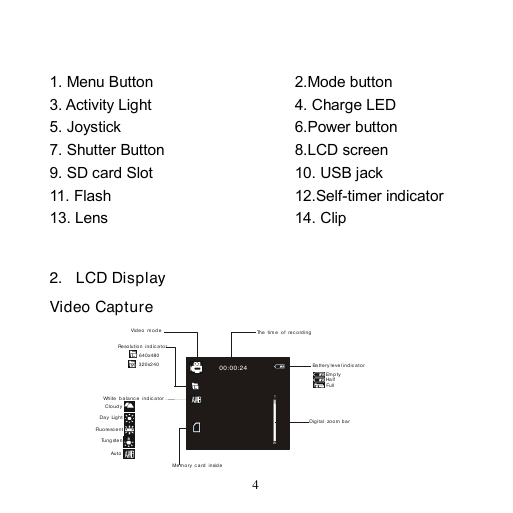
2. LCD Display
Video Capture
2.Mode button
4. Charge LED
6.Power button
8.LCD screen
10. USB jack
12.Self-timer indicator
14. Clip
4
00:00:24TWWhite balance indicatorAutoDay LightTungstenFluorescentCloudyBattery level indicatorEmptyHalfFullDigital zoom barResolution indicator640x480Memory card insideVideo mode320x24000:00:24The time of recording �
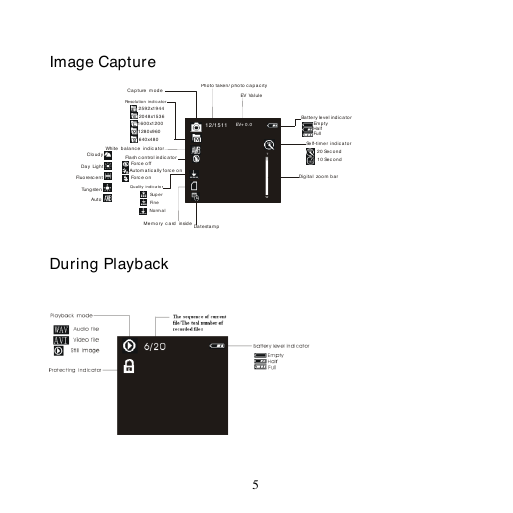
Image Capture
During Playback
5
TW12/1511EV+0.0White balance indicatorQuality indicatorAutoDay LightTungstenFluorescentCloudySuperFineNormalSelf-timer indicator10 Second20 SecondBattery level indicatorEmptyHalfFullDigital zoom barResolution indicator2592x19442048x15361600x12001280x960640x480Memory card insideCapture modeEV ValulePhoto taken/ photo capacityDatestampFlash control indicatorForce on Force offAutomatically force on�
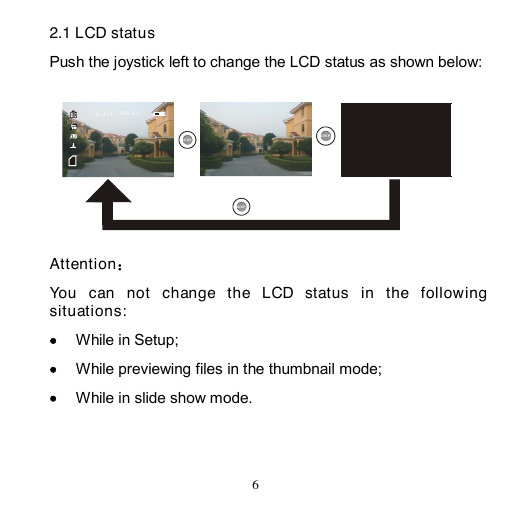
2.1 LCD status
Push the joystick left to change the LCD status as shown below:
Attention:
You can not change the LCD status in the following
situations:
While in Setup;
While previewing files in the thumbnail mode;
While in slide show mode.
6
00:00:2412/1511EV+0.0DISPDISPDISP�
3. Camera Setup
3.1 Battery
This digital camera uses a rechargeable li-ion battery. Before
using this camera please charge the battery for at least 4 hours.
The battery can be charged by connecting the camera to the AC
adapter and connecting to a wall outlet or by connecting the
camera to computer via the USB cable.
Note: When the camera is charging, the Charge LED is Red
and this light turns off when charging is complete. If charging
the camera via USB, turn the camera off before connecting it to
the computer.
3.2 Insert a memory card
Insert the memory card to the card slot carefully with the label
facing the LCD screen.
Attention:
If the SD card does not go completely into the slot, do not
force it; remove and insert again.
To remove the card press the edge of the card gently and
then release it.
7
�




 2023年江西萍乡中考道德与法治真题及答案.doc
 2012年重庆南川中考生物真题及答案.doc
 2013年江西师范大学地理学综合及文艺理论基础考研真题.doc
 2020年四川甘孜小升初语文真题及答案I卷.doc
 2020年注册岩土工程师专业基础考试真题及答案.doc
 2023-2024学年福建省厦门市九年级上学期数学月考试题及答案.doc
 2021-2022学年辽宁省沈阳市大东区九年级上学期语文期末试题及答案.doc
 2022-2023学年北京东城区初三第一学期物理期末试卷及答案.doc
 2018上半年江西教师资格初中地理学科知识与教学能力真题及答案.doc
 2012年河北国家公务员申论考试真题及答案-省级.doc
 2020-2021学年江苏省扬州市江都区邵樊片九年级上学期数学第一次质量检测试题及答案.doc
 2022下半年黑龙江教师资格证中学综合素质真题及答案.doc