4-254-827-11(1)
The player
USB Memory Player
with FM Radio
Operating Instructions
AZ-BS1/BS32
©2004 Sony Corporation
�
Declaration of Conformity
Trade Name: AIWA
Model No.: AZ-RM32
Responsible Party: Sony Electronics Inc.
Address: 16450 W. Bernardo Dr, San Diego, CA
92127 U.S.A.
Telephone No.: 858-942-2230
This device complies with part 15 of the FCC rules.
Operation is subject to the following two
conditions: (1) This device may not cause harmful
interference, and (2) this device must accept any
interference received, including interference that
may cause undesired operation.
AZ-BS1: No “pavit”
AZ-BS32: AZ-RM32 (one 32-MB “pavit”)
NOTE
This equipment has been tested and found to comply
with the limits for a Class B digital device, pursuant to
Part 15 of the FCC Rules. These limits are designed to
provide reasonable protection against harmful
interference in a residential installation. This equipment
generates, uses, and can radiate radio frequency energy
and, if not installed and used in accordance with the
instructions, may cause harmful interference to radio
communications. However, there is no guarantee that
interference will not occur in a particular installation.
If this equipment does cause harmful interference to
radio or television reception, which can be determined
by turning the equipment off and on, the user is
encouraged to try to correct the interference by one or
more of the following measures:
– Reorient or relocate the receiving antenna.
– Increase the separation between the equipment and
receiver.
– Connect the equipment into an outlet on a circuit
different from that to which the receiver is connected.
– Consult the dealer or an experienced radio/TV
technician for help.
You are cautioned that any changes or modifications
not expressly approved in this manual could void your
authority to operate this equipment.
CAUTION
You are cautioned that any changes or
modifications not expressly approved in this
manual could void your authority to operate this
equipment.
WARNING
To prevent fire or shock
hazard, do not expose the unit
to rain or moisture.
Do not install the appliance in a confined
space, such as a bookcase or built-in
cabinet.
To prevent fire, do not cover the ventilation
of the apparatus with news papers, table
cloths, curtains, etc. And don’t place lighted
candles on the apparatus.
To prevent fire or shock hazard, do not place
objects filled with liquids, such as vases, on
the apparatus.
Certain countries may regulate disposal of
the battery used to power this product. Please
consult with your local authority.
The validity of the CE marking is restricted
to only those countries where it is legally
enforced, mainly in the countries EEA
(European Economic Area).
For the customers in the USA
Owner’s Record
The model number is located at the rear and
the serial number is located inside the battery
compartment. Record the serial number in
the space provided below. Refer to these
numbers whenever you call upon your Aiwa
dealer regarding this product.
Model No. __________________________
Serial No. ___________________________
If you have any questions about this product,
you may call;
Aiwa Customer Information Service Center
1-800-289-2492 or
http://www.us.aiwa.com/.
2
�
Table of Contents
Overview
What you can do with your player .............. 4
Main features ............................................... 5
Getting started
Step 1: Check the package contents. ........... 6
Step 2: Insert batteries. ................................ 7
Locating controls ......................................... 8
Basic operations
Listening to music ..................................... 10
1. Insert the “pavit” into the player. ........... 10
2. Start playback. ....................................... 11
B Playback options
Playing a track repeatedly (REP1) / Playing
all tracks in random order (SHUF) ........ 14
B Listening to the radio
Listening to the radio ................................. 15
Presetting radio stations ............................. 17
B Available features
Using the stopwatch .................................. 18
Using the countdown timer ....................... 19
B Changing the settings of the player
Changing the display pattern ..................... 20
Changing the backlight setting .................. 20
Changing the display language .................. 21
B Additional information
Precautions ................................................ 22
Cleaning ..................................................... 22
Troubleshooting ......................................... 23
Specifications ............................................ 25
Index .......................................................... 26
Before using this player, install the
application software on your
computer using the supplied CD-
ROM, and send some music data to
the player.
3
�
Overview
What you can do with your player
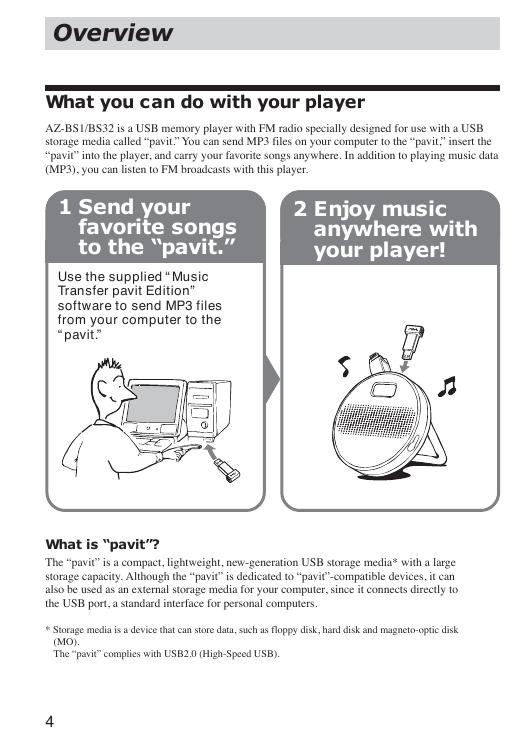
AZ-BS1/BS32 is a USB memory player with FM radio specially designed for use with a USB
storage media called “pavit.” You can send MP3 files on your computer to the “pavit,” insert the
“pavit” into the player, and carry your favorite songs anywhere. In addition to playing music data
(MP3), you can listen to FM broadcasts with this player.
2 Enjoy music
anywhere with
your player!
1 Send your
favorite songs
to the “pavit.”
Use the supplied “Music
Transfer pavit Edition”
software to send MP3 files
from your computer to the
“pavit.”
What is “pavit”?
The “pavit” is a compact, lightweight, new-generation USB storage media* with a large
storage capacity. Although the “pavit” is dedicated to “pavit”-compatible devices, it can
also be used as an external storage media for your computer, since it connects directly to
the USB port, a standard interface for personal computers.
* Storage media is a device that can store data, such as floppy disk, hard disk and magneto-optic disk
(MO).
The “pavit” complies with USB2.0 (High-Speed USB).
4
�
Main features
• Water-resistant construction allows you to use the player in the kitchen, bathroom or at the
poolside.
• The player is equipped with an FM radio tuner. You can listen to FM broadcasts in addition to
playing music data (MP3).
• MP3 files on your computer are sent to the “pavit” by simple and easy operations using the
supplied “Music Transfer pavit Edition” software.
• The “pavit” connects directly to the USB port on your computer for high-speed data transfer.
• You can also store a variety of data other than MP3 files in the new-generation USB storage
O
O
v
v
e
e
r
r
v
v
i
i
e
e
w
w
media “pavit.”
• You can stand the player on the table or hang it on a wall.
Notes
• Music you record is limited to private use only. Any other use requires the permission of the copyright
holders.
• Sony is not liable for incomplete data transfer or damaged data due to problems of this product or your
computer.
5
�
Getting started
Step 1: Check the package contents.
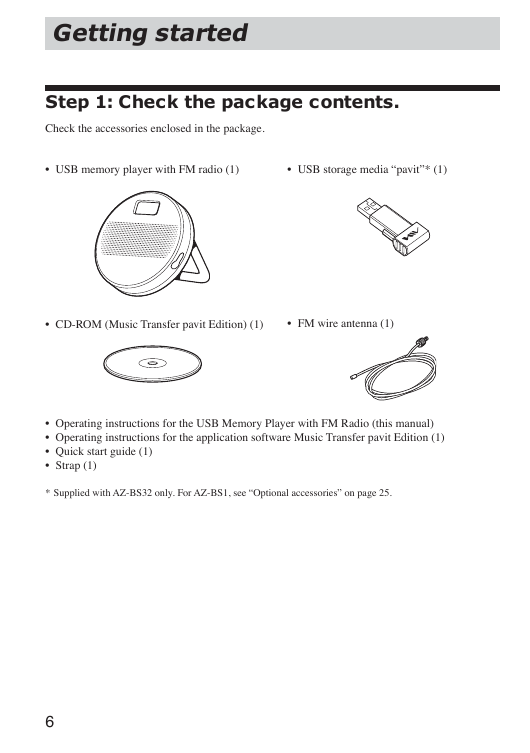
Check the accessories enclosed in the package.
• USB memory player with FM radio (1)
• USB storage media “pavit”* (1)
• CD-ROM (Music Transfer pavit Edition) (1)
• FM wire antenna (1)
• Operating instructions for the USB Memory Player with FM Radio (this manual)
• Operating instructions for the application software Music Transfer pavit Edition (1)
• Quick start guide (1)
• Strap (1)
* Supplied with AZ-BS32 only. For AZ-BS1, see “Optional accessories” on page 25.
6
�
Step 2: Insert batteries.
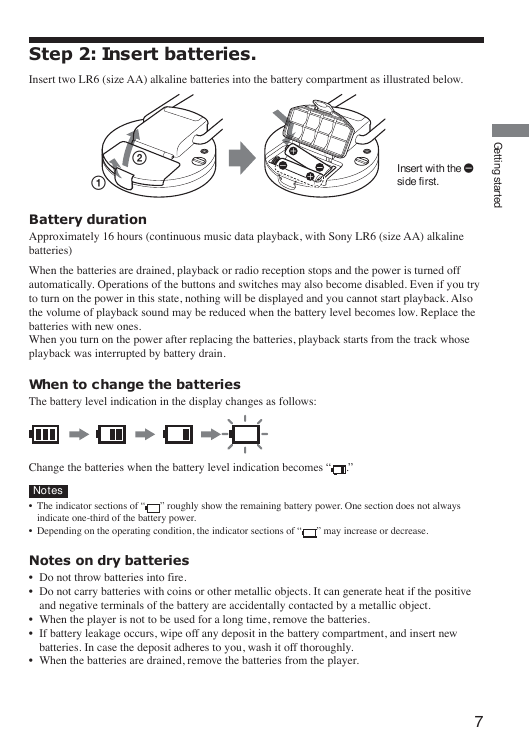
Insert two LR6 (size AA) alkaline batteries into the battery compartment as illustrated below.
2
1
Insert with the E
side first.
G
e
t
t
i
n
g
s
t
a
r
t
e
d
Battery duration
Approximately 16 hours (continuous music data playback, with Sony LR6 (size AA) alkaline
batteries)
When the batteries are drained, playback or radio reception stops and the power is turned off
automatically. Operations of the buttons and switches may also become disabled. Even if you try
to turn on the power in this state, nothing will be displayed and you cannot start playback. Also
the volume of playback sound may be reduced when the battery level becomes low. Replace the
batteries with new ones.
When you turn on the power after replacing the batteries, playback starts from the track whose
playback was interrupted by battery drain.
When to change the batteries
The battery level indication in the display changes as follows:
Change the batteries when the battery level indication becomes “
.”
Notes
• The indicator sections of “
” roughly show the remaining battery power. One section does not always
indicate one-third of the battery power.
• Depending on the operating condition, the indicator sections of “
” may increase or decrease.
Notes on dry batteries
• Do not throw batteries into fire.
• Do not carry batteries with coins or other metallic objects. It can generate heat if the positive
and negative terminals of the battery are accidentally contacted by a metallic object.
• When the player is not to be used for a long time, remove the batteries.
• If battery leakage occurs, wipe off any deposit in the battery compartment, and insert new
batteries. In case the deposit adheres to you, wash it off thoroughly.
• When the batteries are drained, remove the batteries from the player.
7
�
Locating controls
Player (front/top)
3
4 5
6 7 8 9
21
(rear)
0
qa
(side)
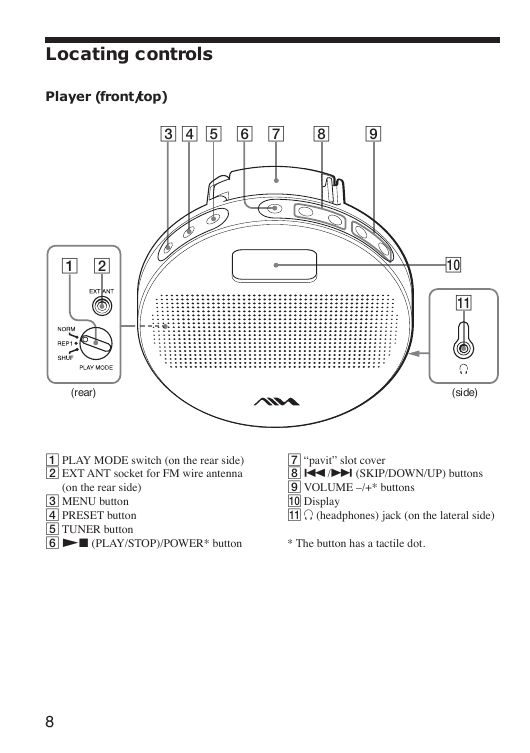
1 PLAY MODE switch (on the rear side)
2 EXT ANT socket for FM wire antenna
(on the rear side)
3 MENU button
4 PRESET button
5 TUNER button
6 Nx (PLAY/STOP)/POWER* button
7 “pavit” slot cover
8 ./> (SKIP/DOWN/UP) buttons
9 VOLUME –/+* buttons
0 Display
qa i (headphones) jack (on the lateral side)
* The button has a tactile dot.
8
�


 2023年江西萍乡中考道德与法治真题及答案.doc
 2012年重庆南川中考生物真题及答案.doc
 2013年江西师范大学地理学综合及文艺理论基础考研真题.doc
 2020年四川甘孜小升初语文真题及答案I卷.doc
 2020年注册岩土工程师专业基础考试真题及答案.doc
 2023-2024学年福建省厦门市九年级上学期数学月考试题及答案.doc
 2021-2022学年辽宁省沈阳市大东区九年级上学期语文期末试题及答案.doc
 2022-2023学年北京东城区初三第一学期物理期末试卷及答案.doc
 2018上半年江西教师资格初中地理学科知识与教学能力真题及答案.doc
 2012年河北国家公务员申论考试真题及答案-省级.doc
 2020-2021学年江苏省扬州市江都区邵樊片九年级上学期数学第一次质量检测试题及答案.doc
 2022下半年黑龙江教师资格证中学综合素质真题及答案.doc