2014/11/10
YotaPhone
USER GUIDE
1. Getting started
1.1. Get to know your YotaPhone
1.2. Install the Micro-SIM card
1.3. Charge your YotaPhone
1.4. Switch your YotaPhone on/off
2. Basics
2.1. Indicators
2.2. Set up accounts
2.3. Touch Types
2.4. Change the Display settings
2.5. Navigation buttons and gestures
2.6. Back screen gestures
2.7. Lock/unlock the main screen
2.8. Turn on/off the airplane mode
2.9. Adjust the volume
2.10. Switch between silent, vibration and normal modes
2.11. Swipe down for notifications and status icons
2.12. Personalise your Home screen
2.13. Tutorial
3. Back screen settings
3.1. About back screen notifications
3.2. Enable back screen notifications
3.3. Set privacy modes
3.4. Enable SMS Fun
3.5. Back screen notification settings
3.6. Manage back screen notifications
3.7. Enable smile for camera
3.8. Enable photo previews
3.9. Enable discharged state
3.10. Choose discharged screen
3.11. Enable task manager
3.12 Enable vibrate
4. Text input
4.1. Input text with the on-screen keyboard
4.2. Input text by voice
4.3. Change default input method
5. Messaging
5.1. Send a message
5.2. Read a message
5.3. Reply to a message
5.4. Forward a message
5.5. Customise message settings
5.6. Delete a message or conversation
6. Call
6.1. Make a call
6.2. Make a conference call
6.3. Make an emergency call
6.4. Make an international call
6.5. Answer or reject a call
6.6. Call log
6.7. Listen to your voicemail messages
6.8. Call settings
7. People
7.1. Add a new contact
7.2. Create a contact group
7.3. Search for a contact
7.4. Import or export contacts
7.5. Manage your contacts
http://yotaphone.com/help/en/#get_to_know
1/97
�
YotaPhone
2014/11/10
8. YotaPhone Apps
8.1. InternetHub
8.2. Notepad
8.3. Organiser
8.4. TeachMe
8.5. Wallpaper
9. Gallery
9.1. Albums
9.2. Play a video
9.3. Set a picture as a wallpaper
9.4. View and edit pictures
10. Camera
10.1. Take a photo
10.2. Switch between different scene modes
10.3. Record a video
10.4. Share your photos and videos
10.5. Take a panoramic photo
10.6. Camera quick settings
11. Multimedia
11.1. FM Radio
11.2. Movie Studio
11.3. Play Music
11.4. Sound Recorder
12. Connectivity
12.1. Mobile data connection
12.2. Wi-Fi connection
12.3. Bluetooth connection
12.4. Computer connection via USB
12.5. Tethering &portable hotspot
13. Browser
13.1. Browse the web
13.2. Browser Settings
13.3. Bookmarks
14. Chrome
14.1. Web browsing in Chrome
14.2. Chrome settings
14.3. Bookmarks and history
15. Email
15.1. Set up an email account
15.2. Set up a corporate account
15.3. Add additional email accounts
15.4. Switch between multiple email accounts
15.5. View email folders
15.6. Read and reply to an email
15.7. Send an email
15.8. Other options
16. Gmail
16.1. Set up a Gmail account on your YotaPhone
16.2. View email folders in Gmail
16.3. Read and reply to an email in Gmail
16.4. Send an email by Gmail
17. Google apps
17.1. Google+
17.2. Hangouts
17.3. Local
17.4. Maps
17.5. Play Store
17.6. Voice search
17.7. YouTube
http://yotaphone.com/help/en/#get_to_know
2/97
�
2014/11/10
18. Tools
YotaPhone
18.1. Calculator
18.2. Calendar
18.3. Clock
18.4. Downloads
19. Settings
19.1. Date and time
19.2. About phone
19.3. Security
19.4. Backup and reset
20. Help and support
21. Specifications
22. Product and safety information
22.1. Safety
22.2. Network support
22.3. Device type and identity information
22.4. Micro-SIM only
22.5. Electronic Paper Display (EPD) Operating Temperature
22.6. Emergency Call
22.7. Back up your important information
22.8. About Digital Rights Management (DRM)
22.9. Protect your device from harmful content
22.10. Avoid the reach of children
22.11. Medical devices
22.12. Care and maintenance
22.13. Recycling and disposal
22.14. Declaration of conformity
22.15. Radio Frequency Exposure Information
22.16. anufacturer’s Warranty for YotaPhone
22.17. Copyrights and other notices
22.18. Disclaimers
1. Getting started
1.1. Get to know your YotaPhone
http://yotaphone.com/help/en/#get_to_know
3/97
�
2014/11/10
YotaPhone
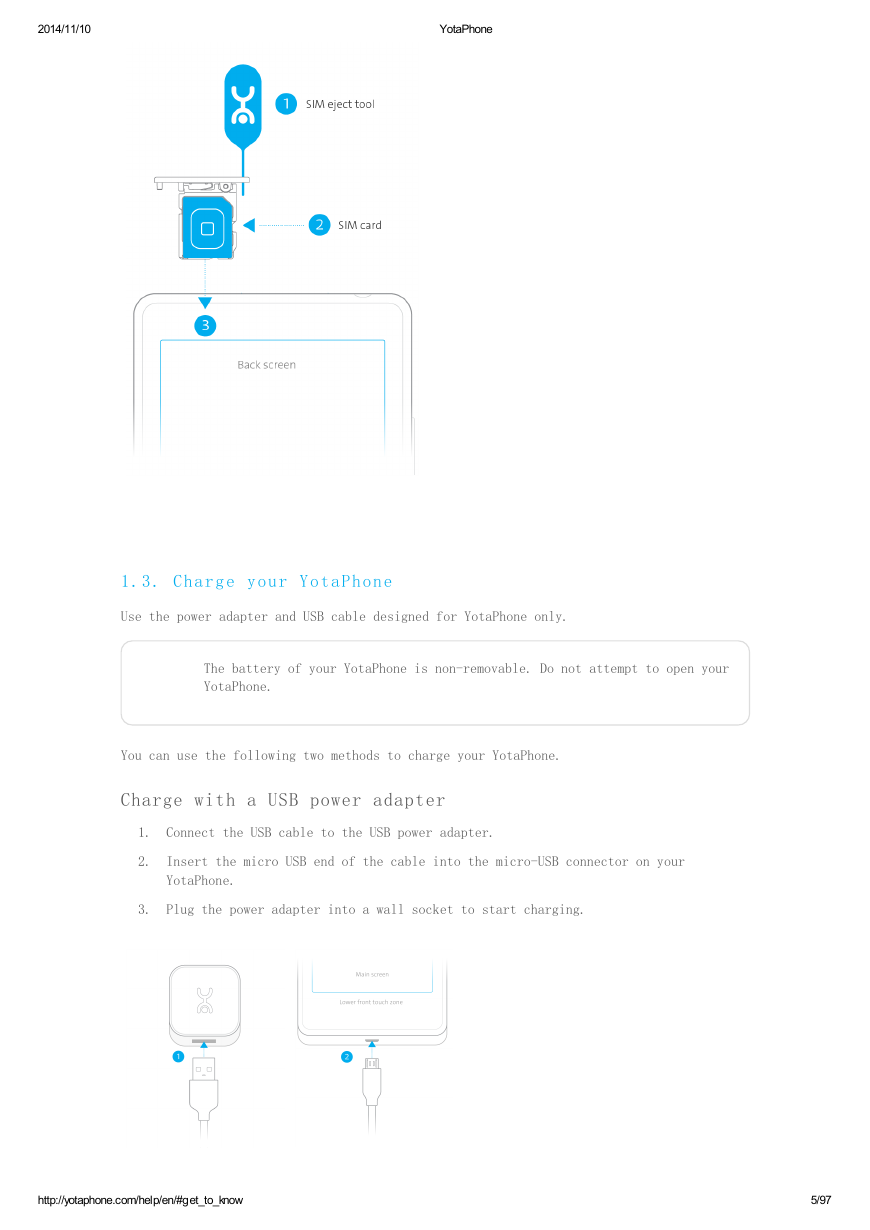
1.2. Install the Micro-SIM card
Learn how to install the Micro-SIM card into your YotaPhone.
YotaPhone is designed to be used with a micro-SIM card. Using incompatible
SIM cards may cause damage to your SIM card tray or device.
Insert the Micro-SIM card provided by your mobile service provider.
1. Insert the SIM eject tool into the SIM ejection hole on your YotaPhone until the
SIM card tray is released, then pull out the tray.
2. Put the SIM card into the tray with the contact area facing up.
3. Replace the SIM card tray carefully until it locks.
http://yotaphone.com/help/en/#get_to_know
4/97
�
2014/11/10
YotaPhone
1.3. Charge your YotaPhone
Use the power adapter and USB cable designed for YotaPhone only.
The battery of your YotaPhone is non-removable. Do not attempt to open your
YotaPhone.
You can use the following two methods to charge your YotaPhone.
Charge with a USB power adapter
1. Connect the USB cable to the USB power adapter.
2. Insert the micro USB end of the cable into the micro-USB connector on your
YotaPhone.
3. Plug the power adapter into a wall socket to start charging.
http://yotaphone.com/help/en/#get_to_know
5/97
�
2014/11/10
YotaPhone
Charge with a computer
1. Insert the micro USB end of the cable into the micro-USB connector on your
YotaPhone.
2. Insert the other end of the USB cable into the USB port on your computer.
Charge the battery before using your YotaPhone for the first time.
1.4. Switch your YotaPhone on/off
To switch your YotaPhone on, press and hold the power button.
To switch your YotaPhone off, press and hold the power button, select the Power off
option and then tap OK.
http://yotaphone.com/help/en/#get_to_know
6/97
�
2014/11/10
YotaPhone
2. Basics
2.1. Indicators
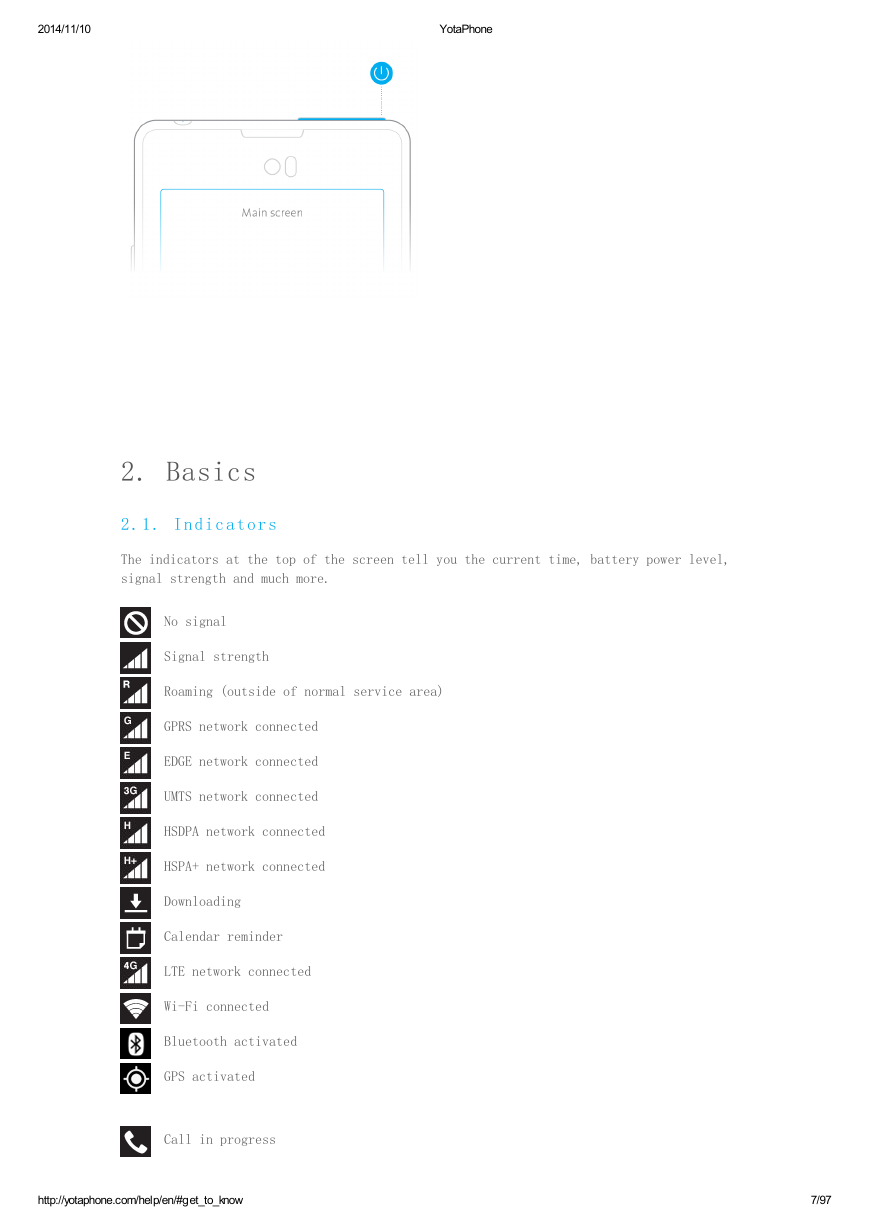
The indicators at the top of the screen tell you the current time, battery power level,
signal strength and much more.
No signal
Signal strength
Roaming (outside of normal service area)
GPRS network connected
EDGE network connected
UMTS network connected
HSDPA network connected
HSPA+ network connected
Downloading
Calendar reminder
LTE network connected
Wi-Fi connected
Bluetooth activated
GPS activated
Call in progress
http://yotaphone.com/help/en/#get_to_know
7/97
�
2014/11/10
YotaPhone
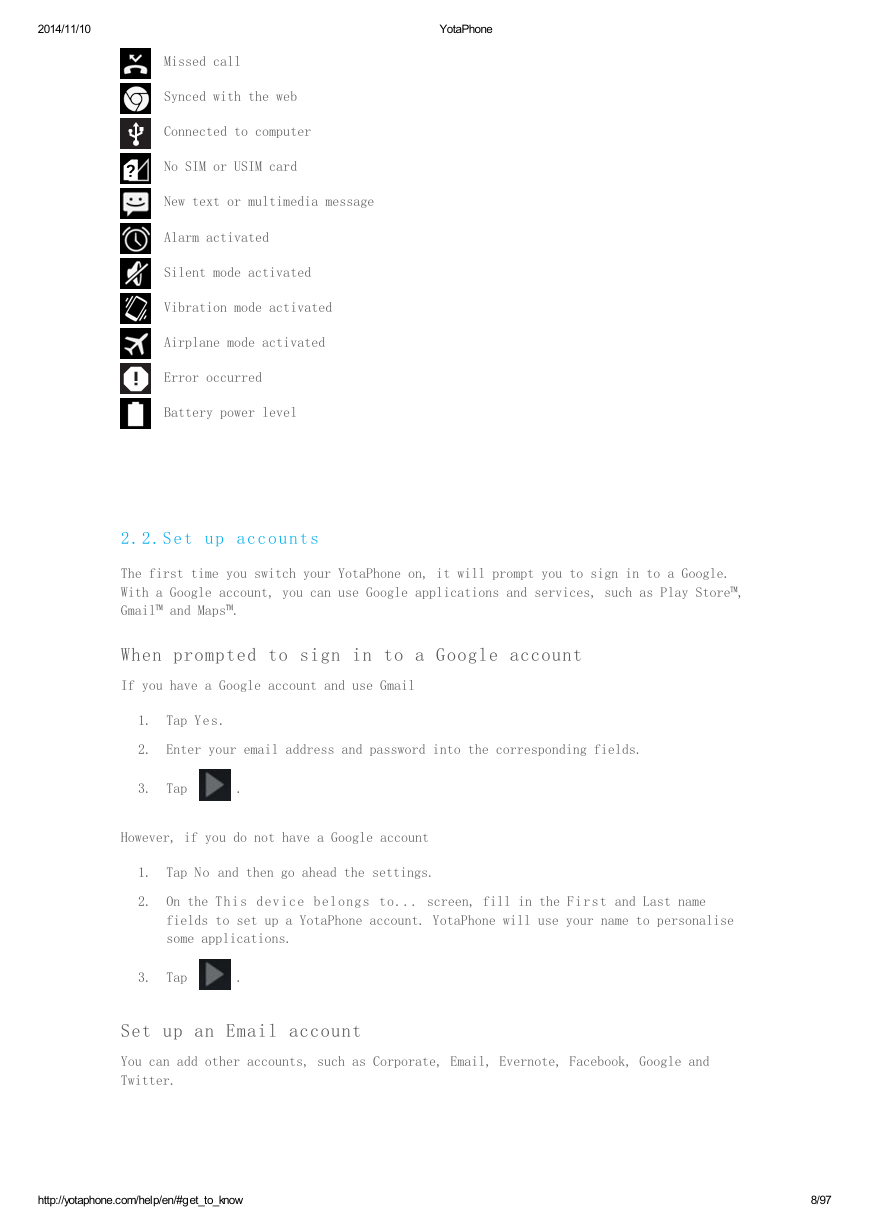
Missed call
Synced with the web
Connected to computer
No SIM or USIM card
New text or multimedia message
Alarm activated
Silent mode activated
Vibration mode activated
Airplane mode activated
Error occurred
Battery power level
2.2.Set up accounts
The first time you switch your YotaPhone on, it will prompt you to sign in to a Google.
With a Google account, you can use Google applications and services, such as Play Store™,
Gmail™ and Maps™.
When prompted to sign in to a Google account
If you have a Google account and use Gmail
1. Tap Yes.
2. Enter your email address and password into the corresponding fields.
3. Tap
.
However, if you do not have a Google account
1. Tap No and then go ahead the settings.
2. On the This device belongs to... screen, fill in the First and Last name
fields to set up a YotaPhone account. YotaPhone will use your name to personalise
some applications.
3. Tap
.
Set up an Email account
You can add other accounts, such as Corporate, Email, Evernote, Facebook, Google and
Twitter.
http://yotaphone.com/help/en/#get_to_know
8/97
�



 2023年江西萍乡中考道德与法治真题及答案.doc
 2012年重庆南川中考生物真题及答案.doc
 2013年江西师范大学地理学综合及文艺理论基础考研真题.doc
 2020年四川甘孜小升初语文真题及答案I卷.doc
 2020年注册岩土工程师专业基础考试真题及答案.doc
 2023-2024学年福建省厦门市九年级上学期数学月考试题及答案.doc
 2021-2022学年辽宁省沈阳市大东区九年级上学期语文期末试题及答案.doc
 2022-2023学年北京东城区初三第一学期物理期末试卷及答案.doc
 2018上半年江西教师资格初中地理学科知识与教学能力真题及答案.doc
 2012年河北国家公务员申论考试真题及答案-省级.doc
 2020-2021学年江苏省扬州市江都区邵樊片九年级上学期数学第一次质量检测试题及答案.doc
 2022下半年黑龙江教师资格证中学综合素质真题及答案.doc