01CP-S235-OG-ENG-再校 03.12.25 2:04 PM ページ1
Projector
CP-S235
User's Manual - Operating Guide
Thank you for purchasing this projector.
WARNING Before using, read the "User's Manual - Safety Guide" and
these manuals to ensure correct usage through understanding. After reading,
store them in a safe place for future reference.
• The information in this manual is subject to change without notice.
NOTE
• The manufacturer assumes no responsibility for any errors that may appear in this manual.
• The reproduction, transmission or use of this document or contents is not permitted without
express written authority.
TRADEMARK ACKNOWLEDGMENT :
• VGA and XGA are registered trademarks of the International Business Machines Corporation.
• Apple and Mac are registered trademarks of Apple Computer, Inc.
• VESA and SVGA are trademarks of the Video Electronics Standard Association.
• Windows is a registered trademark of Microsoft Corporation.
All other trademarks are the property of their respective owners.
1
�
Multifunctional Settings ……………………22
Using The Menu Functions ……22
MAIN Menu ………………………23
PICTURE-1 Menu ………………24
PICTURE-2 Menu ………………26
INPUT Menu ……………………27
AUTO Menu ………………………29
SCREEN Menu …………………30
OPTION Menu ……………………31
Operating The PC Screen ………………32
Lamp ………………………………………………………………33
Replacing The Lamp ……………34
Air Filter …………………………………………………………35
Caring For The Air Filter…………35
Replacing The Air Filter …………36
Other Care ……………………………………………………37
Caring For The Inside
Of The Projector …………………37
Caring For The Lens ……………37
Caring For The Cabinet
And Remote Control ……………37
Troubleshooting ……………………………………38
Related Messages ………………38
Regarding
The Indicator Lamps ……………40
Phenomena That May Easily Be
Mistaken For Machine Defects …42
Warranty And After-Service ……43
Specifications …………………………………………44
01CP-S235-OG-ENG-再校 03.12.25 2:04 PM ページ2
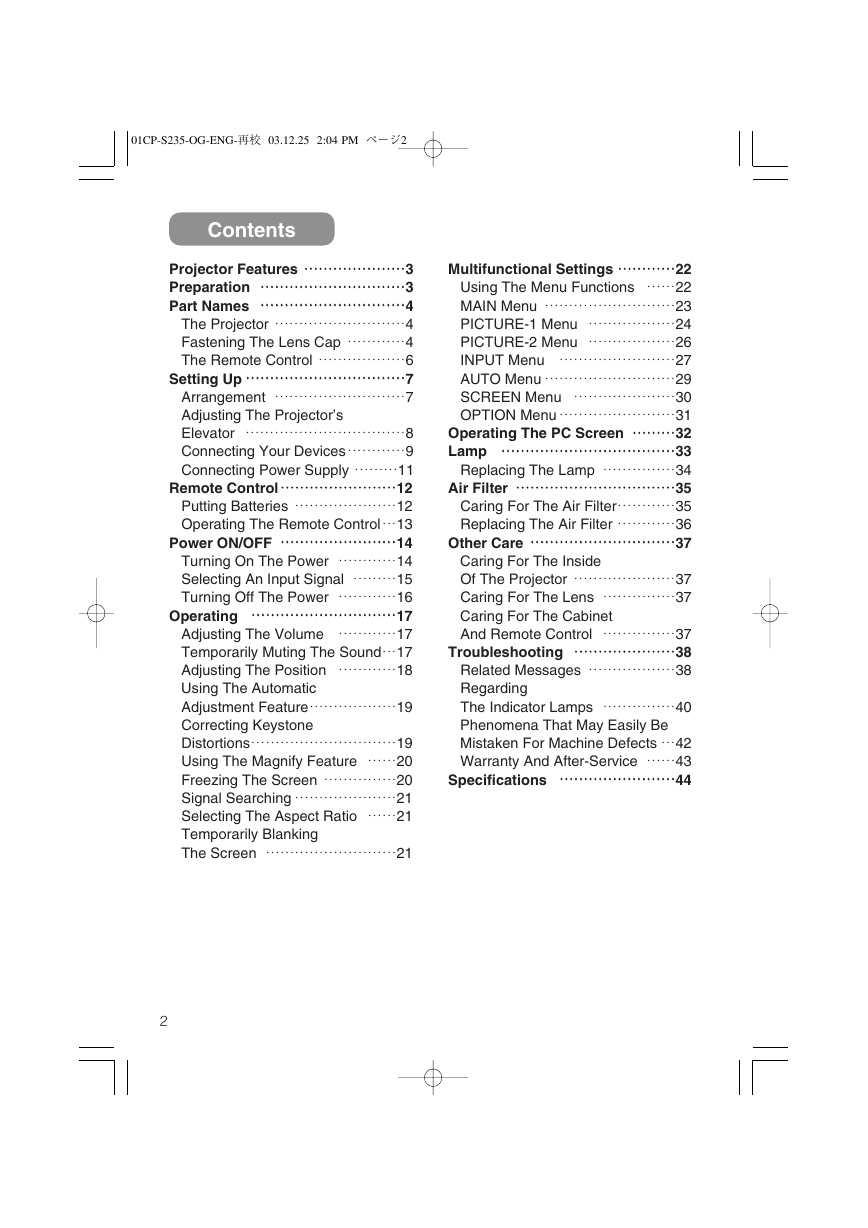
Contents
Projector Features ……………………………………3
Preparation ……………………………………………………3
Part Names ……………………………………………………4
The Projector ………………………4
Fastening The Lens Cap …………4
The Remote Control ………………6
Setting Up …………………………………………………………7
Arrangement ………………………7
Adjusting The Projector’s
Elevator ……………………………8
Connecting Your Devices…………9
Connecting Power Supply ………11
Remote Control…………………………………………12
Putting Batteries …………………12
Operating The Remote Control…13
Power ON/OFF …………………………………………14
Turning On The Power …………14
Selecting An Input Signal ………15
Turning Off The Power …………16
Operating ……………………………………………………17
Adjusting The Volume …………17
Temporarily Muting The Sound…17
Adjusting The Position …………18
Using The Automatic
Adjustment Feature………………19
Correcting Keystone
Distortions…………………………19
Using The Magnify Feature ……20
Freezing The Screen ……………20
Signal Searching …………………21
Selecting The Aspect Ratio ……21
Temporarily Blanking
The Screen ………………………21
2
�
01CP-S235-OG-ENG-再校 03.12.25 2:04 PM ページ3
Projector Features
This multimedia projector is used to project various computer signals as well as
NTSC / PAL / SECAM video signals onto a screen. Little space is required for
installation and large images can easily be realized.
●Ultra High Brightness
Crisp, ultra-bright presentations is achieved by using a UHB (ultra high brightness) lamp and a highly
efficient optical system.
●Whisper Mode Equipped
Special mode is available for reducing projector noise to achieve quieter operation.
●User Memory Function
This projector can memorize 4 settings by MY MEMORY function.
●Partial Magnification Function
Interesting parts of images can be magnified for closer viewing.
●Keystone Distortion Correction
Quick correction of distorted images electrically.
Preparation
Please see the “Contents Of Package” of the “User’s Manual – Quick Guide”.
Your projector should come with the items shown there. Contact your dealer
anything is missing.
NOTE
• Keep the original packing material for future reshipment.
3
�
01CP-S235-OG-ENG-再校 03.12.25 2:04 PM ページ4
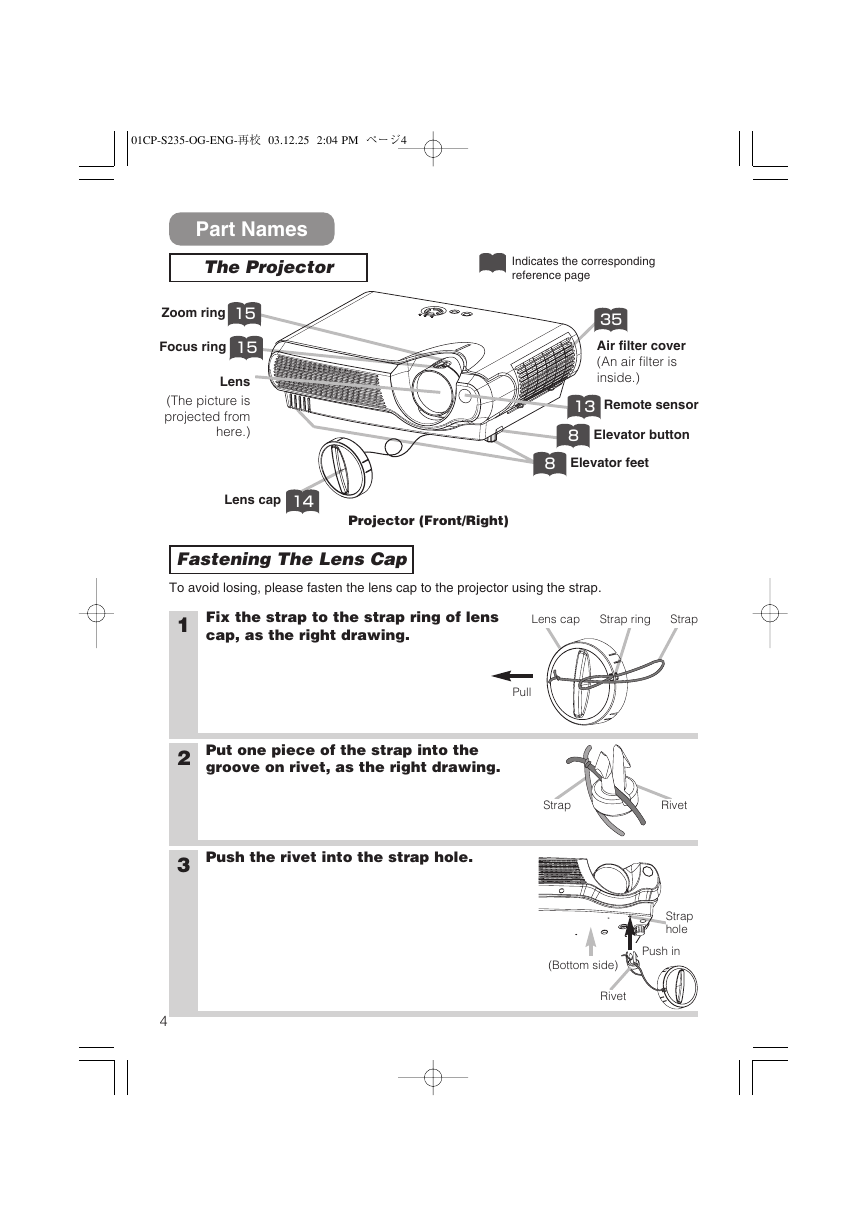
Part Names
The Projector
Zoom ring 15
Focus ring 15
Lens
(The picture is
projected from
here.)
Lens cap 14
Projector (Front/Right)
Indicates the corresponding
reference page
35
Air filter cover
(An air filter is
inside.)
13
Remote sensor
8
Elevator button
8
Elevator feet
Fastening The Lens Cap
To avoid losing, please fasten the lens cap to the projector using the strap.
1 Fix the strap to the strap ring of lens
cap, as the right drawing.
Lens cap Strap ring Strap
Pull
2 Put one piece of the strap into the
groove on rivet, as the right drawing.
3 Push the rivet into the strap hole.
4
Strap
Rivet
Strap
hole
Push in
(Bottom side)
Rivet
�
01CP-S235-OG-ENG-再校 03.12.25 2:04 PM ページ5
Part Names (continued)
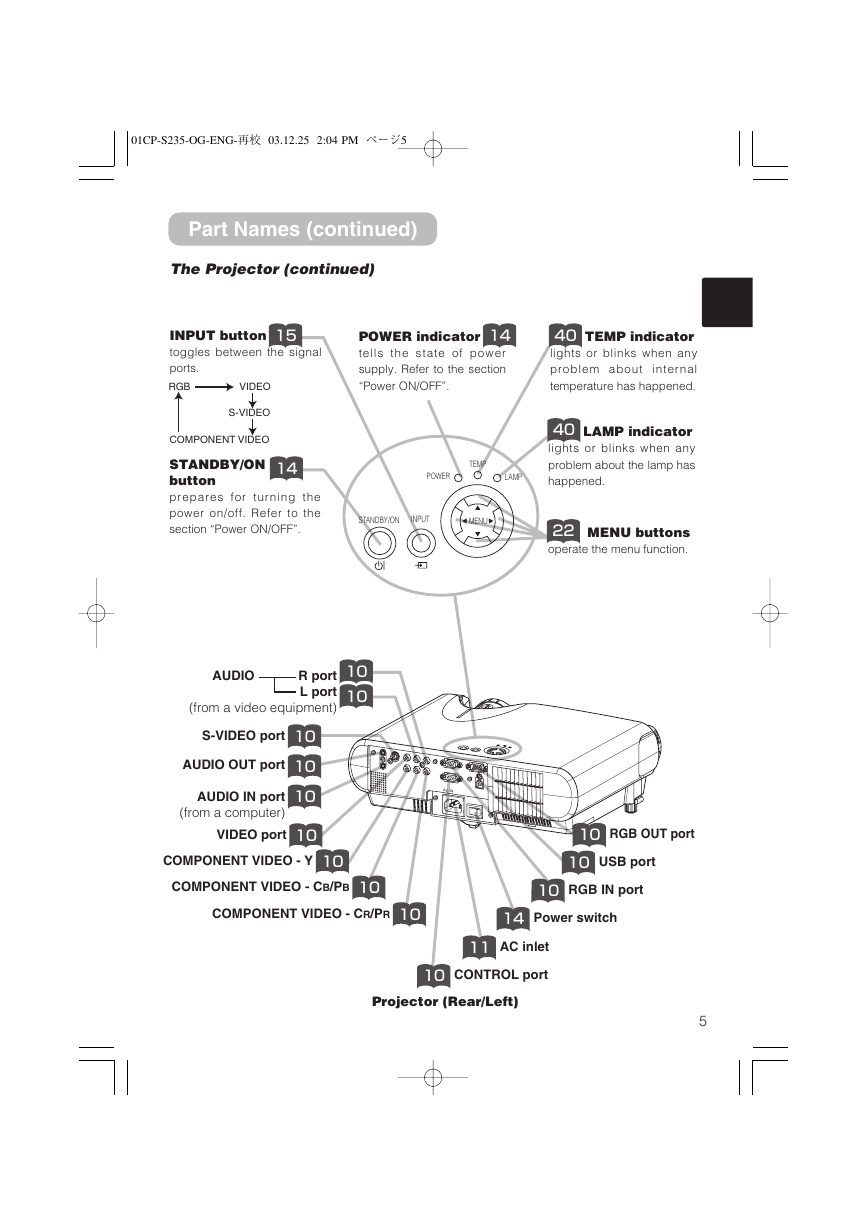
The Projector (continued)
15
INPUT button
toggles between the signal
ports.
RGB
VIDEO
S-VIDEO
COMPONENT VIDEO
14
STANDBY/ON
button
prepares for turning the
power on/off. Refer to the
section “Power ON/OFF”.
14
POWER indicator
tells the state of power
supply. Refer to the section
“Power ON/OFF”.
40
TEMP indicator
lights or blinks when any
problem about internal
temperature has happened.
TEMP
POWER
LAMP
STANDBY/ON
INPUT
MENU
40
LAMP indicator
lights or blinks when any
problem about the lamp has
happened.
22
MENU buttons
operate the menu function.
AUDIO R port
L port
(from a video equipment)
10
10
S-VIDEO port 10
AUDIO OUT port 10
AUDIO IN port
(from a computer)
10
VIDEO port 10
COMPONENT VIDEO - Y 10
COMPONENT VIDEO - CB/PB 10
AC IN
10
RGB OUT port
10
USB port
10
RGB IN port
COMPONENT VIDEO - CR/PR 10
14
Power switch
11
AC inlet
10
CONTROL port
Projector (Rear/Left)
5
�
01CP-S235-OG-ENG-再校 03.12.25 2:04 PM ページ6
Part Names (continued)
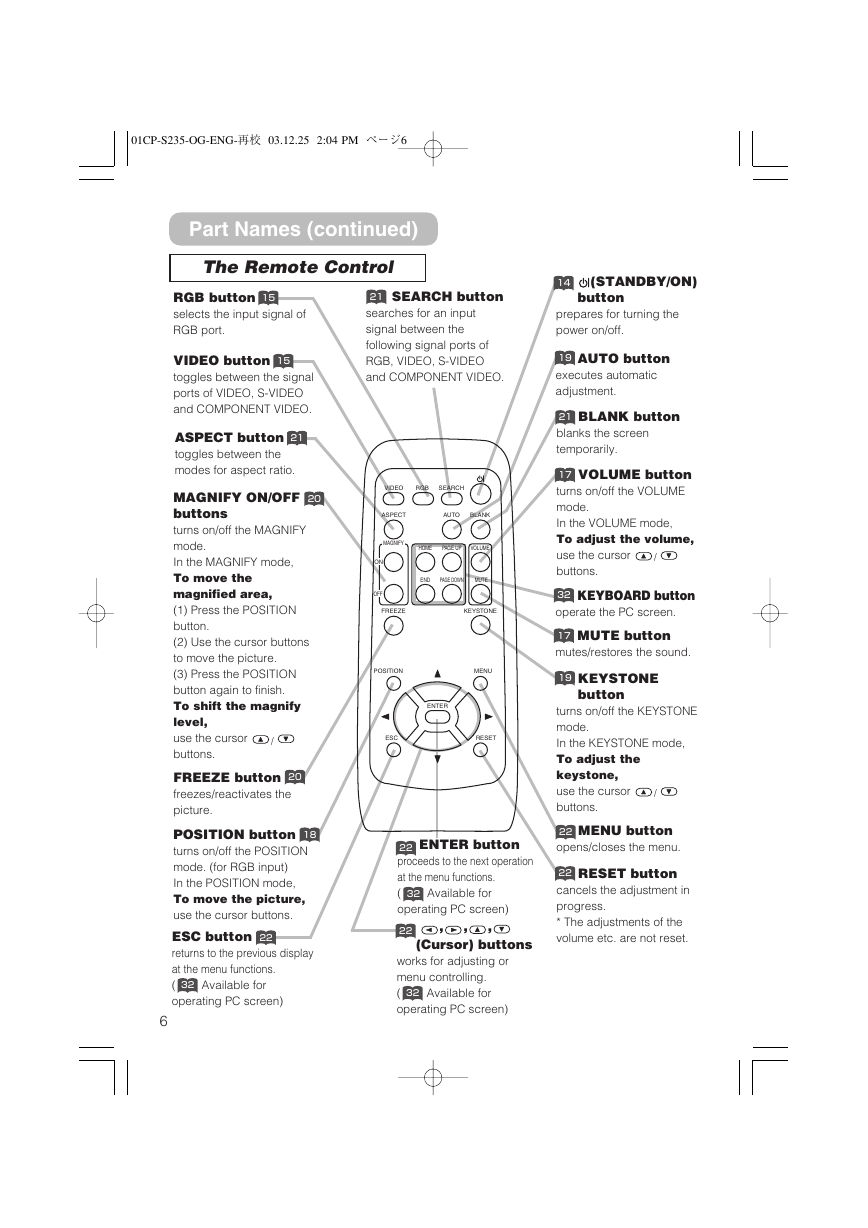
The Remote Control
RGB button
selects the input signal of
RGB port.
15
15
VIDEO button
toggles between the signal
ports of VIDEO, S-VIDEO
and COMPONENT VIDEO.
ASPECT button
toggles between the
modes for aspect ratio.
21
20
MAGNIFY ON/OFF
buttons
turns on/off the MAGNIFY
mode.
In the MAGNIFY mode,
To move the
magnified area,
(1) Press the POSITION
button.
(2) Use the cursor buttons
to move the picture.
(3) Press the POSITION
button again to finish.
To shift the magnify
level,
use the cursor
buttons.
FREEZE button
freezes/reactivates the
picture.
20
/
18
POSITION button
turns on/off the POSITION
mode. (for RGB input)
In the POSITION mode,
To move the picture,
use the cursor buttons.
ESC button
returns to the previous display
at the menu functions.
( Available for
operating PC screen)
22
32
6
SEARCH button
21
searches for an input
signal between the
following signal ports of
RGB, VIDEO, S-VIDEO
and COMPONENT VIDEO.
VIDEO
RGB
SEARCH
ASPECT
AUTO
BLANK
MAGNIFY
HOME
PAGE UP
VOLUME
ON
OFF
END
PAGE DOWN
MUTE
FREEZE
KEYSTONE
POSITION
MENU
ENTER
ESC
RESET
ENTER button
22
proceeds to the next operation
at the menu functions.
( Available for
operating PC screen)
32
22
,
,
,
(Cursor) buttons
works for adjusting or
menu controlling.
( Available for
operating PC screen)
32
14
(STANDBY/ON)
button
prepares for turning the
power on/off.
AUTO button
19
executes automatic
adjustment.
BLANK button
21
blanks the screen
temporarily.
VOLUME button
17
turns on/off the VOLUME
mode.
In the VOLUME mode,
To adjust the volume,
use the cursor
buttons.
/
KEYBOARD button
32
operate the PC screen.
MUTE button
17
mutes/restores the sound.
19
KEYSTONE
button
turns on/off the KEYSTONE
mode.
In the KEYSTONE mode,
To adjust the
keystone,
use the cursor
buttons.
/
MENU button
22
opens/closes the menu.
RESET button
22
cancels the adjustment in
progress.
* The adjustments of the
volume etc. are not reset.
�
01CP-S235-OG-ENG-再校 03.12.25 2:04 PM ページ7
Setting Up
Arrangement
WARNING • Install the projector in a suitable environment according to
instructions of the “User’s Manual – Safety Guide” and this manual.
• The power outlet should be close to the projector and easily accessible.
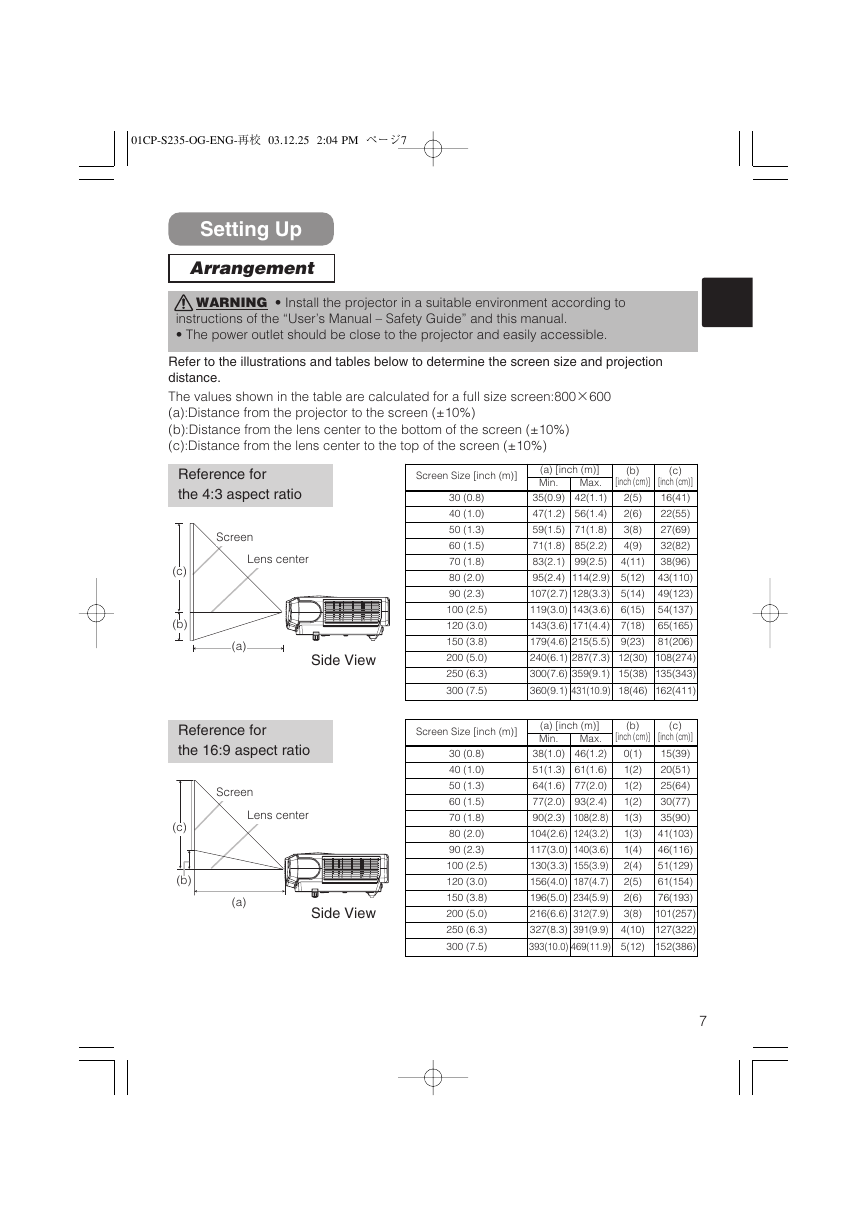
Refer to the illustrations and tables below to determine the screen size and projection
distance.
The values shown in the table are calculated for a full size screen:800×600
(a):Distance from the projector to the screen (±10%)
(b):Distance from the lens center to the bottom of the screen (±10%)
(c):Distance from the lens center to the top of the screen (±10%)
Reference for
the 4:3 aspect ratio
Screen
Lens center
(c)
(b)
(a)
Side View
Reference for
the 16:9 aspect ratio
Screen
Lens center
(c)
(b)
(a)
Side View
Screen Size [inch (m)]
30 (0.8)
40 (1.0)
50 (1.3)
60 (1.5)
70 (1.8)
80 (2.0)
90 (2.3)
100 (2.5)
120 (3.0)
150 (3.8)
200 (5.0)
250 (6.3)
300 (7.5)
Screen Size [inch (m)]
30 (0.8)
40 (1.0)
50 (1.3)
60 (1.5)
70 (1.8)
80 (2.0)
90 (2.3)
100 (2.5)
120 (3.0)
150 (3.8)
200 (5.0)
250 (6.3)
300 (7.5)
(c)
(b)
[inch (cm)]
(a) [inch (m)]
[inch (cm)]
Min.
Max.
16(41)
35(0.9) 42(1.1)
2(5)
22(55)
47(1.2) 56(1.4)
2(6)
27(69)
59(1.5) 71(1.8)
3(8)
32(82)
71(1.8) 85(2.2)
4(9)
38(96)
83(2.1) 99(2.5)
4(11)
43(110)
95(2.4) 114(2.9) 5(12)
49(123)
107(2.7) 128(3.3) 5(14)
54(137)
119(3.0) 143(3.6) 6(15)
65(165)
143(3.6) 171(4.4) 7(18)
179(4.6) 215(5.5) 9(23)
81(206)
240(6.1) 287(7.3) 12(30) 108(274)
300(7.6) 359(9.1) 15(38) 135(343)
360(9.1) 431(10.9) 18(46) 162(411)
(c)
(b)
[inch (cm)]
(a) [inch (m)]
[inch (cm)]
Max.
Min.
38(1.0) 46(1.2)
15(39)
0(1)
51(1.3) 61(1.6)
20(51)
1(2)
64(1.6) 77(2.0)
25(64)
1(2)
77(2.0) 93(2.4)
30(77)
1(2)
90(2.3) 108(2.8)
35(90)
1(3)
104(2.6) 124(3.2)
41(103)
1(3)
117(3.0) 140(3.6)
46(116)
1(4)
130(3.3) 155(3.9)
51(129)
2(4)
156(4.0) 187(4.7)
61(154)
2(5)
196(5.0) 234(5.9)
76(193)
2(6)
216(6.6) 312(7.9)
3(8)
101(257)
327(8.3) 391(9.9)
4(10) 127(322)
393(10.0) 469(11.9) 5(12) 152(386)
7
�
01CP-S235-OG-ENG-再校 03.12.25 2:04 PM ページ8
Setting Up (continued)
Adjusting The Projector's Elevator
CAUTION • If you press the elevator buttons without holding the projector, the
projector might crash down, overturn, smash your fingers and possibly result in
malfunction. To prevent damaging the projector and injuring yourself, ALWAYS HOLD
THE PROJECTOR whenever using the elevator buttons to adjust the elevator feet.
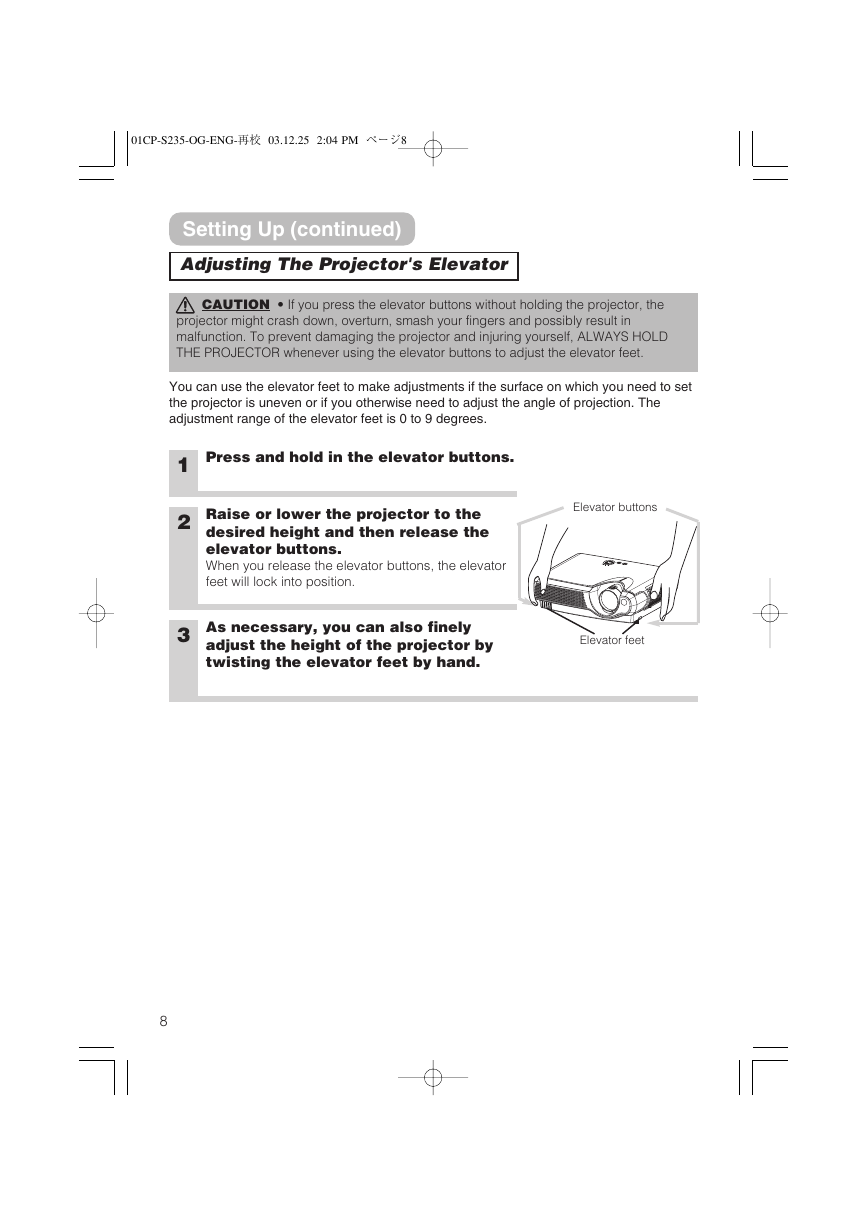
You can use the elevator feet to make adjustments if the surface on which you need to set
the projector is uneven or if you otherwise need to adjust the angle of projection. The
adjustment range of the elevator feet is 0 to 9 degrees.
1 Press and hold in the elevator buttons.
2 Raise or lower the projector to the
desired height and then release the
elevator buttons.
When you release the elevator buttons, the elevator
feet will lock into position.
Elevator buttons
3 As necessary, you can also finely
adjust the height of the projector by
twisting the elevator feet by hand.
Elevator feet
8
�



 2023年江西萍乡中考道德与法治真题及答案.doc
 2012年重庆南川中考生物真题及答案.doc
 2013年江西师范大学地理学综合及文艺理论基础考研真题.doc
 2020年四川甘孜小升初语文真题及答案I卷.doc
 2020年注册岩土工程师专业基础考试真题及答案.doc
 2023-2024学年福建省厦门市九年级上学期数学月考试题及答案.doc
 2021-2022学年辽宁省沈阳市大东区九年级上学期语文期末试题及答案.doc
 2022-2023学年北京东城区初三第一学期物理期末试卷及答案.doc
 2018上半年江西教师资格初中地理学科知识与教学能力真题及答案.doc
 2012年河北国家公务员申论考试真题及答案-省级.doc
 2020-2021学年江苏省扬州市江都区邵樊片九年级上学期数学第一次质量检测试题及答案.doc
 2022下半年黑龙江教师资格证中学综合素质真题及答案.doc